Sarrera
The ECG DM-817 is an auto-ranging digital multimeter designed for precise electrical measurements. It features a 6000-count display and 3-5/6 digit resolution, making it suitable for a wide range of applications. This manual provides detailed instructions for the safe and effective operation, maintenance, and troubleshooting of your DM-817 multimeter.
Segurtasun Informazioa
Always observe the following safety precautions when using the DM-817 multimeter:
- Ez gainditu funtzio bakar baterako sarrera-muga maximoak.
- Oso kontuz ibili voltag60V DC edo 30V AC RMS-tik gorakoa da.
- Ensure the test leads are properly connected and the function switch is in the correct position before making measurements.
- Do not use the multimeter if it appears damaged or if the test leads are frayed.
- Replace the battery and fuses only with the specified type and rating.
- Funtzioak aldatu aurretik, deskonektatu beti proba-kableak zirkuitutik.
- Jarraitu tokiko eta nazioko segurtasun-kode guztiak.
OHARRA: Produktu honek Kaliforniako Estatuak minbizia eta jaiotza-akatsak edo ugalketa-kalte batzuk eragiten dituen produktu kimikoak ditu. Informazio gehiagorako, bisitatu www.P65Warnings.ca.gov.
Paketearen edukia
Egiaztatu elementu guztiak paketean daudela:
- ECG DM-817 Digital Multimeter
- Proba-kableak (bat gorri, bestea beltz)
- Eramateko zorroa
- 2 x AAA bateria (aurrez instalatuta edo aparte sartuta)
- Erabiltzailearen eskuliburua (dokumentu hau)

Image: The ECG DM-817 Digital Multimeter displayed alongside its included test leads, carrying case, and batteries.
Produktua amaituview
Familiarize yourself with the components of your DM-817 multimeter:

Irudia: Aurrealdea view of the ECG DM-817 Digital Multimeter, showing the display, function dial, and input jacks.
- LCD pantaila: Shows measurement readings, units, and function indicators. Features a backlight for low-light conditions.
- Funtzio-markagailua: Rotary switch to select measurement functions (Voltage, Current, Resistance, Capacitance, Temperature, Frequency, Diode, Continuity).
- Aukeratu botoia: Toggles between AC/DC, Diode/Continuity, or other sub-functions within a dial setting.
- HOLD botoia: Uneko irakurketa pantailan izozten du.
- Atzeko argiaren botoia: Pantailaren atzeko argia aktibatzen edo desaktibatzen du.
- Sarrerako Jackak:
- VΩHzCAP°C: Bolumenaren sarreratage, Resistance, Frequency, Capacitance, and Temperature measurements.
- mAµA: Milirako sarreraampere eta mikroampere current measurements (fused).
- 10A: Input for high current measurements up to 10A (fused).
- COM: Neurketa guztietarako sarrera komuna (lurra).
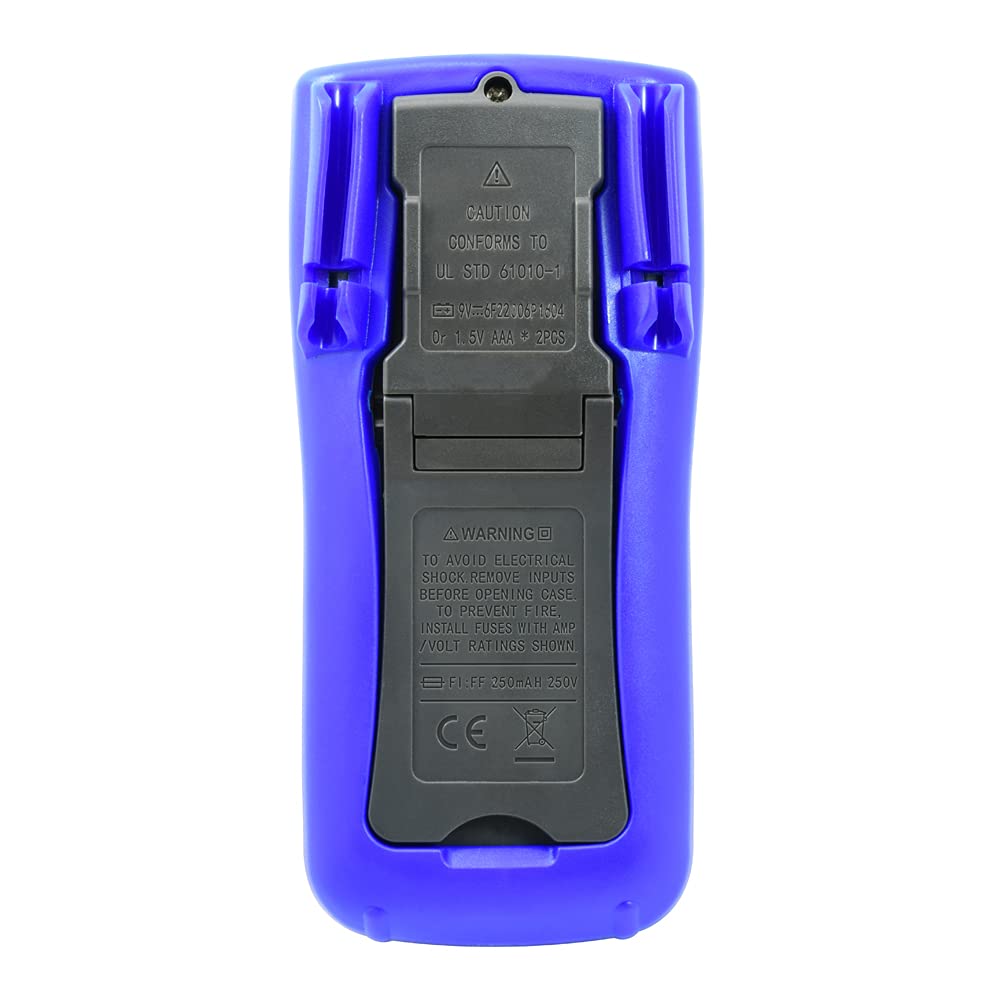
Irudia: Atzealdea view of the ECG DM-817 Digital Multimeter, showing the battery compartment and kickstand.
The back of the multimeter features a battery compartment cover and a foldable kickstand for convenient hands-free operation.
Konfigurazioa
Bateriaren instalazioa
The DM-817 requires two AAA batteries for operation. These are typically included. If not, or if the low battery indicator appears on the display, follow these steps:
- Ziurtatu multimetroa itzalita dagoela eta deskonektatu proba-kable guztiak.
- Bilatu bateriaren konpartimentuaren estalkia unitatearen atzealdean.
- Erabili bihurkin bat bateriaren estalkia lotzen duen torlojua askatzeko.
- Kendu estalkia.
- Sartu bi AAA pila, konpartimentuaren barruan adierazten den polaritate zuzena (+ eta -) errespetatuz.
- Jarri bateriaren estalkia eta lotu torlojuarekin.
Funtzionamendu-argibideak
Before any measurement, ensure the test leads are securely plugged into the correct input jacks and the function dial is set to the desired measurement type.
Neurketa DC Voltage (VDC)
- Plug the red test lead into the VΩHzCAP°C jack and the black test lead into the COM jack.
- Biratu funtzio-markagailua V (DC Voltage) position. The multimeter is auto-ranging.
- Konektatu proba-kableak neurtu beharreko osagai edo zirkuituan, polaritatea errespetatuz.
- Irakurri liburukiatage balioa LCD pantailan.
Neurketa AC Voltage (VAC)
- Plug the red test lead into the VΩHzCAP°C jack and the black test lead into the COM jack.
- Biratu funtzio-markagailua V~ (AC bolumenatage) position. The multimeter is auto-ranging.
- Konektatu proba-kableak neurtu beharreko osagai edo zirkuituan.
- Irakurri liburukiatage balioa LCD pantailan.
Measuring DC Current (DCA)
- Itzali zirkuituari.
- For currents up to 600mA, plug the red test lead into the mAµA jack. For currents up to 10A, plug the red test lead into the 10A jack. Plug the black test lead into the COM jack.
- Biratu funtzio-markagailua A (Korronte zuzena) posizioa.
- Break the circuit and connect the multimeter in series with the circuit.
- Jarri korrontea zirkuituari eta irakurri uneko balioa LCD pantailan.
- Turn off power and disconnect the multimeter before restoring the circuit.
Measuring AC Current (ACA)
- Itzali zirkuituari.
- For currents up to 600mA, plug the red test lead into the mAµA jack. For currents up to 10A, plug the red test lead into the 10A jack. Plug the black test lead into the COM jack.
- Biratu funtzio-markagailua A~ (Alternatiboa den korrontea) posizioa.
- Break the circuit and connect the multimeter in series with the circuit.
- Jarri korrontea zirkuituari eta irakurri uneko balioa LCD pantailan.
- Turn off power and disconnect the multimeter before restoring the circuit.
Measuring Resistance (Ω)
- Plug the red test lead into the VΩHzCAP°C jack and the black test lead into the COM jack.
- Biratu funtzio-markagailua Ω (Erresistentzia) posizioa.
- Ziurtatu zirkuitua deskonektatuta dagoela erresistentzia neurtu aurretik.
- Konektatu proba-kableak neurtu beharreko osagaira.
- Irakurri erresistentziaren balioa LCD pantailan.
Measuring Capacitance (F)
- Plug the red test lead into the VΩHzCAP°C jack and the black test lead into the COM jack.
- Biratu funtzio-markagailua CAP (Kapazitantzia) posizioa.
- Ziurtatu kondentsadorea guztiz deskargatuta dagoela neurketa egin aurretik.
- Konektatu proba-kableak kondentsadorearen artean.
- Irakurri kapazitate-balioa LCD pantailan.
Measuring Temperature (°C/°F)
- Plug the temperature probe (if included, otherwise use appropriate adapter) into the VΩHzCAP°C and COM jacks, observing polarity.
- Biratu funtzio-markagailua ° C / ° F (Tenperatura) posizioa.
- The display will show the ambient temperature. Place the probe on or near the object whose temperature is to be measured.
- Read the temperature value on the LCD display. Use the SELECT button to toggle between Celsius and Fahrenheit.
Neurtzeko maiztasuna (Hz)
- Plug the red test lead into the VΩHzCAP°C jack and the black test lead into the COM jack.
- Biratu funtzio-markagailua Hz (Frequency) position.
- Konektatu proba-kableak seinale-iturrira.
- Irakurri maiztasunaren balioa LCD pantailan.
Diode Test and Continuity Check
- Plug the red test lead into the VΩHzCAP°C jack and the black test lead into the COM jack.
- Biratu funtzio-markagailua Diodoa/Jarraitutasuna posizioa.
- Diodo proba: Konektatu kable gorria diodoaren anodora eta kable beltza katodora. Aurrerako bolumen battage drop will be displayed. Reverse the leads; an open circuit (OL) should be displayed.
- Jarraitutasun-egiaztapena: Connect the test leads across the circuit or component. If continuity exists (resistance below approximately 50Ω), the buzzer will sound.
Mantentzea
Garbiketa
Garbitu kasua iragarkiarekinamp oihal eta detergente leun batekin. Ez erabili urratzailerik edo disolbatzailerik. Mantendu sarrera terminalak zikinkeriarik eta hezetasunik gabe.
Fusiblearen ordezkapena
If the current measurement functions stop working, the fuses may need replacement. Always use fuses with the specified ratings:
- mAµA input: F1 250mA/250V fast-blow fuse.
- 10A input: F2 10A/250V fast-blow fuse.
To replace fuses:
- Ziurtatu multimetroa itzalita dagoela eta deskonektatu proba-kable guztiak.
- Open the battery compartment cover as described in the "Battery Installation" section.
- The fuses are located inside the battery compartment. Carefully remove the old fuse.
- Sartu mota eta balorazio zuzeneko fusible berri bat.
- Jarri berriro bateriaren estalkia eta segurtatu.
Biltegiratzea
If the multimeter is not used for an extended period, remove the batteries to prevent leakage and damage to the unit. Store the multimeter in its carrying case in a cool, dry place away from direct sunlight and extreme temperatures.
Arazoak konpontzea
| Arazoa | Kausa posiblea | Irtenbidea |
|---|---|---|
| Pantailarik ez edo pantaila iluna | Bateria agortuta edo gutxituta | Ordeztu bateriak. |
| "OL" (Gainkarga) bistaratzen da | Input value exceeds range; incorrect function selected | Select a higher range (if manual ranging) or correct function. Ensure leads are connected properly. |
| Ez dago korronte neurketarik | Blown fuse; incorrect lead connection | Check and replace fuse if necessary. Ensure leads are in the correct current input jacks (mAµA or 10A). |
| Irakurketa okerrak | Low battery; poor lead contact; external interference | Replace batteries. Ensure leads are clean and make good contact. Move away from strong electromagnetic fields. |
Zehaztapenak
The following table outlines the key specifications of the ECG DM-817 Digital Multimeter:

Image: Detailed specifications printed on the back of the ECG DM-817 product packaging.
| Neurketa Mota | Barrutia | Zehaztasuna |
|---|---|---|
| DC bolumenatage | 600mVtik 1000Vra | ±(0.5% + 5 digits) to ±(0.8% + 5 digits) |
| AC Boltage (Egiazko RMS) | 600mVtik 750Vra | ±(0.8% + 5 digits) to ±(1.2% + 10 digits) |
| Korronte DC | 600µA to 10A | ±(1.0% + 5 digits) to ±(2.0% + 30 digits) |
| AC korrontea | 600µA to 10A | ±(1.2% + 5 digits) to ±(2.5% + 30 digits) |
| Erresistentzia | 600Ω-tik 60MΩ | ±(0.8% + 5 digits) to ±(2.0% + 20 digits) |
| Kapazitatea | 10nF to 6000µF | ±(3.5% + 20 digits) to ±(5.0% + 10 digits) |
| Maiztasuna | 10 Hz eta 10 MHz artean | ±(% 0.1 + 3 zifra) |
| Tenperatura | -20 °C eta 1000 °C artean / -4 °F eta 1832 °F artean | ±(1.0% + 5 digits) to ±(2.0% + 5 digits) |
Zehaztapen orokorrak:
- Pantaila: 6000 Counts, 3-5/6 Digit LCD with Backlight
- Itzali automatikoa: Bai
- Datuak gordetzea: Bai
- Energia iturria: 2 x AAA bateria (barne)
- Neurriak: 7.25 x 3.5 x 1.78 hazbete
- Pisua: 1 libra
- Segurtasunaren balorazioa: CAT IV 600V, CAT III 1000V
Bermea eta Laguntza
For warranty information and technical support, please contact ECG customer service. Refer to the product packaging or the official ECG webwebgunea, harremanetarako datu eguneratuenak lortzeko.
Fabrikatzailea: ECG, NTE