1. Sarrera
This manual provides essential information for setting up, operating, and exploring the GeeekPi Micro Python Programming Kit for Raspberry Pi Pico. The kit is designed for enthusiasts and engineers interested in Python programming and embedded systems, offering a variety of modules and components for experimental projects.
The kit includes a Raspberry Pi Pico, a Pico Breadboard Kit, an I2C 1602 LCD Display Module, and numerous other components to facilitate learning and development. Detailed tutorials and demo codes are available to guide users through various experiments.

1.1. irudia: Amaituview of the GeeekPi Micro Python Programming Kit components.
2. Paketearen edukia
The GeeekPi Micro Python Programming Kit includes a comprehensive selection of modules and components. Below is a list of the main items you will find in your kit:
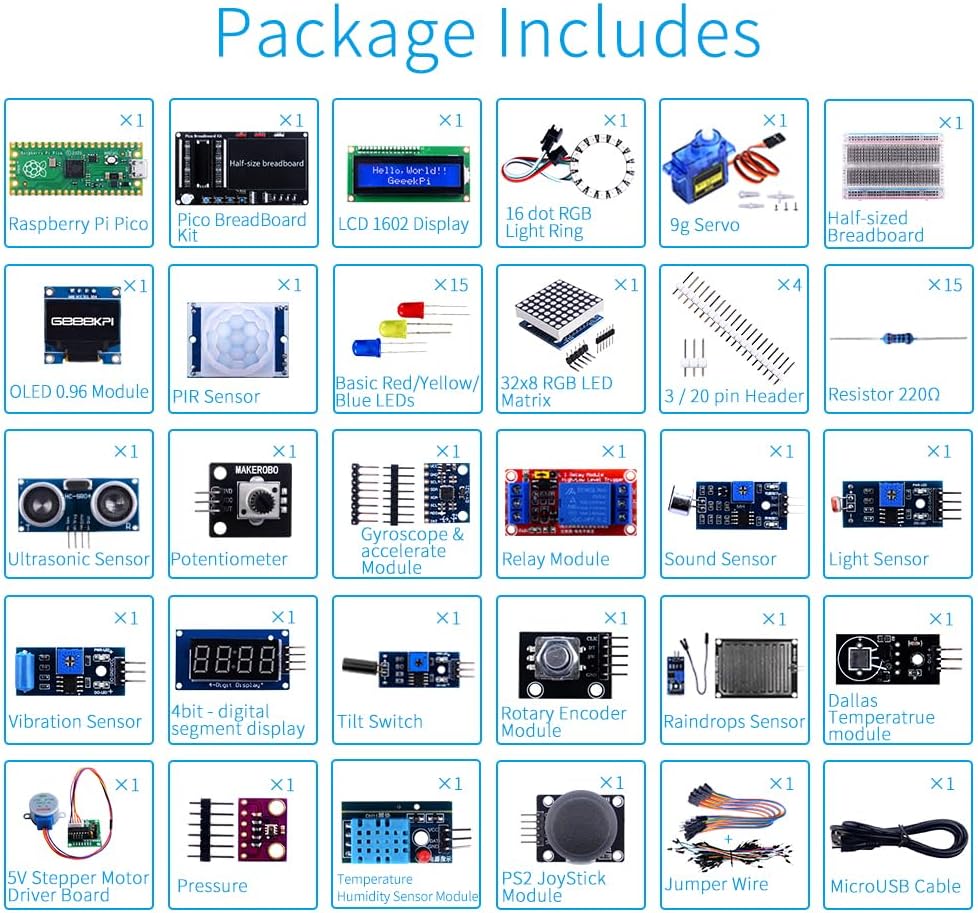
Image 2.1: Detailed diagram of all components included in the kit.
- Raspberry Pi Pico
- Pico BreadBoard Kit
- I2C 1602 LCD Display Module
- 16 RGB NeoPixel Light Ring
- 9g Servo
- Half-sized Breadboard
- OLED 0.96 Module
- PIR sentsorea
- Basic Red/Yellow/Blue LEDs (15x)
- 32x8 RGB LED Matrix
- 3 / 20 Pin Header (4x)
- Resistor 220Ω (15x)
- Ultrasoinu-sentsore
- Potentiometer
- Gyroscope & Accelerate Module
- Errele modulua
- Soinu sentsorea
- Argi-sentsorea
- Bibrazio-sentsorea
- 4-bit Digital Segment Display
- Okertu etengailua
- Kodegailu birakaria modulua
- Raindrops Sensor
- Dallas Temperature Module
- 5V Stepper Motor Driver Board
- Presio-sentsorea
- Tenperatura Hezetasun Sentsore Modulua
- PS2 JoyStick Module
- Jumper Wire Pack
- MikroUSB kablea
3. Zehaztapenak
| Ezaugarri | Xehetasuna |
|---|---|
| Marka | GeekPi |
| Modelo zenbakia | K-0586 |
| Sistema eragilea | MicroPython |
| CPU fabrikatzailea | BESOA |
| Konektibitate Teknologia | I2C |
| Haririk gabeko mota | Bluetootha |
| Elementuaren pisua | 1.8 kilo |
| Paketearen neurriak | 10.47 x 6.85 x 2.52 hazbete |
4. Konfigurazioa eta lehen urratsak
To begin using your GeeekPi Micro Python Programming Kit, follow these general steps. For detailed, project-specific instructions, please refer to the official wiki.
4.1 Hasierako hardware konfigurazioa
- Connect Raspberry Pi Pico: Carefully insert the Raspberry Pi Pico into the Pico Breadboard Kit. Ensure all pins are correctly aligned.
- Attach Breadboard: The Pico Breadboard Kit has a designated area for attaching the half-sized breadboard. Secure it firmly.
- Potentzia-konexioa: Connect the MicroUSB cable to the Raspberry Pi Pico and then to a power source (e.g., computer USB port or a 5V power adapter).

Image 4.1: Detailed pinout and features of the Pico Breadboard Kit.
4.2 Software Setup (MicroPython)
- Install Thonny IDE: Thonny is a user-friendly Python IDE recommended for MicroPython development. Download and install it from the official Thonny webgunea.
- Flash MicroPython Firmware: Connect your Raspberry Pi Pico to your computer while holding down the BOOTSEL button. Drag and drop the MicroPython UF2 firmware file onto the RPI-RP2 drive that appears. The Pico will reboot running MicroPython.
- Connect Thonny to Pico: In Thonny, select Tools > Options > Interpreter and choose 'MicroPython (Raspberry Pi Pico)' as the interpreter. Select the correct port.
For detailed instructions on firmware flashing and Thonny setup, please visit the official GeeekPi wiki: wiki.52pi.com/index.php?title=K-0586
5. Operating Instructions and Project Examples
The kit provides 28 kinds of experimental project tutorials, allowing you to easily learn and develop applications using MicroPython. Each experiment includes detailed wiring diagrams and demo code.

5.1. irudia: Amaituview of the 28 experimental project tutorials.
5.1 Adibample Project: Ultrasonic Sensor
This project demonstrates how to use the ultrasonic sensor to measure distance and display the results on the I2C 1602 LCD module.

Image 5.2: Wiring diagram for connecting an ultrasonic sensor and LCD to Raspberry Pi Pico.
5.2 General Programming Workflow
- Assemble Circuit: Follow the wiring diagram provided in the tutorial for your chosen project.
- Download Demo Code: Access the demo code files from the GeeekPi wiki or GitHub repository.
- Upload Code: Open the demo code in Thonny IDE, connect your Raspberry Pi Pico, and upload the code to the Pico.
- Run and Observe: Execute the code and observe the behavior of your circuit.
The kit encourages exploration and creativity. After completing the provided tutorials, you can modify the code or combine modules to create your own unique projects.

Image 5.3: A user learning and experimenting with the kit.
5.3 Produktu Ofizialen Bideoak
Watch these official videos from GeeekPi for additional guidance and project demonstrations:
Video 5.4: GeeekPi MicroPython Programming Kit for Raspberry Pi Pico. This video provides an overview of the kit and its capabilities.
Video 5.5: GeeekPi Raspberry Pi Pico Basic Starter Kit. This video demonstrates basic functionalities and projects for a similar kit.
Video 5.6: GeeekPi Ultimate Kit for Raspberry Pi Pico 2 W. This video showcases an ultimate kit, providing insight into advanced projects.
6. Mantentzea
Proper care and maintenance will ensure the longevity and optimal performance of your programming kit:
- Handle Components Carefully: The electronic components are delicate. Avoid excessive force when inserting or removing them from the breadboard.
- Behar bezala gordetzea: Use the provided storage box to keep components organized and protected from dust and damage when not in use.
- Saihestu deskarga estatikoa: Handle electronic components on an anti-static surface or by grounding yourself to prevent damage from static electricity.
- Mantendu lehorra: Protect all components from moisture and liquids, which can cause short circuits and damage.
- Itzali erabiltzen ez denean: Always disconnect power from the Raspberry Pi Pico and other modules when not actively working on a project.

Image 6.1: Referencing the detailed manual for project guidance.
7. Arazoak
If you encounter issues while using your kit, consider the following troubleshooting steps:
- Egiaztatu konexioak: Ensure all wires and components are correctly connected according to the wiring diagrams. Loose or incorrect connections are common causes of problems.
- Egiaztatu elikadura-iturria: Confirm that the Raspberry Pi Pico is receiving adequate power (5V). Check the MicroUSB cable and power source.
- Review Kodea: Double-check your MicroPython code for any syntax errors or logical mistakes. Compare it with the provided demo code.
- Consult Wiki/Tutorials: The GeeekPi wiki provides extensive resources, including detailed tutorials and troubleshooting guides for each project.
- Re-flash Firmware: If software issues persist, try re-flashing the MicroPython firmware to your Raspberry Pi Pico.
- Isolate Components: If a complex circuit isn't working, try testing individual components or smaller parts of the circuit to identify the faulty element.
8. Bermea eta Laguntza
For any technical assistance, questions, or feedback regarding your GeeekPi Micro Python Programming Kit, please utilize the following resources:
- Official Wiki: The most comprehensive resource for tutorials, demo code, and detailed information is available at wiki.52pi.com/index.php?title=K-0586.
- Posta elektronikoko laguntza: You can contact GeeekPi directly via email for personalized support. Refer to the product packaging or official webgunea kontaktu-informazio eguneratuena lortzeko.
Specific warranty details are typically provided with your purchase documentation. Please retain your proof of purchase for any warranty claims.


