1. Produktua amaitu daview
The TECHTONICS Solar Charge Controller 10A is an intelligent battery charger designed for solar power systems. It supports both 12V and 24V battery systems, automatically detecting the battery voltage. This controller efficiently regulates current from solar panels to prevent overcharging and extend battery life. It is equipped with a USB port for charging external devices and an LCD display for monitoring system parameters.
Key features include built-in protections against short circuits, open circuits, reverse voltage, and overload, making it a reliable component for various solar applications.

1. irudia: Aurrealdea view of the TECHTONICS Solar Charge Controller 10A, showing the LCD screen, control buttons, and dual USB charging ports.
2. Ezaugarriak
- Dual Voltage Bateragarritasuna: Automatically detects and works with 12V or 24V battery systems.
- 10A Charging Capacity: 10 arte kudeatzeko gai da Amperes of charging current, suitable for moderate-sized solar installations.
- Bateriaren bateragarritasun polifazetikoa: Supports various battery types including Lead-Acid (B1), Li-ion (B2), and LiFePO4 (B3). Ensure correct battery type selection for optimal charging.
- Karga adimenduna: Optimizes power conversion, monitors voltage, and adjusts charging parameters to safeguard against overcharging and extend battery lifespan.
- Babes integrala: Features built-in short circuit protection, open-circuit protection, reverse voltage protection, and overload protection.
- USB portu bikoitzak: Integrated 5V USB ports for convenient charging of external devices.
- LCD pantaila: Provides real-time monitoring of charging status, battery voltage, and other system parameters.
- Ezarpen pertsonalizagarriak: Allows adjustment of work mode, float voltage, discharge reconnect, and discharge stop parameters.

2 Irudia: Gainetikview of the six intelligent security protection features: Short-circuit protection, Overload protection, Over Current protection, Overcharge protection, Under-voltage protection, and Over-voltagbabesa
3. Konfigurazioa eta instalazioa
Proper connection order is crucial for the correct functioning and safety of the solar charge controller. Follow these steps carefully:
- Konektatu bateria: Lehenik eta behin, konektatu bateria karga-kontrolagailura. Ziurtatu polaritate zuzena dela (positibotik positibora, negatibotik negatibora). Kontrolagailuak automatikoki detektatuko du bateriaren bolumena.tage (12V edo 24V).
- Eguzki-panelak konektatu: Next, connect the solar panels to the charge controller. Again, observe correct polarity.
- Konektatu korronte zuzeneko karga (aukerakoa): Finally, connect any DC loads (e.g., lights, fans) to the load terminals of the controller.
Ohar garrantzitsua: The controller will not function if connections are made in an incorrect order. Only 12V batteries will power a 12V panel, and a 24V panel requires a 24V battery for proper operation.

Figure 3: Connection diagram illustrating the proper sequence for connecting the battery, solar panels, and optional loads to the solar charge controller.
4. Funtzionamendu-argibideak
The LCD display provides essential information about your solar power system. Use the control buttons to navigate through the display modes and adjust settings.
4.1. LCD pantailaren informazioa
The LCD screen cycles through various parameters, providing real-time data. The image below illustrates the typical display sequence and what each reading represents:

Figure 4: Explanation of the LCD display sequence, including Main Display (current voltage), Float Voltage, Discharge Reconnect voltage, Discharge Stop voltage, Work Mode, and Battery Type.
- Pantaila nagusia: Bateriaren bolumena erakusten dutage.
- Float Voltage: Liburukiatage at which the battery is maintained after being fully charged.
- Deskargatu berriro konektatu Liburukiatage at which the load will be reconnected after being disconnected due to low battery.
- Deskarga geldiarazi: Liburukiatage at which the load will be disconnected to protect the battery from over-discharge.
- Lan egiteko modua: Configures the load output mode (e.g., 24 hours, dusk to dawn, timed).
- Bateria mota: Indicates the selected battery chemistry.
4.2. Battery Type Selection
It is essential to select the correct battery type for optimal charging and battery longevity. The controller supports the following types:
- B1: For Lead-Acid batteries.
- B2: For Li-ion batteries.
- B3: For LiFePO4 batteries.
Refer to your battery's specifications to determine the correct type and set it accordingly on the controller.
4.3. Customizing Parameters
The controller allows customization of various parameters to suit your specific needs. These include:
- Lan egiteko modua
- Float Voltage
- Deskarga Berkonexio Bolumenatage
- Deskarga-geldialdiaren bolumenatage
Consult the detailed instructions provided with the controller for specific steps on how to enter programming mode and adjust these settings.
5. Mantentzea
To ensure optimal performance and longevity of your TECHTONICS Solar Charge Controller, follow these maintenance guidelines:
- Ohiko garbiketa: Keep the controller clean and free from dust and debris. Use a soft, dry cloth for cleaning. Do not use liquid cleaners.
- Egiaztatu konexioak: Periodically inspect all wiring connections to ensure they are secure and free from corrosion. Loose connections can lead to poor performance or damage.
- Aireztapena: Ensure the controller is installed in a well-ventilated area to prevent overheating. Do not block ventilation openings.
- Ingurumen-baldintzak: Saihestu kontrolatzailea tenperatura altuen, eguzki-argiaren eraginpean edo hezetasun gehiegizkoaren eraginpean jartzea.
6. Arazoak
Atal honek zure eguzki-karga-kontrolagailuarekin izan ditzakezun arazo ohikoenak jorratzen ditu.
| Gaia | Kausa posiblea | Irtenbidea |
|---|---|---|
| Controller not powering on / LCD off | Incorrect battery connection polarity; Battery voltage too low; Loose battery connection. | Verify battery polarity (+ to +, - to -); Check battery voltage (must be above minimum operating voltage); Secure battery connections. |
| Eguzki-panelen bidez ez da kargatzen | Incorrect solar panel connection polarity; Solar panel voltage too low; Shading on panels; Faulty panel. | Verify solar panel polarity; Ensure sufficient sunlight; Check panel voltage; Inspect panels for damage. |
| Karga ez dabil | Bateria boltage too low (discharge stop activated); Overload protection activated; Incorrect load connection. | Charge battery; Reduce load; Check load connections and ensure load current is within controller's limits. |
| Overcharge protection active | Battery is fully charged; Incorrect float voltagezarpena. | This is normal operation when battery is full; Verify float voltage setting is appropriate for your battery type. |
| Short circuit or reverse polarity error | Wiring error (short circuit or reversed connections). | Immediately disconnect all power sources. Carefully re-check all wiring for shorts and correct polarity before reconnecting. |
7. Zehaztapenak
| Parametroa | Balioa |
|---|---|
| Marka | TECHTONICS |
| Modelo zenbakia | tech1101-000 |
| Kargatutako korronte nominala | 10A |
| Sistema Boltage | 12V/24V Auto-detect |
| Bistaratzeko mota | LCDa |
| USB irteera | Dual 5V USB ports |
| Elementuaren pisua | 100 g |
| Paketearen neurriak | 12 x 8 x 4 cm |
| Jatorrizko Herrialdea | Txina |
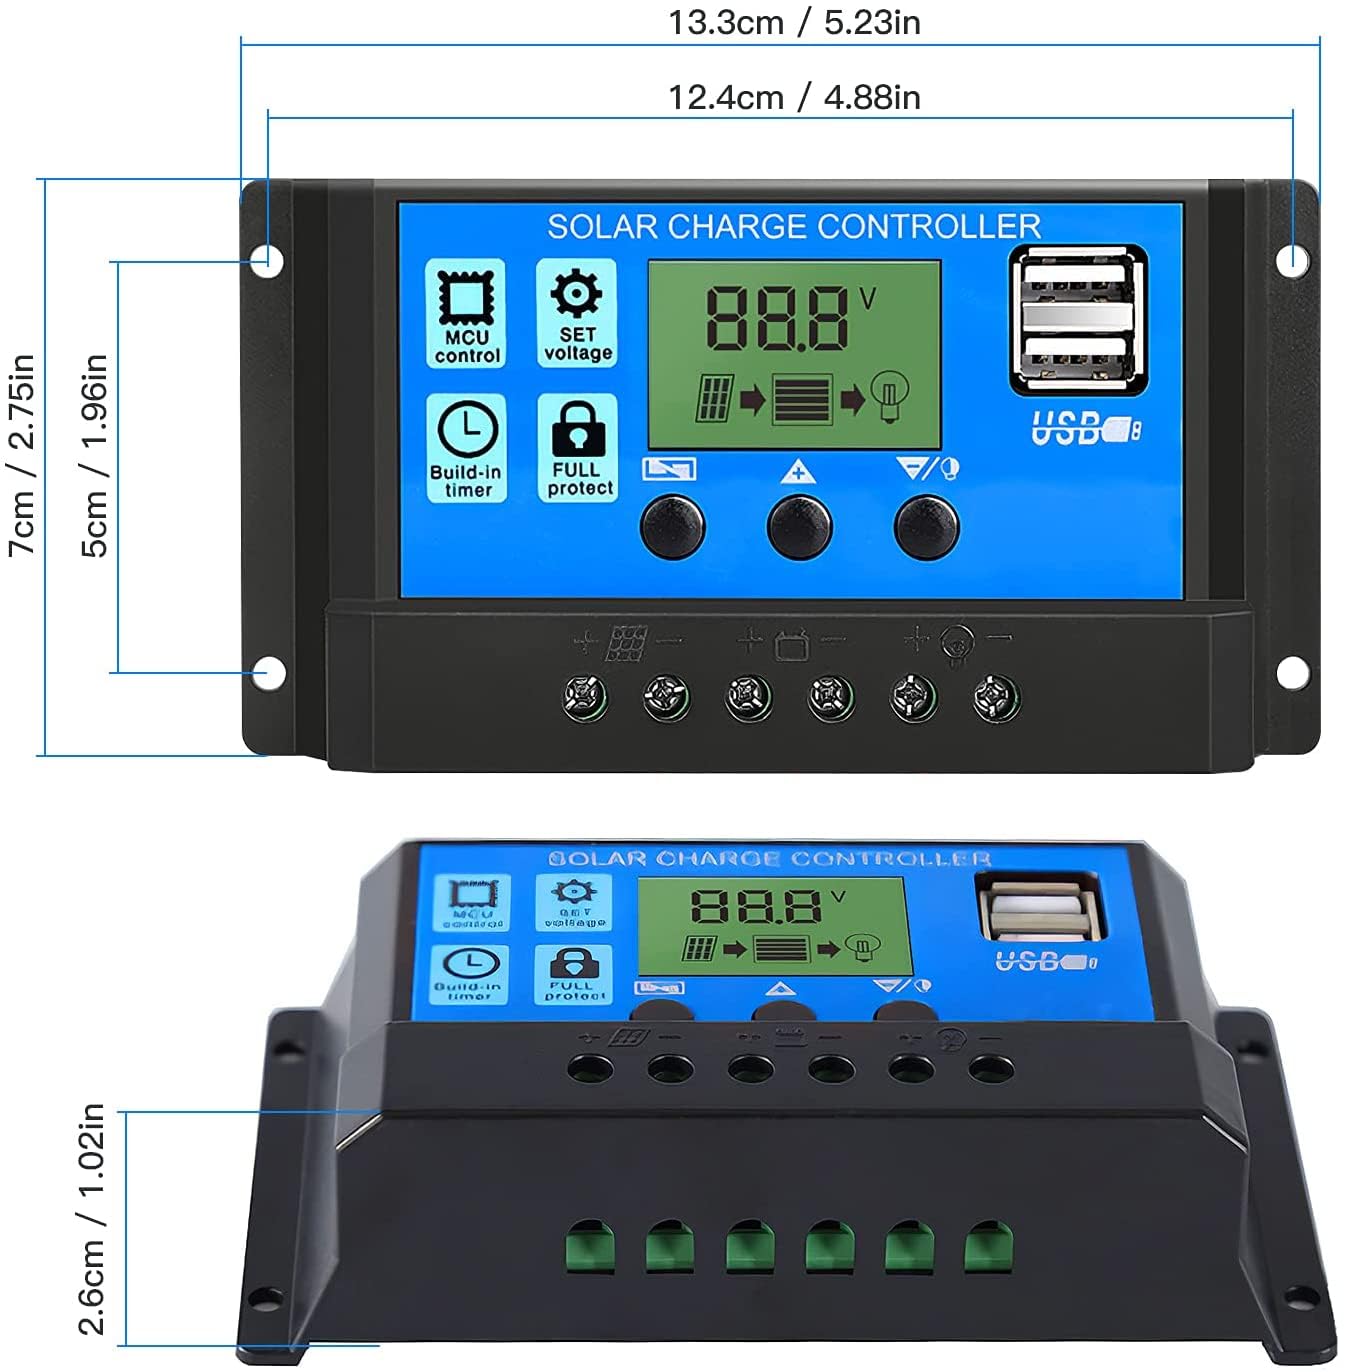
Figure 5: Physical dimensions of the solar charge controller, approximately 13.3 cm (5.23 in) wide, 7 cm (2.75 in) high, and 2.6 cm (1.02 in) deep.
8. Bermea eta Laguntza
TECHTONICS offers a risk-free replacement policy for this product. If you encounter any issues related to the product, you can raise a 7-day replacement request to ensure a direct replacement.
For further assistance or technical support, please refer to the contact information provided with your purchase or visit the official TECHTONICS webgunea.


