1. Sarrera
Welcome to the user manual for your Ulefone Armor X9 Rugged Phone. This guide provides essential information on setting up, operating, maintaining, and troubleshooting your device. The Ulefone Armor X9 is designed for durability and performance, featuring robust protection and advanced functionalities.
Key features of your Ulefone Armor X9 include:
- IP68/IP69K Grade 360 All Round Protection: Ingurune gogorrak jasateko eraikia.
- Android 11 sistema eragilea: Enjoy the latest Android experience.
- 4 GB RAM + 128 GB ROM: Ample memory and storage for your applications and data.
- 16MP Triple Rear Camera: Capture high-quality photos and videos.
- Massive 5580mAh Battery Capacity: Extended usage time.
- Triple Navigation System: Enhanced positioning accuracy.
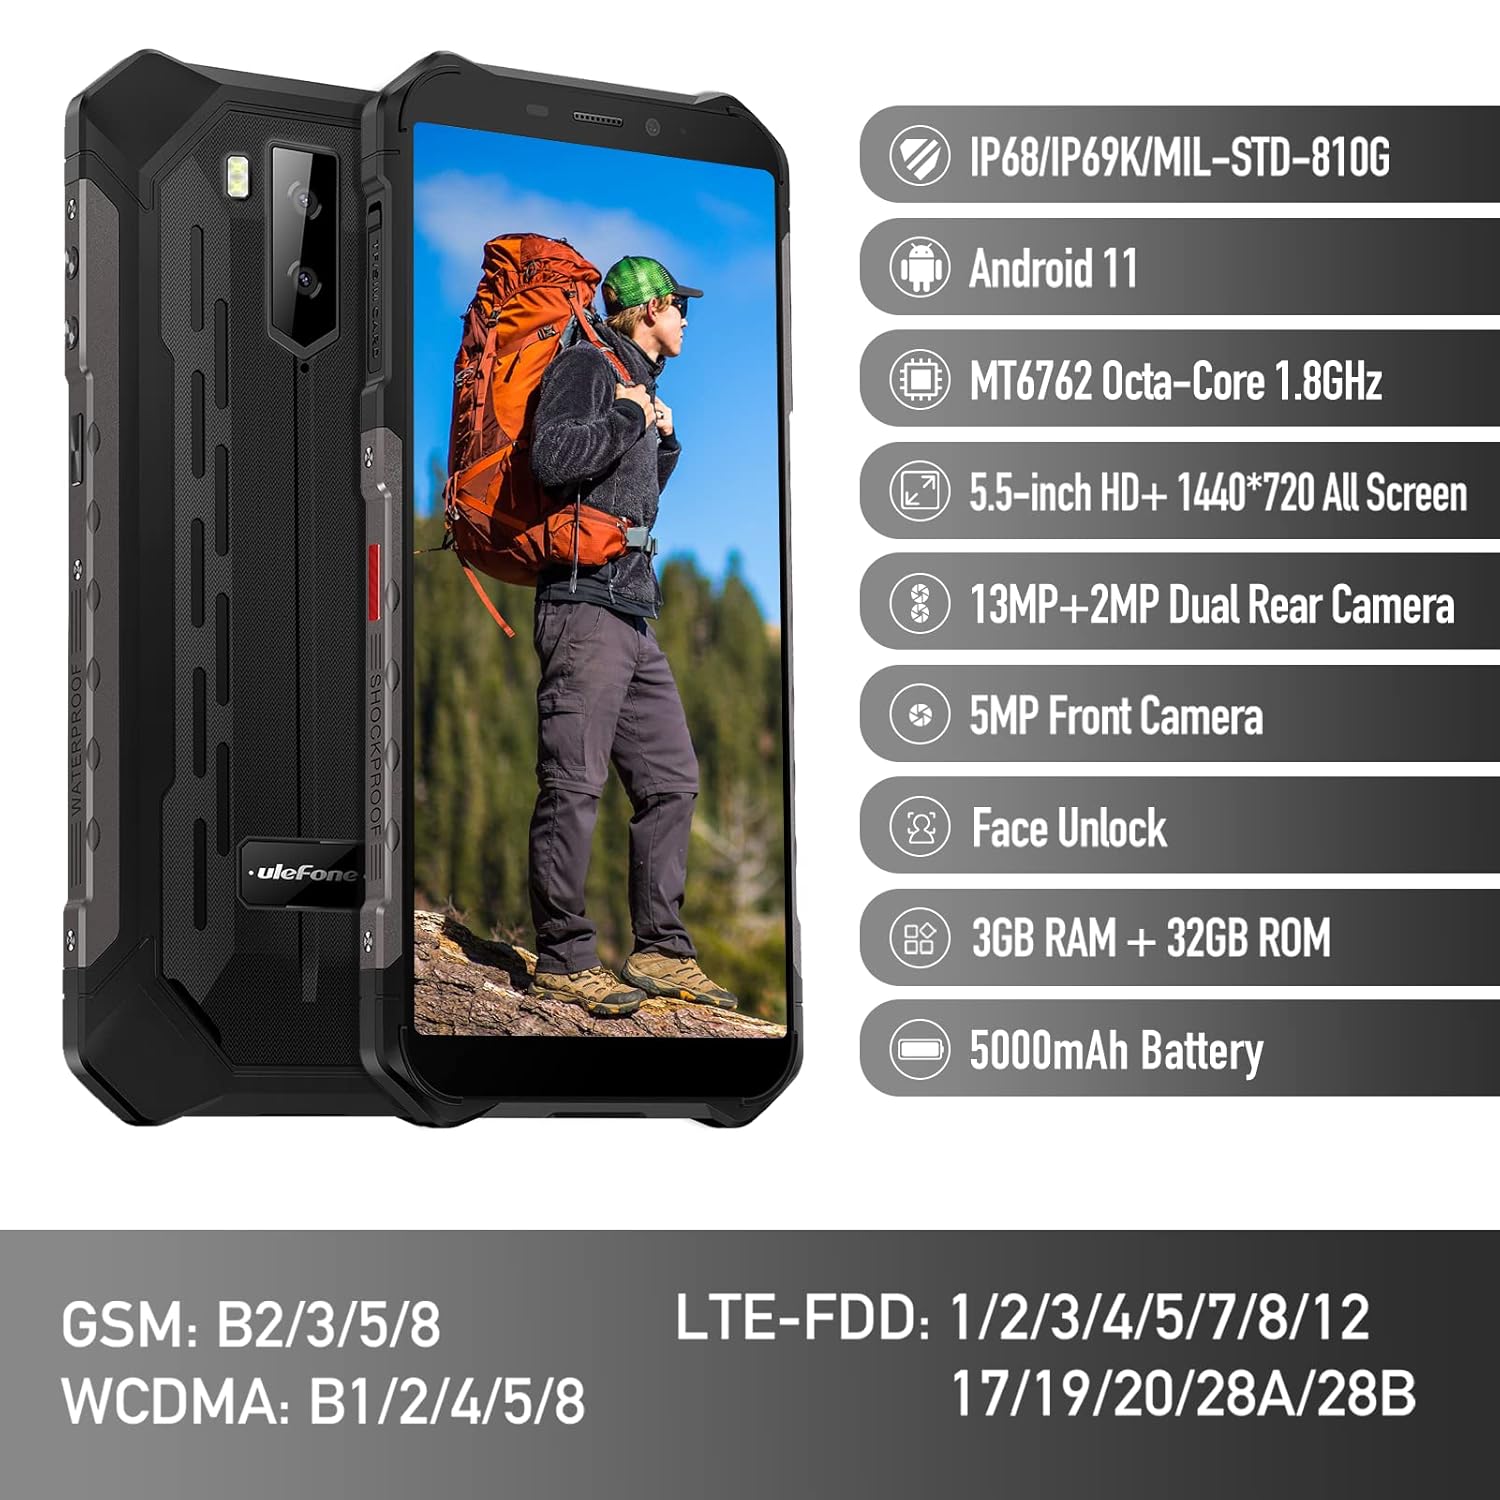
Figure 1: Ulefone Armor X9 Rugged Phone overview, highlighting its robust design and core specifications like IP68/IP69K rating, Android 11, Octa-Core processor, 5.5-inch HD+ screen, 13MP+2MP dual rear camera, 5MP front camera, Face Unlock, 3GB RAM + 32GB ROM, and 5000mAh battery.
2. Konfigurazioa
2.1. SIM txartelaren eta TF txartelaren instalazioa
The Ulefone Armor X9 supports dual SIM cards and a TF (microSD) card for expandable storage. Follow these steps to install them:
- Aurkitu SIM txartelaren erretilua telefonoaren alboan.
- Erabili SIM txartelaren kanporatzeko tresna erretilua irekitzeko.
- Kontu handiz sartu Nano-SIM txartelak dagokien zirrikituetan (SIM1 eta SIM2).
- If using a TF card, place it into the dedicated TF card slot. Note that some configurations may share a slot between SIM2 and the TF card.
- Gently push the tray back into the phone until it is flush with the device body. Ensure the tray is properly sealed to maintain water and dust resistance.

Figure 2: Illustration of the dual SIM and TF card tray, showing how to insert SIM1, SIM2, and a TF card into the Ulefone Armor X9.
2.2. Hasierako kargatzea
Before first use, it is recommended to fully charge your Ulefone Armor X9. Use the provided USB cable and power adapter.
- Konektatu USB kablea telefonoaren kargatzeko atakara.
- Konektatu USB kablearen beste muturra korronte-egokigailura.
- Entxufatu korronte-egokigailua hormako entxufe batera.
- Kargatzeko adierazlea pantailan agertuko da. Utzi telefonoa kargatzen bateriaren ikonoa beteta agertu arte.
2.3. Piztu/Itzaltzea
- Pizteko: Press and hold the Power button (usually on the right side) until the Ulefone logo appears.
- Itzaltzeko: Press and hold the Power button until the power options menu appears on the screen. Select "Power off" and confirm.
- Berrabiarazteko: Energia aukeren menuan, hautatu "Berrabiarazi" eta baieztatu.
3. Funtzionamendu-argibideak
3.1. Oinarrizko nabigazioa (Android 11)
Your Ulefone Armor X9 runs on Android 11, offering an intuitive user interface. Common gestures and navigation include:
- Irristatu gora: Sartu aplikazioen tiradera.
- Irristatu hatza behera: Ireki jakinarazpen-panela eta ezarpen azkarrak.
- Sakatu: Hautatu elementu bat edo ireki aplikazio bat.
- Prentsa luzea: Sartu testuinguru-menuetara edo mugitu ikonoak.
- Zoom egiteko apur bat egin: Irudiak handitu edo txikitu eta web orrialdeak.

Figure 3: Screenshots of the Android 11 interface on the Ulefone Armor X9, showing settings menus, quick toggles, and the sound recorder application.

Figure 4: The 5.5-inch 18:9 All Screen display of the Ulefone Armor X9, showcasing its immersive viewing experience with an image of a skier.
3.2. Kameraren erabilera
Your phone is equipped with a 16MP Triple Rear Camera and a Front Camera. To use the camera:
- Ireki "Kamera" aplikazioa hasierako pantailatik edo aplikazioen tiradertik.
- Sakatu obturadorearen botoia argazkia ateratzeko.
- Aldatu argazki eta bideo moduen artean behar den moduan.
- Tap the icon to switch between the front and rear cameras.
- Arakatu kamera modu eta ezarpen desberdinak emaitza optimoak lortzeko.
3.3. Konektibitatea
The Ulefone Armor X9 supports various connectivity options:
- Wi-Fi: Joan Ezarpenak > Sarea eta internet > Wi-Fi atalera eskuragarri dauden sareetara konektatzeko.
- Bluetootha: Go to Settings > Connected devices > Bluetooth to pair with Bluetooth devices.
- GPSa: The phone features AGPS for accurate location services. Ensure location services are enabled in Settings > Location.
- USBa: Connect your phone to a computer using a USB cable for data transfer or charging.
3.4. Face Unlock
For convenient and secure unlocking, your Ulefone Armor X9 supports Face Unlock:
- Go to Settings > Security > Face Unlock.
- Jarraitu pantailako argibideei zure aurpegia erregistratzeko.
- Ensure good lighting and hold the phone at eye level during registration.
- Once registered, you can unlock your phone by simply looking at the front camera.
4. Mantentzea
4.1. Garbiketa eta Zainketa
To maintain the performance and appearance of your rugged phone:
- Garbitu pantaila eta gorputza zapi leun eta lihorik gabeko batekin.
- Zikinkeria egoskorretarako, erabili apur bat damp oihal. Saihestu produktu kimiko gogorrak edo material urratzaileak.
- Ensure all port covers are securely closed to maintain water and dust resistance, especially after charging or using headphones.

Figure 5: The Ulefone Armor X9's 360° All Protection Design, showcasing its superior materials and superb durability against impacts and harsh conditions.
4.2. Urarekiko eta hautsarekiko erresistentzia (IP68/IP69K)
The Ulefone Armor X9 is rated IP68/IP69K, meaning it is resistant to dust and water immersion. However, this resistance is not permanent and may decrease over time with normal wear. To ensure optimal protection:
- Do not intentionally submerge the phone in water for extended periods or beyond specified depths.
- Avoid exposing the phone to high-pressure water or extreme temperatures.
- Ensure all port covers are tightly sealed before exposure to water or dust.
- Telefonoa bustitzen bada, ondo lehortu kargatu edo atakak ireki aurretik.
4.3. Bateria zaintzea
To prolong the life of your 5580mAh Lithium Polymer battery:
- Saihestu tenperatura muturrekoak (beroak edo hotzak), bateriaren errendimendua hondatu baitezakete.
- Use only the original charger and cable or certified compatible accessories.
- Ez utzi bateria maiz erabat agortzen. Kargatu maila oso baxuetara iritsi baino lehen.
5. Arazoak
If you encounter issues with your Ulefone Armor X9, try the following troubleshooting steps:
5.1. Telefonoa ez da pizten
- Ensure the battery is charged. Connect the phone to a charger for at least 30 minutes.
- Berrabiarazteko, sakatu eta eutsi pizteko botoia 10-15 segundoz.
5.2. Kargatzeko arazoak
- Verify that the charging cable and adapter are working correctly. Try a different charger if available.
- Ziurtatu kargatzeko ataka garbia eta hondakinik gabe dagoela.
- Make sure the charging cable is fully inserted into the port. Some rugged phone ports may require a firm connection due to protective covers.
5.3. SIM/TF Card Not Detected
- Ensure the SIM/TF card is correctly inserted into the tray and the tray is fully seated.
- Berrabiarazi telefonoa.
- Check if the SIM card is active with your network provider.
5.4. App Crashes or Freezing
- Itxi eta ireki berriro arazoa duen aplikazioa.
- Garbitu aplikazioaren cachea eta datuak (Ezarpenak > Aplikazioak > [Aplikazioaren izena] > Biltegiratzea eta cachea).
- Ziurtatu aplikazioa azken bertsiora eguneratuta dagoela.
- Berrabiarazi telefonoa.
5.5. Fabrika berrezarri
Arazoak konpontzen ez badira, fabrika berrezartzeak konpondu ditzake. Abisua: Honek telefonoko datu guztiak ezabatuko ditu. Jarraitu aurretik, egin datu garrantzitsuen babeskopia.
- Joan Ezarpenak > Sistema > Berrezarri aukerak atalera.
- Hautatu "Ezabatu datu guztiak (fabrika berrezartzea)".
- Berretsi zure erabakia eta idatzi zure PINa/pasahitza eskatzen bazaizu.
6. Zehaztapenak
Below are the detailed specifications for the Ulefone Armor X9:

Figure 6: Details of the Ulefone Armor X9's Octa-Core Processor, highlighting its power-efficient yet powerful performance, along with 3GB RAM and 32GB ROM, and support for up to 256GB TF card extendable storage.
| Ezaugarri | Zehaztapena |
|---|---|
| Sistema eragilea | Android 11.0 |
| RAM | 3 GB (Note: Feature bullets mention 4GB RAM, please verify actual model) |
| Memoria Biltegiratzeko Ahalmena | 32 GB (Expandable with TF card up to 256GB. Feature bullets mention 128GB ROM, please verify actual model) |
| CPU eredua | MT6762 Octa-Core 1.8GHz (Note: Specifications list 'Snapdragon', but image indicates MT6762. Please verify actual model) |
| Produktuaren neurriak | 15.8 x 7.75 x 1.38 cm |
| Elementuaren pisua | 472 g |
| Pilak | 1 Lithium Polymer battery (5580mAh, included) |
| Haririk gabeko komunikazioa | Cellular, Bluetooth, USB, Wi-Fi |
| GPSa | AGPS |
| Ezaugarri bereziak | Rear Camera, Face Unlock, IP68/IP69K, MIL-STD-810G |
| Bistaratzea | 5.5-inch HD+ 1440*720 All Screen |
| Atzeko kamera | 13MP+2MP Dual Rear Camera (Note: Feature bullets mention 16MP Triple Rear Camera, please verify actual model) |
| Aurrealdeko kamera | 5MP aurreko kamera |
| Kolorea | Beltza |
| Fabrikatzailea | Ulefone |
Note: Specifications are based on available product data and may vary slightly. Please refer to your product packaging for the most accurate information. There are discrepancies between feature bullets, specifications, and image text regarding RAM, ROM, CPU, and camera megapixels. This manual uses the most frequently cited or detailed information, with notes for clarification.
7. Bermea eta Laguntza
7.1. Bermearen informazioa
Your Ulefone Armor X9 is covered by a manufacturer's warranty. The specific terms and duration of the warranty may vary by region and retailer. Please refer to the warranty card included in your product packaging or contact your point of purchase for detailed information regarding warranty coverage and claims.
7.2. Bezeroarentzako arreta
For technical assistance, troubleshooting beyond this manual, or warranty inquiries, please contact Ulefone customer support or your authorized dealer. You can typically find contact information on the official Ulefone webgunean edo zure produktuaren dokumentazioan.
- Visit the official Ulefone website for FAQs, software updates, and support contact details.
- Laguntza-zerbitzura deitzean, gorde erosketa-agiria eta produktuaren serie-zenbakia eskura.


