1. Sarrera
Thank you for choosing the Inkbird BBQGO BG-CT2D Digital Food Thermometer. This device is designed to help you achieve perfectly cooked meals by accurately monitoring food temperatures. Featuring dual probes, a touch screen, and preset temperature options, it is ideal for use with ovens, grills, smokers, and various cooking methods. Please read this manual thoroughly before use to ensure proper operation and longevity of your thermometer.
2. Produktua amaitu daview
2.1 Ezaugarri nagusiak
- Zunda bikoitzak: Monitor two different foods or two parts of the same food simultaneously. Probes are 40 inches (100cm) long and heat-resistant.
- Tenperatura sorta zabala: Measures from -20℃ to 250℃ (-4°F to 482°F) with an accuracy of ±2℃/±2°F.
- Aurrez ezarritako menuak: Includes factory-preset temperatures and doneness levels for 8 types of meat (Beef, Lamb, Veal, Hamburger, Pork, Turkey, Chick, Fish).
- Diseinu erosoa: Features two magnets for attachment to metal surfaces and a back stand for tabletop use. Silicone cover provides protection.
- Touch Screen & LCD Backlight: Easy-to-read large LCD with sensitive touch controls and backlight for clear visibility in any lighting condition.
- Built-in Timer & Alarm: Set cooking times from 59 seconds to 99 minutes. An alarm sounds when the set temperature is reached or time expires, preventing overcooking.
2.2 Osagaiak
The Inkbird BBQGO BG-CT2D thermometer consists of the main unit and two temperature probes.

Image: The main thermometer unit with its two temperature probes, showing approximate dimensions.

Image: A detailed diagram illustrating the various parts and buttons of the thermometer, including probe channels, display areas, and control buttons.
- 1. Magnet: For attaching to metal surfaces.
- 2. Etengailua: Gailua piztu/itzali egiten du.
- 3. Support Frame: Mahai gaineko kokapenerako.
- 4. Probe Jack: Connects the temperature probes.
- 5. Bateriaren konpartimendua: Holds 2 AAA batteries (not included).
- 6. Preset Meat Type: Displays the selected meat type.
- 7. Probe Channel: Indicates which probe (1 or 2) is active.
- 8. Doneness Level: Shows the selected doneness (e.g., RARE, MEDIUM).
- 9. Alarm Temperature: Displays the target temperature for the alarm.
- 10. Uneko tenperatura: Shows the real-time temperature from the probe.
- M botoia: Changes preset mode or turns on the alarm.
- T botoia: Selects doneness level or switches between °C/°F.
- CH botoia: Selects probe channel or sets an alarm.
3. Konfigurazioa
3.1 Bateriaren instalazioa
- Bilatu bateriaren konpartimentua termometro unitatearen atzealdean.
- Ireki bateriaren estalkia.
- Insert 2 AAA batteries (not included), ensuring correct polarity (+/-).
- Itxi bateriaren estalkia ongi.

Image: The rear of the thermometer unit with the battery compartment open, indicating where to insert 2 AAA batteries.
3.2 Zundak konektatzea
- Ensure the thermometer unit is powered off.
- Insert the stainless steel probes into the probe jacks located on the sides of the main unit. Ensure they are fully inserted for a secure connection.
Image: The thermometer unit with both probes correctly connected to the side jacks.
3.3 Piztu/Itzali
- To power on, slide the power switch on the back of the unit to the "ON" position.
- Itzaltzeko, irristatu etengailua "OFF" posiziora.

Irudia: Gertutik view of the power switch located on the side of the thermometer unit.
4. Funtzionamendu-argibideak
4.1 Tenperatura Unitatearen Hautaketa (°C/°F)
Celsius (°C) eta Fahrenheit (°F) artean aldatzeko, sakatu T button on the touch screen. The display will update accordingly.

Image: The thermometer display indicating the option to select between Celsius and Fahrenheit temperature units.
4.2 Selecting Probe Channel
Sakatu CH button to switch between Probe 1 and Probe 2. The selected channel will be highlighted on the display.
4.3 Aurrez ezarritako tenperaturak erabiltzea
- Sakatu M button to cycle through the 8 preset meat types (BEEF, LAMB, VEAL, HAMBURGER, PORK, TURKEY, CHICK, FISH).
- Once a meat type is selected, press the T button to choose the desired doneness level (e.g., RARE, MED RARE, MEDIUM, WELL). The target temperature will adjust automatically.
- Insert the probe into the thickest part of the food, avoiding bone or gristle.
- The thermometer will display the current temperature and the set alarm temperature. An alarm will sound when the food reaches the target temperature.
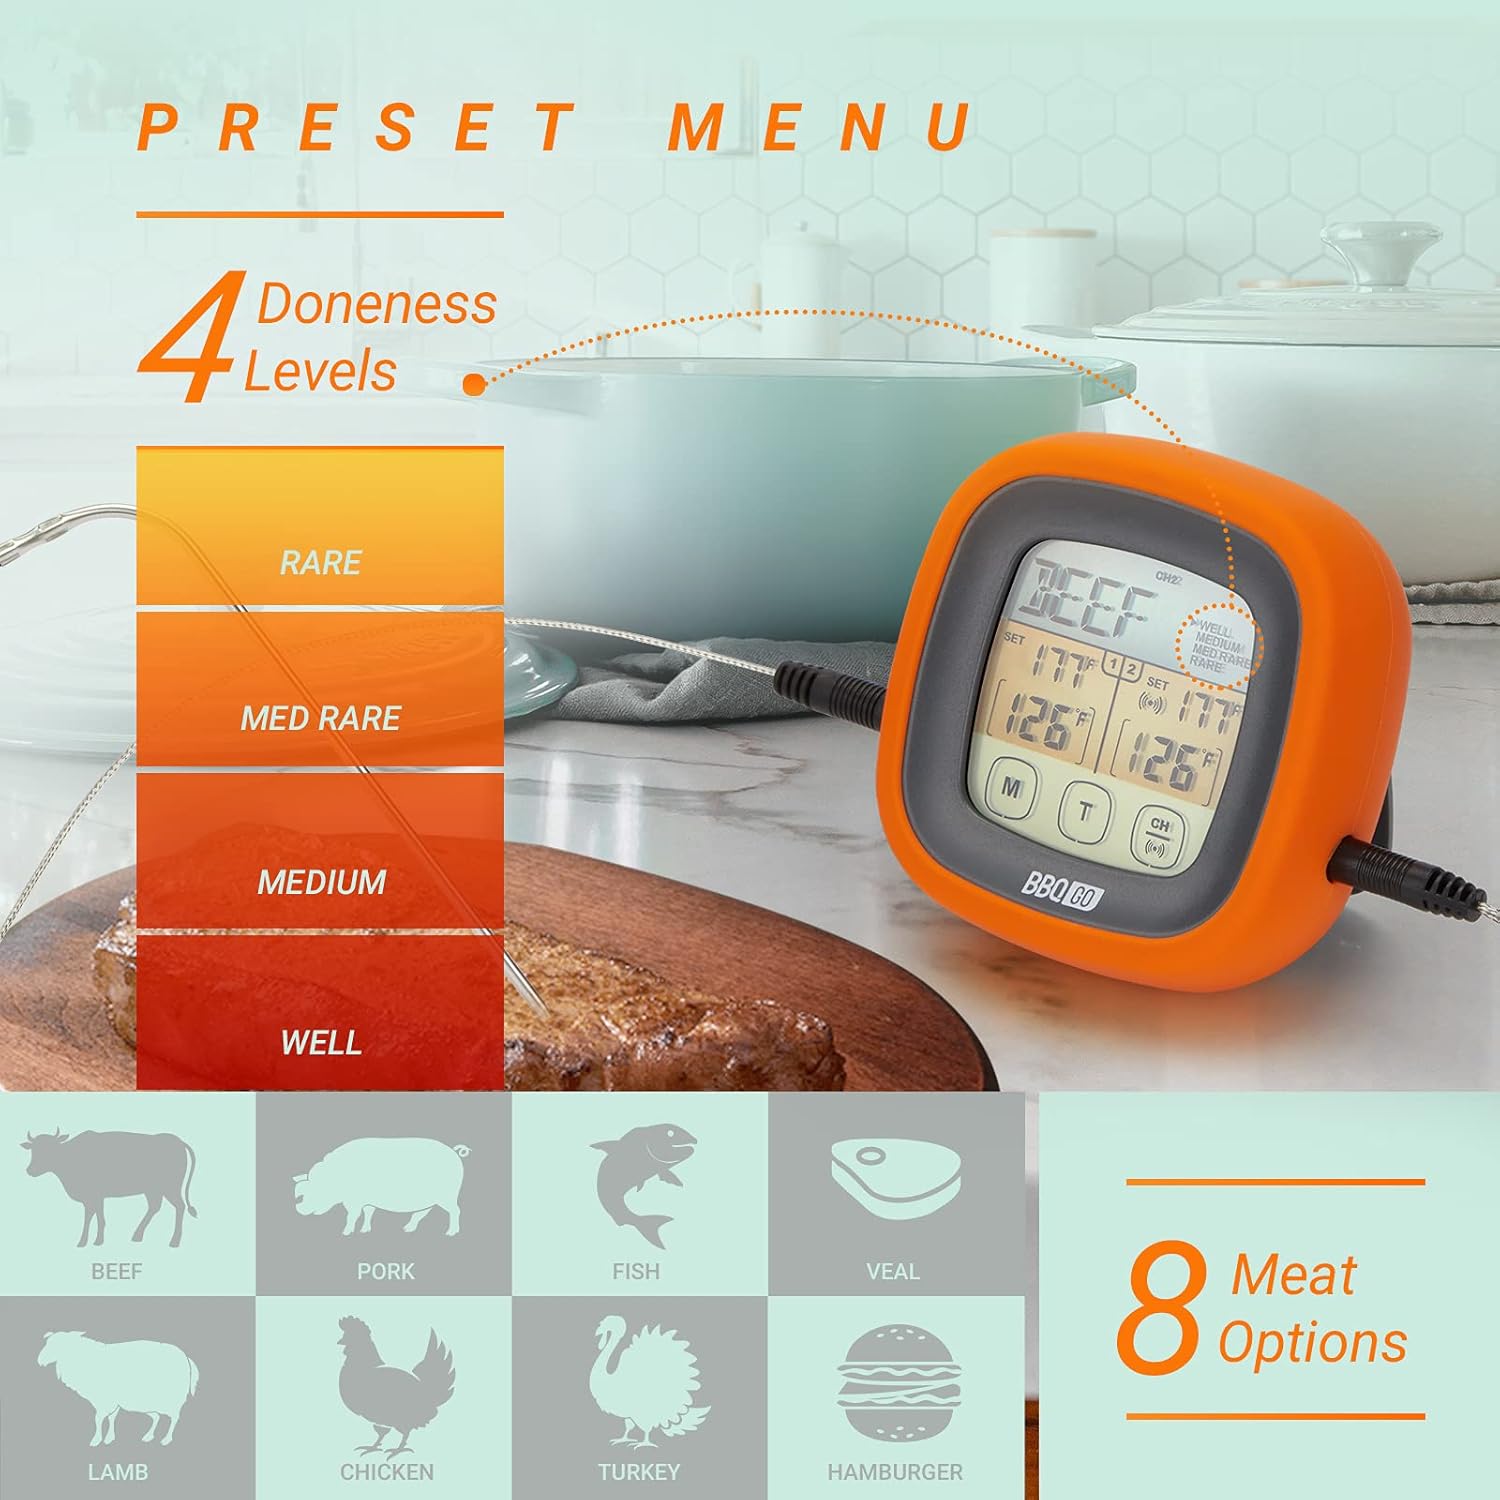
Image: The thermometer display illustrating the selection of various meat types and their corresponding doneness levels.
4.4 Tenperatura pertsonalizatuak ezartzea
If you prefer a specific temperature not covered by the presets:
- Select the desired probe channel using the CH botoia.
- Eduki sakatuta CH button until the alarm temperature starts flashing.
- Erabili M eta T buttons to adjust the target temperature up or down.
- Sakatu CH berriro ezarpena berresteko.
4.5 Tenporizadorearen funtzioa
The thermometer includes a built-in timer:
- To activate the timer, press and hold the M button until the timer digits appear.
- Erabili M eta T buttons to set the desired time (up to 99 minutes, 59 seconds).
- Sakatu CH tenporizadorea abiarazteko edo eteteko.
- Tenporizadorea zerora iristen denean alarma bat joko du.
4.6 Atzeko argiaren kontrola
The LCD backlight can be activated for better visibility:
- Press any button to momentarily activate the backlight.
- The backlight will automatically turn off after a short period of inactivity to conserve battery.

Image: The thermometer display illuminated by its backlight, demonstrating clear readability in low-light conditions.
5. Mantentzea
5.1 Garbiketa
- Thermometer Unit: Garbitu unitate nagusia iragarkiarekinamp cloth. Do not immerse the unit in water or place it under running water.
- Zundaketak: Wash the stainless steel probes with warm soapy water after each use. Rinse thoroughly and dry completely before storage. The probe wires are heat-resistant but should not be submerged in water.
5.2 Biltegiratzea
- Gorde termometroa eta zundak leku garbi eta lehor batean erabiltzen ez dituzunean.
- Saihestu muturreko tenperaturan edo hezetasun handietan gordetzea.
5.3 Bateria ordezkatzea
Replace batteries when the display becomes dim or the unit fails to power on. Follow the battery installation steps in Section 3.1.
6. Arazoak
| Arazoa | Kausa posiblea | Irtenbidea |
|---|---|---|
| Pantaila hutsik edo ilun dago. | Bateria gutxi edo agortuta; bateria gaizki instalatuta. | Ordeztu bateriak AAA bateria berriekin, polaritate zuzena ziurtatuz. |
| Tenperaturaren irakurketa okerrak. | Probe not fully inserted; probe tip touching bone/gristle; probe damaged. | Ensure probe is fully inserted into the food's thickest part, away from bone. If problem persists, the probe may need replacement. |
| Alarmak ez du jotzen. | Alarm function not activated; volume too low (if applicable); unit malfunction. | Ensure alarm temperature is set. Check if the unit has a volume setting (this model does not, so this is a general troubleshooting tip). Contact support if issue persists. |
| Ukipen-pantailak ez du erantzuten. | Unit frozen; temporary software glitch. | Remove and reinsert batteries to reset the unit. |
7. Zehaztapenak
| Ezaugarri | Xehetasuna |
|---|---|
| Ereduaren izena | BG-CT2D |
| Marka | Inkbird |
| Tenperatura tartea | -20 ℃ eta 250 ℃ (-4 °F eta 482 °F) |
| Zehaztasuna | ±2℃/±2°F |
| Sonda Luzera | 40 hazbete (100 cm) |
| Bistaratzeko mota | LCD atzeko argiarekin |
| Energia iturria | 2 x AAA bateria (ez daude barne) |
| Ezaugarri bereziak | Fast Reading System, Dual Probes, Touch Screen, Preset Menus, Timer, Magnetic Back, Stand, Silicone Cover |
| Kanpoko Materiala | Acrylonitrile Butadiene Styrene, Silicon |
| Produktuen zainketa | Oven Safe (probes only), Wipe Clean (main unit) |
8. Bermea eta Laguntza
Inkbird products are designed for reliability and performance. For specific warranty information regarding your Inkbird BBQGO BG-CT2D Digital Food Thermometer, please refer to the warranty card included in your product packaging or visit the official Inkbird webgunea.
If you encounter any issues or have questions about your product, please contact Inkbird customer support through their official website or the retailer where you purchased the product. Please have your model number (BG-CT2D) and purchase details ready when contacting support.
You can visit the Inkbird store for more information: Inkbird Official Store