1. Sarrera
Thank you for choosing an Indesit appliance. This user manual provides essential information for the safe and efficient operation, installation, and maintenance of your Indesit TWE 71252 S EU front-loading washing machine. Please read these instructions carefully before using the appliance and keep them for future reference. Proper use and maintenance will ensure optimal performance and extend the lifespan of your washing machine.
2. Segurtasun informazioa
Segurtasun orokorra:
- Tresna hau etxeko erabilerarako soilik da.
- Do not allow children to play with the appliance. Supervise children to ensure they do not climb into the drum.
- Deskonektatu beti tresna garbiketa edo mantentze-lanak egin aurretik.
- Do not operate the washing machine if the power cord or plug is damaged, or if the appliance itself is faulty. Contact qualified service personnel.
- Ziurtatu gailua lurra behar bezala lotuta dagoela.
Instalazioaren segurtasuna:
- Remove all transit bolts and packaging materials before use. Failure to do so can cause severe damage.
- Install the appliance on a firm, level floor. Adjust the feet to ensure stability.
- Ziurtatu aireztapen egokia aparatuaren inguruan.
- Konektatu uraren sarrerako mahuka ur hotzeko txorrota batera. Ziurtatu konexio guztiak ondo itxita daudela ihesak saihesteko.
- The drain hose must be securely fixed to prevent displacement during operation.
3. Produktua amaitu daview
Your Indesit TWE 71252 S EU washing machine features a user-friendly design with essential components for efficient laundry care.

3.1. irudia: Aurrealdea view of the Indesit TWE 71252 S EU washing machine. This image shows the overall design, including the control panel at the top, the detergent dispenser on the left, and the main loading door in the center.
Funtsezko osagaiak:
- Kontrol-panela: Located at the top, featuring digital touch controls, push buttons, and a rotary knob for program selection.
- Detergente-banatzailea: A pull-out drawer for adding detergent and fabric softener.
- Kargatzeko atea: Arropa gehitu eta ateratzeko aurrealdeko atea.
- Danborrak: Stainless steel interior where laundry is washed.
- Hustubideko iragazkia: Aurrealdeko beheko aldean kokatua, garbitzeko eskuragarri.

3.2. irudia: Close-up of the detergent dispenser and control panel. This view highlights the various compartments within the dispenser for pre-wash, main wash, and softener, along with the program selection knob and digital display.

3.3. irudia: Barrualdea view of the stainless steel drum. This image shows the perforated surface of the drum, designed for effective washing and rinsing, and the agitator paddles.
4. Instalazioa eta konfigurazioa
Instalazio egokia ezinbestekoa da zure garbigailuaren errendimendurako eta iraupen luzerako.
4.1 Despaketatzea:
- Kontu handiz kendu ontziratzeko material guztiak, poliestirenozko oinarria eta babes-filma barne.
- Remove the transit bolts located at the rear of the machine. These bolts secure the drum during transport and must be removed before operation. Keep them for future transport if needed.
4.2 Positioning:
- Place the washing machine on a flat, stable surface, away from direct sunlight or heat sources.
- Egokitu makinaren beheko aldean dauden oin erregulagarriak guztiz mailakatuta dagoela ziurtatzeko. Erabili maila bat egiaztatzeko.
- Ensure there is sufficient space around the machine for ventilation and ease of access.
4.3 Ur-konexioa:
- Connect the supplied water inlet hose to the cold water tap. Hand-tighten the connection, then use a wrench for a quarter turn.
- Connect the other end of the inlet hose to the water inlet valve at the back of the washing machine.
- Position the drain hose into a standpipe or over the edge of a sink, ensuring it is securely fixed to prevent it from falling out during draining. The height of the drain point should be between 65 cm and 100 cm from the floor.
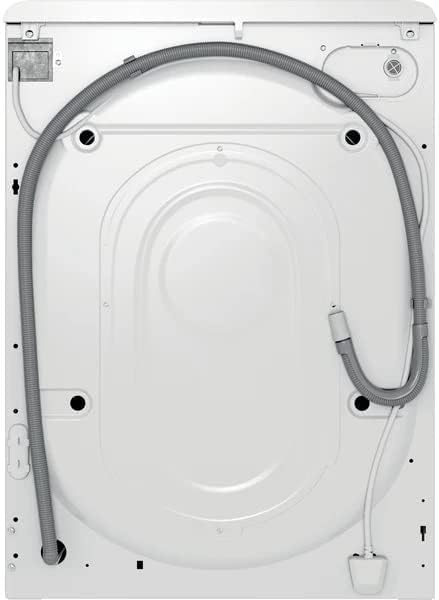
4.1. irudia: Atzekoa view of the washing machine. This image illustrates the connections for the water inlet hose (typically blue or white) and the drain hose, along with the power cable.
4.4 Konexio elektrikoa:
- Entxufatu elikatze-kablea behar bezala lurrera konektatutako entxufe elektriko batera.
- Do not use extension cords or multi-plugs.
4.5 First Wash Cycle:
- Before washing clothes, run an empty wash cycle to clean the drum and remove any manufacturing residues.
- Add a small amount of detergent to the main wash compartment.
- Select a short, hot wash program (e.g., 60°C cotton cycle) and start the machine.
5. Funtzionamendu-argibideak
Jarraitu urrats hauek zure garbigailua modu eraginkor eta seguruan erabiltzeko.
5.1 Arropa garbitzea:
- Ireki kargatzeko atea.
- Sailkatu arropa ehun motaren, kolorearen eta zikinkeria mailaren arabera.
- Load laundry loosely into the drum, ensuring not to overload. The 7kg capacity refers to dry laundry weight.
- Itxi atea ondo itxi arte klik egin arte.
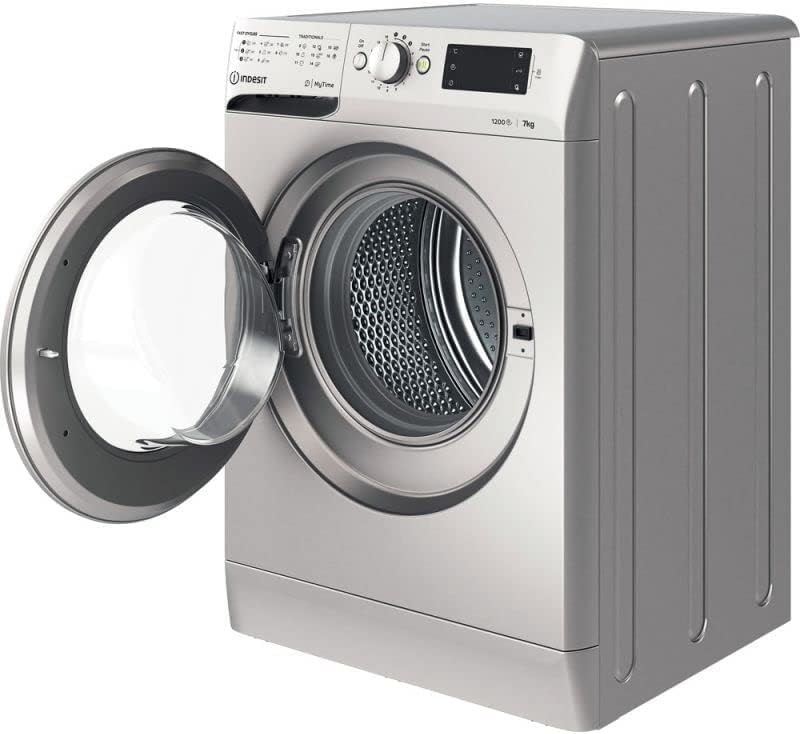
5.1. irudia: Aurrealdea view of the washing machine with the door open. This image shows the wide opening for easy loading and unloading of laundry into the drum.
5.2 Adding Detergent and Additives:
- Atera detergentearen tiradera.
- Add the appropriate amount of detergent to the main wash compartment (usually marked 'II' or 'Main Wash').
- If using fabric softener, pour it into the designated compartment (usually marked with a flower symbol or 'Softener'). Do not exceed the 'MAX' level.
- Itxi astiro-astiro banatzailearen tiradera.
5.3 Selecting a Program:
- Turn the rotary knob on the control panel to select the desired wash program. The machine offers various programs for different fabric types and soil levels, including a 'Quick Wash' option.
- Use the digital touch controls and push buttons to adjust additional settings such as temperature, spin speed (up to 1200 RPM), or delay start, if available for the selected program.
5.4 Starting a Cycle:
- Press the 'Start/Pause' button to begin the wash cycle. The indicator light will illuminate.
5.5 Pausing/Canceling a Cycle:
- To pause a cycle, press the 'Start/Pause' button. The indicator light will flash.
- To cancel a cycle, press and hold the 'Start/Pause' button for a few seconds, or turn the program selector knob to 'Off' and then back to a new program.
5.6 End of Cycle:
- The machine will signal the end of the cycle (e.g., with an audible alert or a specific display message).
- Open the door and remove the laundry promptly to prevent creasing and odors.
- Utzi atea apur bat erdi irekita danborra airean lehortzen uzteko.
6. Mantentzea eta Garbiketa
Mantentze-lan erregularrak errendimendu eta higiene optimoak bermatzen ditu.
6.1 Detergente-banagailua garbitzea:
- Atera banagailuaren tiradera guztiz.
- Kendu daitezkeen piezak eta garbitu ur korrontearen azpian.
- Garbitu tiraderaren karkasa eskuila batekin.
- Berriro muntatu eta sartu tiradera.
6.2 Danborra garbitzea:
- Run a maintenance wash cycle (e.g., a hot cycle with a drum cleaning agent or white vinegar) every few months to prevent odor and residue buildup.
6.3 Cleaning the Door Seal:
- Wipe the rubber door seal after each wash to remove lint, dirt, and moisture. This prevents mold and odors.
6.4 Hustubideko iragazkia garbitzea:
- Periodically clean the drain filter to prevent blockages and ensure proper drainage.
- Open the cover at the bottom front of the machine.
- Jarri ontzi lauso bat azpian, geratzen den ura biltzeko.
- Astiro-astiro kendu iragazkia, ura isurtzen utziz.
- Kendu iragazkitik eta haren etxebizitzatik lint, txanpon edo objektu arrotzak.
- Rinse the filter under running water and screw it back in firmly. Close the cover.

6.1. irudia: Close-up of the drain filter access. This image shows the removable cap that covers the drain filter, which needs to be regularly cleaned to prevent blockages.
6.5 External Cleaning:
- Garbitu makinaren kanpoaldea leun batekin, damp oihal. Ez erabili garbitzaile edo disolbatzaile urratzailerik.
7. Arazoak
Before contacting customer service, try these simple solutions for common issues.
| Arazoa | Kausa posiblea | Irtenbidea |
|---|---|---|
| Makina ez da martxan jartzen | No power; Door not closed; Program not selected; Start/Pause button not pressed. | Check power supply; Ensure door is firmly closed; Select a program; Press Start/Pause. |
| Ura ez da betetzen. | Ur-txorrota itxita; Sarrerako mahuka okertuta; Ur-presioa baxuegia. | Ireki ur-txorrota; Zuzen ezazu mahuka; Egiaztatu etxeko ur-presioa. |
| Ura ez da xukatzen | Hustubideko mahuka tolestuta edo blokeatuta; Hustubideko iragazkia blokeatuta. | Straighten or clear drain hose; Clean the drain filter (see Section 6.4). |
| Bibrazio / zarata gehiegizkoa | Garraio-torlojuak ez dira kendu; Makina ez dago maila berean; Karga irregularra. | Remove transit bolts (if not already); Adjust feet to level machine; Redistribute laundry evenly. |
| Arropako detergente hondarrak | Too much detergent; Detergent dispenser blocked; Insufficient rinse. | Reduce detergent amount; Clean dispenser; Select an extra rinse option if available. |
8. Zehaztapenak
Detailed technical specifications for the Indesit TWE 71252 S EU washing machine.
| Ezaugarri | Zehaztapena |
|---|---|
| Eredua | TWE 71252 S EU |
| Marka | Indesit |
| Edukiera | 7 kg |
| Biraketa-abiadura maximoa | 1200 RPM |
| Neurriak (H x W x D) | 85 cm x 59.5 cm x 54 cm |
| Pisua | 66.5 kg |
| Energia Eraginkortasuna | A+++ 90% |
| Danborraren materiala | Altzairu herdoilgaitza |
| Kontrol mota | Digital Touch, Push Button, Rotary Knob |
| Instalazio mota | exentu |
| Kolorea | Zilarrezkoa |
| Ezaugarri bereziak | Durable, Quick Wash Option |
| Dakarten osagaiak | Garbigailua |
9. Bermea eta Laguntza
For warranty information, please refer to the warranty card provided with your appliance or contact your retailer. Keep your proof of purchase (receipt or invoice) as it will be required for any warranty claims.
If you encounter issues that cannot be resolved using the troubleshooting guide, please contact Indesit customer service or an authorized service center. Do not attempt to repair the appliance yourself, as this may void your warranty and pose safety risks.


