1. Produktua amaitu daview
This manual provides instructions for the KICKER 48TRTP122 12-inch CompRT Down-Firing Loaded Subwoofer Enclosure, the DS18 CANDY-X1B Mono Class D Amplifier, and the accompanying DS18 AMPKIT4 4AWG Complete Amplifier Wiring Kit. This system is designed to enhance your vehicle's audio experience with powerful bass output.
2. Zer dago kutxan
- Kicker 48TRTP122 12" CompRT Series Down-Firing Loaded Subwoofer Enclosure
- DS18 CANDY-X1B Mono Candy-X Series Car Ampbiziagoa
- DS18 AMPKIT4 4AWG Complete Amplifier Kit, including:
- 17 ft 4 AWG Red Power Wire
- 3 ft 4 AWG Black Ground Wire
- 17 ft Remote Wire
- 17 ft Red/Black Speaker Cable
- 17 ft Red/Black Twisted RCA Cable
- Mini ANL Fuse Holder with Mini ANL 100A Fuse
- 6 ft 4 AWG Loom Tube
- 1 x Rubber Grommet
- 10 x Kable lokarriak
- 2 x Eraztun terminalak
- 2 x Spade Terminal
- 5 x Small Spade Terminals

Figure 2.1: Components of the DS18 AMPKIT4 4AWG Complete AmpLider Kit.
3. Konfigurazioa eta instalazioa
Proper installation is crucial for optimal performance and safety. If you are unsure about any steps, consult a professional car audio installer.
3.1 Segurtasun-neurriak
- Deskonektatu ibilgailuaren bateriaren terminal negatiboa edozein lan elektriko hasi aurretik.
- Ziurtatu kableatu guztiak behar bezala isolatuta eta ondo lotuta daudela, zirkuitulaburrak eta kalteak saihesteko.
- Erabili babes pertsonaleko ekipamendu (BPE) egokia instalazioan zehar.
3.2 Subwoofer Enclosure Placement
The KICKER 48TRTP122 is a down-firing enclosure, designed to be placed in the trunk or cargo area of your vehicle. Ensure it is securely fastened to prevent movement during driving.

Figure 3.1: KICKER 48TRTP122 Down-Firing Subwoofer Enclosure.
3.3 Amplifier Muntaketa
Mount the DS18 CANDY-X1B amplifier in a location that allows for adequate ventilation and protection from moisture. Common locations include under a seat, in the trunk, or on the back of a rear seat. Ensure it is securely mounted to prevent vibration damage.

Figure 3.2: DS18 CANDY-X1B Mono Class D Ampbiziagoa.
3.4 Kableatzeko jarraibideak
Follow these steps carefully for wiring the system. Refer to the wiring diagram below for visual guidance.
- Power Wire (Red 4 AWG): Run the 17 ft red power wire from the vehicle's positive battery terminal to the fuse holder, then from the fuse holder to the +12V terminal on the DS18 amplifier. Ensure the fuse holder is installed close to the battery (within 18 inches).
- Ground Wire (Black 4 AWG): Connect the 3 ft black ground wire from the GND terminal on the ampIbilgailuaren xasiseko gainazal metaliko garbi eta margotu gabe batera jarri behar da kablea. Ziurtatu konexio elektriko ona dagoela.
- Remote Turn-On Wire: Connect the remote wire from your head unit's remote output to the REM terminal on the amplififikatzailea. Hari honek pizten du amppiztu eta itzali lifatzailea unitate nagusiarekin.
- RCA kableak: Connect the RCA cables from your head unit's subwoofer output (or full-range output if no dedicated sub output) to the RCA input jacks on the DS18 ampbiziagoa.
- Bozgorailuaren kablea: Konektatu bozgorailuaren kablea amplifier's speaker output terminals to the KICKER subwoofer enclosure's input terminals. Ensure correct polarity (+ to + and - to -). The KICKER 48TRTP122 enclosure has a 2-ohm impedance.
- Baxu urrunekoa: Connect the included bass remote to the dedicated remote port on the DS18 amplifier. Mount the remote in an accessible location for easy adjustment.
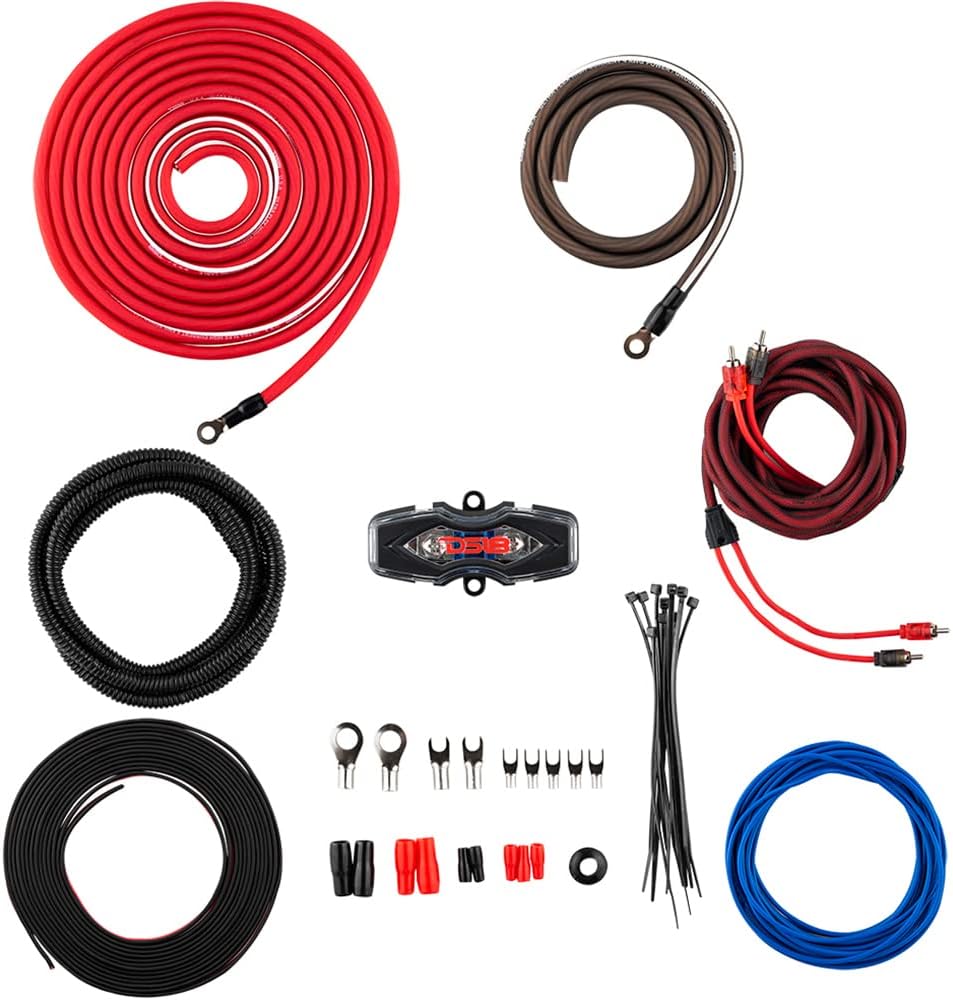
Figure 3.3: Subwoofer to Amplifier Wiring Diagram (2-ohm connection).

Figure 3.4: DS18 Bass Remote Control.
4. Funtzionamendu-argibideak
Once the system is installed, follow these steps to configure and operate your subwoofer and ampbiziagoa.
4.1 Hasierako piztea eta irabaziaren ezarpena
- Konektatu berriro ibilgailuaren bateriaren terminal negatiboa.
- Piztu zure unitate nagusia. amplifier should power on (indicated by a blue LED on the ampbiziagoa).
- Ezarri amplifier's GAIN control to its minimum (fully counter-clockwise) position.
- Play a music track with strong bass at a moderate volume level on your head unit (around 75% of maximum volume).
- Handitu poliki-poliki IRABAZIA kontrola amplifier until you hear distortion, then back it off slightly until the sound is clear. This sets the maximum clean output level.
4.2 Amplifier Controls (DS18 CANDY-X1B)
The DS18 CANDY-X1B amplifier features several controls for fine-tuning your bass output:
- IRABAZIA: Adjusts the input sensitivity to match the output of your head unit. (See 4.1)
- BASS BOOST (0-18 dB): Increases the bass output at a specific frequency (typically around 45 Hz). Use sparingly to avoid distortion and speaker damage.
- LPF (Low-Pass Filter) (50-150 Hz): This filter allows only frequencies below the set point to pass through to the subwoofer. Adjust to blend the subwoofer's output seamlessly with your main speakers.
- SUBSONIC FILTER (10-55 Hz): Filters out extremely low frequencies that are inaudible and can cause damage to the subwoofer. Set it slightly below your subwoofer's lowest usable frequency.
- PHASE (0/180 degrees): Adjusts the phase of the subwoofer output relative to your main speakers. Experiment with both settings to find the one that provides the most impactful and coherent bass.
- URRUTIKOA: Port for connecting the wired bass remote control, allowing convenient bass level adjustment from the driver's seat.
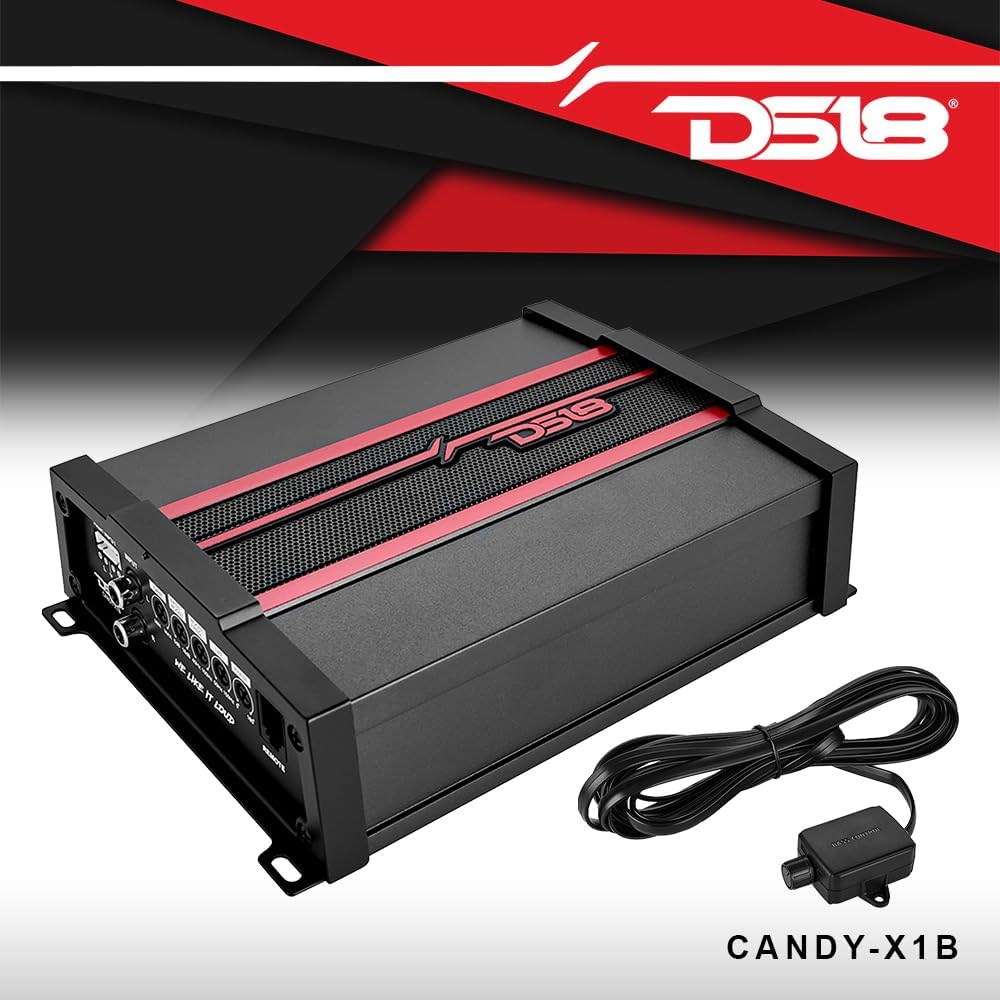
Figure 4.1: DS18 CANDY-X1B Amplifier Controls.
5. Mantentzea
Regular maintenance ensures the longevity and optimal performance of your audio system.
- Garbiketa: Keep the subwoofer enclosure and amplifier clean and free of dust and debris. Use a soft, dry cloth. Avoid liquid cleaners directly on components.
- Konexioak: Aldian-aldian egiaztatu kableatu-konexio guztiak estutasuna eta korrosioa duten ikusteko. Konexio solteek errendimendu eskasa edo kalteak eragin ditzakete.
- Aireztapena: Ziurtatu amplifier's cooling fins are not obstructed to prevent overheating.
- Fusiblearen egiaztapena: bada amplifier does not power on, check the fuse in the fuse holder near the battery. Replace with a fuse of the same rating (100A Mini ANL).
6. Arazoak
Atal honetan ohiko arazoei eta haien irtenbideei buruzko informazioa aurkituko duzu.
| Arazoa | Kausa posiblea | Irtenbidea |
|---|---|---|
| Ez dago soinurik subwooferretik |
|
|
| Soinu distortsionatua |
|
|
| Amplifier gehiegi berotzen da |
|
|
| Bass remote not working |
|
|
7. Zehaztapenak
Detailed specifications for the components in this bundle.
7.1 KICKER 48TRTP122 12" CompRT Subwoofer Enclosure
- Hizlari mota: Subwoofer
- Subwooferaren diametroa: 12 hazbete
- Potentzia maximoa: 1000 watt
- RMS potentzia: 500 watt
- Inpedantzia: 2 ohmio
- Sentikortasuna: 98 dB
- Ezaugarri berezia: Down-Firing, Active thin-mount CompRT subwoofer, High-output reFLEX passive woofer
- Materiala: Dentsitate ertaineko zuntzezko ohola
- Neurriak: 27.5" W x 6.125" H x 14.625" D (Top) x 14.625" D (Bottom)
7.2 DS18 CANDY-X1B Mono Class D Ampbiziagoa
- RMS potentzia balorazioa:
- 4 ohm: 240 watt x 1 kanal
- 2 ohm: 400 watt x 1 kanal
- 1 ohm: 600 watts x 1 channel
- Gehienezko potentzia irteera: 1800 watt
- Sentikortasuna: 100 dB
- Maiztasun-erantzuna: 20-150 Hz
- Baxu urrunekoa: Barne
- Diseinua: D klasea
- Baxu igoera aldakorra: 0-18 dB
- Variable Low-pass filter (LPF): 50-150 Hz
- Iragazki subssonikoa: 10-55 Hz
- Neurriak: 5.9" Z x 8.3" S x 2.16" A
7.3 DS18 AMPKIT4 4AWG Complete AmpLider Kit
- Kablearen neurgailua: 4 AWG
- Alanbrearen materiala: High Performance CCA (Copper Clad Aluminum)
- Gomendatua: Bat amplifier up to 1300 Watts
- Dakarten osagaiak: Power wire, ground wire, remote wire, speaker cable, RCA cable, fuse holder with 100A fuse, loom tube, grommet, cable ties, various terminals.
8. Bermearen informazioa
This product bundle typically comes with a manufacturer's warranty. The KICKER 48TRTP122 subwoofer enclosure and DS18 CANDY-X1B amplifier are covered by a full warranty from their respective manufacturers. Specific warranty terms, duration, and coverage details may vary. Please retain your proof of purchase for warranty claims.
For detailed warranty information, refer to the documentation included with each individual component or visit the respective manufacturer's official webgunea.
9. Laguntza
If you encounter issues not covered in this manual or require further assistance, please contact the manufacturer's customer support:
- KICKER Support: Visit the official KICKER weblaguntza baliabideetarako, maiz egiten diren galderetarako eta harremanetarako informaziorako gunea.
- DS18 Support: Bisitatu DS18 ofiziala website for product support and contact details.
When contacting support, please have your product model numbers (48TRTP122, CANDY-X1B, AMPKIT4) and proof of purchase readily available.


