1. Sarrera
This manual provides detailed instructions for the proper setup, operation, and maintenance of your SHEHDS DMX384 DJ Controller. Please read this manual thoroughly before operating the device to ensure safe and efficient use. Retain this manual for future reference.
2. Segurtasun informazioa
- Konektatu beti gailua lurreko hartune batera.
- Ziurtatu elikadura hornidura boltage gailuaren eskakizunekin bat dator.
- Ez jarri gailua euri edo hezetasunera.
- Avoid operating the device in extreme temperatures or high humidity.
- Ez ireki c-a.asing; bidali mantentze-lan guztiak langile kualifikatuen esku.
- Mantendu gailua material sukoietatik urrun.
3. Produktua amaitu daview
The SHEHDS DMX384 is an intelligent lighting controller designed for managing DMX-compatible stage lighting equipment. It features 384 control channels, allowing for comprehensive control over multiple fixtures.
3.1 Aurrealdeko panelaren kontrolak
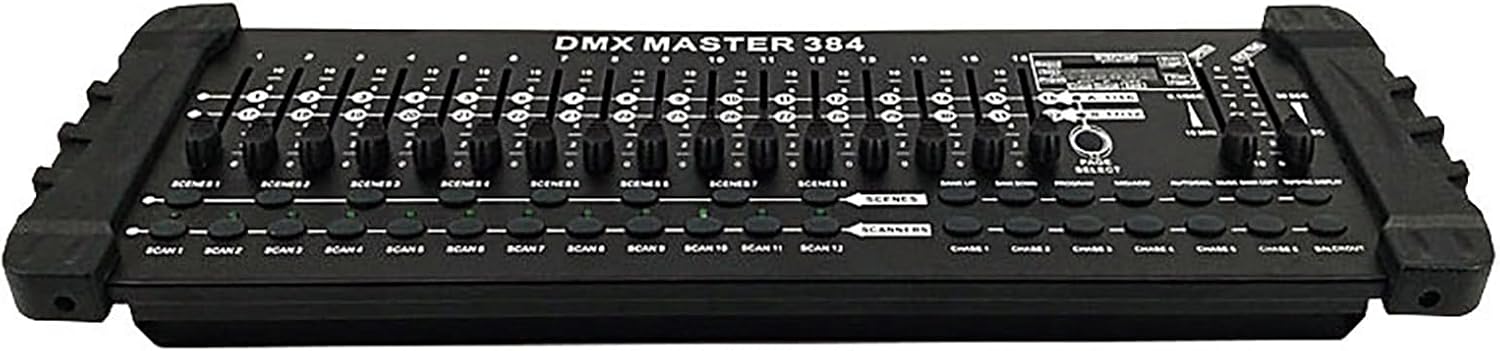
1. irudia: Aurrealdea view of the SHEHDS DMX384 DJ Controller, displaying the array of faders and control buttons for various functions.
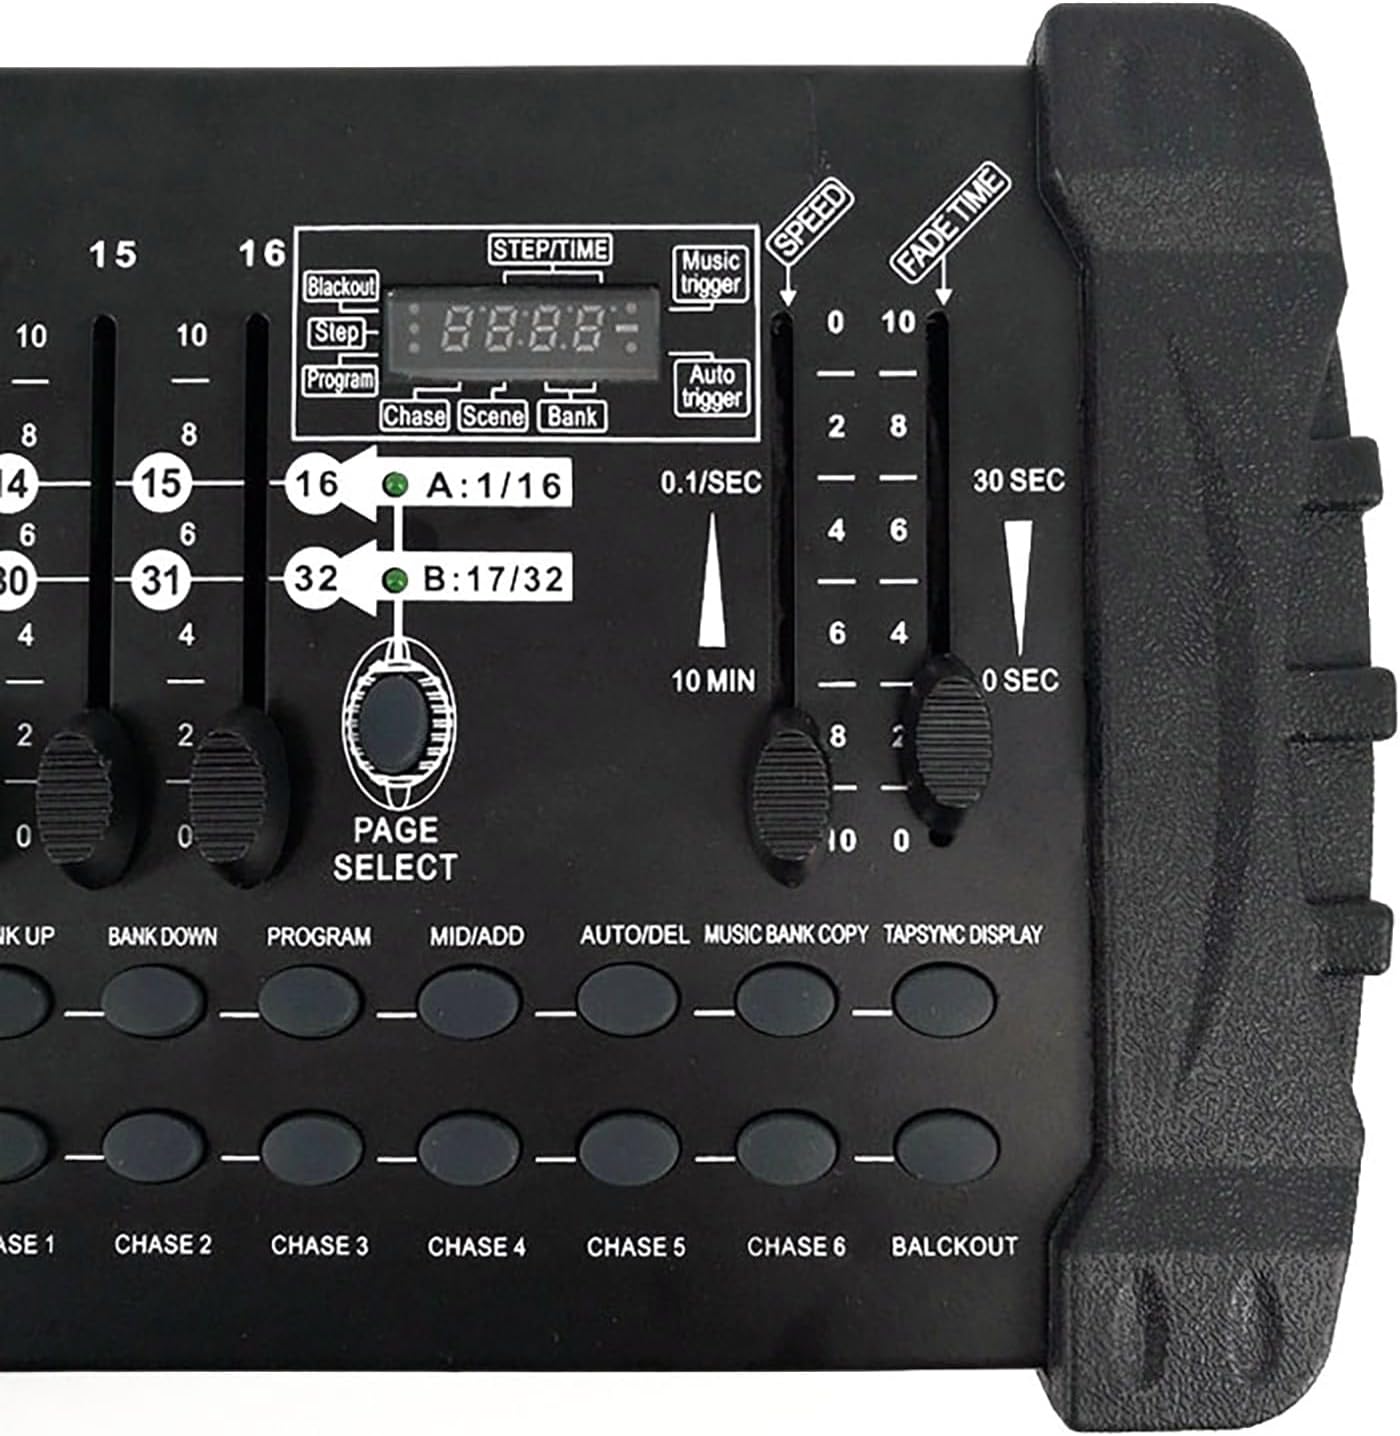
Figure 2: Close-up of the control panel, highlighting the LED digital display, channel faders, and function buttons for scene and program selection.
Aurrealdeko panelak honako hauek ditu:
- Argiztapen eremua: Controls for individual light fixtures.
- Channel Faders (1-16): Adjust DMX channel values.
- Time Speed Faders: Control fade time and speed for scenes and chases.
- Functional Area: Buttons for program, scene, and bank selection.
- Eszena-teklak: Activate stored scenes.
- Page Change Area: Navigate between different pages of channels (A/B).
- LCD pantaila: Shows current settings and values.
3.2 Atzeko panelaren konexioak

Figure 3: Rear panel of the DMX384 Controller, showing all connection ports.

4. irudia: Xehetasuna view of the DMX 512 output, DC input, and USB port on the rear panel.
Atzeko panelak honako hauek ditu:
- MIDI sarrera/irteera: For MIDI control (if applicable).
- DMX 512 Output: Standard 3-pin XLR connector for DMX signal output.
- DC Input (9V 1000mA): Power input for the controller.
- USB ataka: For potential firmware updates or data transfer (refer to specific software instructions).
- Switch potentziala: On/Off control for the device.
4. Konfigurazioa
4.1 Paketatzea

Figure 5: Contents of the SHEHDS DMX384 Controller package.
Kontu handiz atera osagai guztiak paketetik. Egiaztatu elementu guztiak daudela:
- SHEHDS DMX384 Controller
- Energia egokitzailea (9V 1000mA)
- Erabiltzailearen eskuliburua
4.2 Energia-konexioa
- Connect the provided power adapter to the DC Input port on the rear panel of the DMX384 controller.
- Plug the power adapter into a suitable electrical outlet (9V 1000mA).
- Ensure the power switch on the rear panel is in the 'OFF' position before connecting.
4.3 DMX konexioa
- Use a standard 3-pin DMX cable to connect the DMX 512 Output of the controller to the DMX Input of your first lighting fixture.
- For multiple fixtures, daisy-chain them by connecting the DMX Output of the first fixture to the DMX Input of the second, and so on.
- Ensure the last fixture in the chain has a DMX terminator connected to its DMX Output to prevent signal reflection.
5. Funtzionamendu-argibideak
The DMX384 controller provides 384 DMX channels, capable of controlling up to 12 intelligent computer lights, each with 32 channels. It supports 30 bar stacks with 8 scenes each, and 6 slots with up to 240 scenes. Scenes can be recorded with fading and sensitivity settings. The 16 sliders allow direct control of channels, and a built-in amplifier supports music mode operation.
5.1 Piztea eta hasieratzea
- Jarri atzeko paneleko etengailua 'ON' posiziora.
- The LCD display will illuminate, indicating the controller is ready for operation.
5.2 DMX helbideak ezartzea
Before controlling your lighting fixtures, ensure each fixture has a unique DMX address set. Refer to your fixture's manual for specific instructions on setting its DMX address.
Note: After setting the DMX address on the controller, press the 'OK' key. The original DMX address will be retained even after shutting down and restarting the unit.
5.3 Basic Channel Control
- Select the desired scanner (fixture) using the 'SCANNER' buttons (SCAN 1-12).
- Use the 16 channel faders to adjust the DMX values for the selected fixture's channels. The LCD display will show the current channel values.
- Use the 'PAGE SELECT' button to switch between channel pages A (1-16) and B (17-32) if your fixture uses more than 16 channels.
5.4 Scene Programming
The controller allows you to program and store multiple scenes.
- Press the 'PROGRAM' button to enter programming mode.
- Select the desired scanner(s) and adjust their channels using the faders to create your desired lighting state.
- Press the 'MIDI/ADD' button to save the current lighting state.
- Select a 'SCENE' button (SCENE 1-8) to store the scene.
- Errepikatu eszena gehigarrietarako.
- Exit programming mode by pressing the 'PROGRAM' button again.
5.5 Scene Playback
- Ensure the controller is not in programming mode.
- Press the desired 'SCENE' button to activate a stored scene.
- Use the 'FADE TIME' fader to adjust the transition speed between scenes.
- Use the 'SPEED' fader to adjust the speed of dynamic effects within a scene.
5.6 Chase Programming and Playback
Chases are sequences of scenes that play automatically.
- Press the 'PROGRAM' button.
- Press the 'CHASE' button (CHASE 1-6) to select a chase to program.
- Select and activate scenes in the desired order. Each activated scene will be added to the chase.
- Press 'MIDI/ADD' after each scene to add it to the chase.
- Exit programming mode by pressing the 'PROGRAM' button.
- To play a chase, select the desired 'CHASE' button.
5.7 Musika modua
The DMX384 features a built-in amplifier for music mode, allowing lighting to react to audio input.
- Connect an audio source to the controller's audio input (if available, refer to specific model features).
- Activate 'MUSIC TRIGGER' mode (refer to LCD display and function buttons).
- The lighting will now respond to the rhythm and intensity of the music.
6. Mantentzea
- Garbiketa: Use a soft, dry cloth to clean the exterior of the controller. Do not use abrasive cleaners or solvents.
- Biltegiratzea: When not in use, store the controller in a dry, dust-free environment.
- Ikuskapena: Aldian-aldian egiaztatu kable eta konexio guztiak higadura edo kalterik dagoen.
7. Arazoak
| Arazoa | Kausa posiblea | Irtenbidea |
|---|---|---|
| Kontrolagailua ez da pizten. | No power, faulty power adapter, power switch off. | Check power connection, ensure adapter is working, turn power switch ON. |
| Lights do not respond to controller. | Incorrect DMX addressing, faulty DMX cable, DMX terminator missing. | Verify DMX addresses on fixtures, check DMX cable integrity, ensure terminator is used on the last fixture. |
| Intermittent light flickering. | DMX signal interference, loose connections, faulty fixture. | Ensure DMX cables are properly shielded, check all connections, test fixtures individually. |
| Scenes/Chases not saving. | Not in programming mode, incorrect save procedure. | Ensure 'PROGRAM' button is active, follow scene/chase programming steps carefully. |
8. Zehaztapenak
- Eredua: DMX384
- Kontrol-kanalak: 384 DMX kanal
- Controllable Fixtures: 12 intelligent computer lights (up to 32 channels each)
- Eszenak: 30 banks of 8 programmable scenes (240 total)
- Jazarpenak: 6 programmable chases (up to 240 steps each)
- Fader: 16 channel faders, 2 time speed faders
- Pantaila: LED pantaila digitala
- Konektibitatea: 3-pin DMX output, DC power input, USB port
- Potentzia sarrera: DC 9V 1000mA (Corded Electric)
- Materiala: Plastic (housing), Aluminum (internal components/heat sinks)
- Neurriak (L x W x H): 24.4" x 8.8" x 5.7" (61.98 cm x 22.35 cm x 14.48 cm)
- Pisua: 6.19 libra (2.81 kg)
- Muntatze mota: Rack Mount (Note: Some users report non-standard 19" rack compatibility, verify before rack installation)
9. Bermea eta Laguntza
SHEHDS is committed to providing quality products and customer satisfaction.
- Ordezko politika: 1-Month Replacement for manufacturing defects.
- Bermea: 1-Year Limited Warranty from the date of purchase.
- Bezeroarentzako arreta: For technical support, warranty claims, or general inquiries, please contact SHEHDS customer service through your retailer or the official SHEHDS webgunea.


