Sarrera
This manual provides detailed instructions for assembling, operating, and maintaining your GeeekPi Mini Tower NAS Kit for Raspberry Pi 4 Model B. The kit transforms your Raspberry Pi into a compact, mobile mini-host with expanded storage capabilities and efficient cooling.
The kit includes an M.2 SATA SSD expansion board for mass storage, an ICE Tower Cooler with a PWM RGB fan for superior heat dissipation, a 0.96-inch OLED display, and a GPIO 1 to 2 expansion board. The case is constructed from durable ABS material with transparent acrylic side panels.
Konfigurazioa eta Muntaketa
Follow these steps carefully to assemble your GeeekPi Mini Tower NAS Kit. Ensure all components are present before beginning.
Osagaiak barne:
- ABS Mini Tower Case
- ICE-Tower CPU Cooling Fan
- 2 x Acrylic Side Panels
- 0.96-inch OLED Display (pre-mounted)
- GPIO Edge Expansion Board
- M.2 SATA SSD Shield
- Assembly Manual (this document)
- Necessary screws and standoffs
Note: Raspberry Pi 4 Model B is not included. A 40-pin parallel cable for GPIO expansion is also not included.
M.2 SATA SSD Compatibility:
The M.2 SATA SSD expansion board supports M.2 SATA SSDs of lengths 2280, 2260, and 2242, with capacities up to 2TB. It does NOT support NVMe SSDs. Please ensure you use a compatible M.2 SATA SSD.
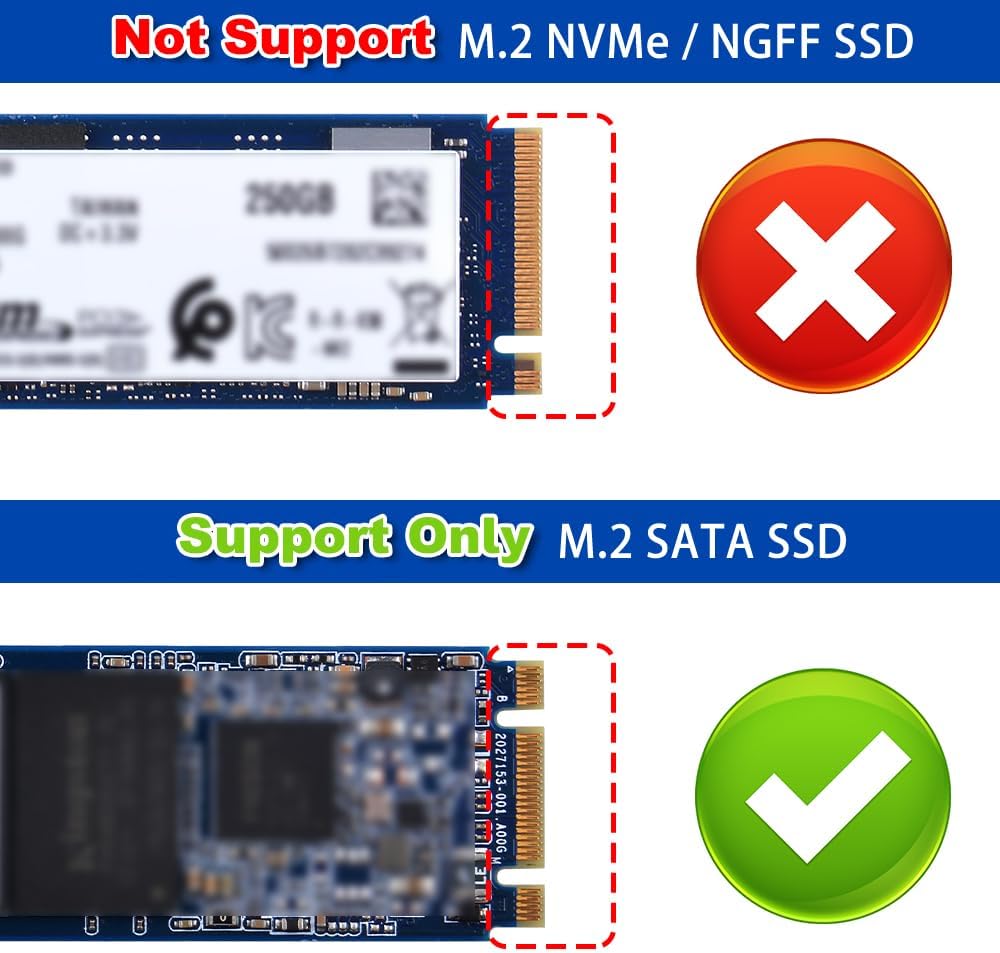
Image: Comparison showing M.2 NVMe SSD (not supported) and M.2 SATA SSD (supported) with their distinct keying.
Urratsez urratseko muntaketa:
- Install M.2 SATA SSD: Secure your M.2 SATA SSD onto the M.2 SATA SSD Shield.
- Install Thermal Pad: Apply the thermal pad to the CPU of your Raspberry Pi 4 Model B.
- Attach ICE Tower Cooler Brackets: Fix the metal brackets of the Low Profile ICE Tower Cooler using M2.5 screws.
- Mount ICE Tower Cooler: Fix the ICE Tower Cooler to the Raspberry Pi with the provided copper pillars.
- Assemble Raspberry Pi and SSD Expansion: Fix the Raspberry Pi board and the HDD Expansion Board (M.2 SATA SSD Shield) together onto the black base of the case using four screws.
- Konektatu haizagailuaren kablea: Connect the fan cable to the OLED driver board.
- Connect OLED Cable and GPIO: Insert the white plug of the OLED screen cable into the side jack of the driver board. Connect the female header of the GPIO pin of the Raspberry Pi in the direction shown in the figure. The red wire indicates the 5V pin; ensure correct orientation.
- Konektatu USB egokitzailea: Connect the USB adapter from the Raspberry Pi USB 3.0 port to the SSD adapter board. This USB dongle facilitates data transfer between the Raspberry Pi and the SSD.
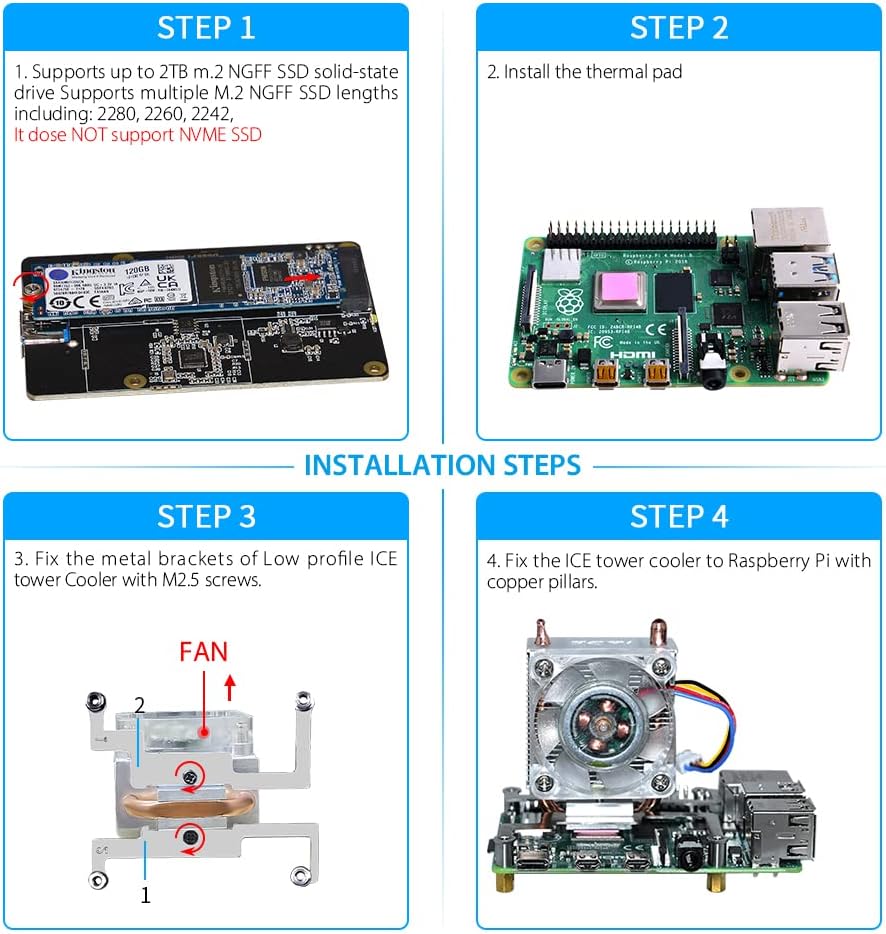
Image: Visual guide for installation steps 1 through 4, showing SSD installation, thermal pad placement, and cooler bracket/cooler mounting.

Image: Visual guide for installation steps 5 through 8, detailing the assembly of the main boards, fan connection, OLED/GPIO connection, and USB adapter connection.

Image: Diagram illustrating the front side components including the ICE-Tower CPU Cooling Fan, M.2 NGFF SATA SSD Shield, USB-C Power Supply Port, Micro HDMI Ports, Audio Port, and Raspberry Pi 4B (not included).

Image: The ABS Mini Tower Case, highlighting the transparent acrylic side and the ample space for the SD card.

Image: The GPIO Edge Expansion Board connected to the Raspberry Pi, demonstrating how the 40-pin GPIO can be extended.
Funtzionamendu-argibideak
Piztea:
Once assembled, connect a compatible USB-C power supply to your Raspberry Pi. The system should boot up.
ICE Tower Cooler and RGB Fan:
The ICE Tower Cooler provides efficient heat dissipation with its 24 aluminum fins and 5mm copper pipe. The PWM RGB fan offers customizable cooling and aesthetic lighting.

Image: The ICE Tower Cooler installed, showing the 5mm copper tube and fan, illustrating its cooling capability.
Note: The RGB light in the fan and the mood light will not illuminate, and the OLED display will not show information until the necessary drivers are installed and enabled. Refer to the Troubleshooting section and the official GeeekPi wiki for driver installation instructions.
0.96 hazbeteko OLED pantaila:
The OLED display, pre-mounted on the case, can be programmed to show various system information. This includes the Raspberry Pi's IP address, CPU temperature, disk utilization, CPU load, memory status, network card traffic, and other system details. You can customize the displayed content through programming.

Image: The 0.96-inch OLED display showing system information such as IP address, temperature, memory usage, and disk usage.
M.2 SATA SSD Usage:
The M.2 SATA SSD expansion board allows for significant mass storage expansion. It supports booting from the SSD, which can improve system performance. Ensure your Raspberry Pi's boot configuration is set to boot from USB (which the SSD is connected via) if you intend to use the SSD as the primary boot device.
Mantentzea
- Garbiketa: Periodically clean the fan and heatsink to prevent dust buildup, which can impede cooling performance. Use compressed air or a soft brush.
- Kasuen Arreta: Wipe the ABS and acrylic surfaces with a soft, damp oihal. Saihestu garbitzaile urratzaileak.
- Ingurumen-baldintzak: Operate the kit in a well-ventilated area, away from direct sunlight, excessive heat, and moisture.
- Kableen kudeaketa: Ensure all cables are neatly routed and not obstructing airflow or putting strain on connectors. The case includes internal cable management features.
Arazoak konpontzea
Fan RGB Lights or OLED Display Not Working:
Arazoa: The RGB lights on the fan are not illuminating, or the OLED display is blank.
Irtenbidea: This is typically due to missing drivers or incorrect software configuration. You must install the necessary drivers and enable the features through software. Refer to the official GeeekPi wiki for detailed instructions and scripts:
- GeeekPi Wiki: wiki.52pi.com/index.php?title=ZP-0130-4wire
Ensure you follow the steps carefully, including any dependencies mentioned in the documentation.
SSD Boot Issues:
Arazoa: Raspberry Pi fails to boot from the M.2 SATA SSD, or encounters errors like "USB device XX: failed to read filesystem."
Irtenbidea:
- Verify SSD Type: Confirm that your SSD is an M.2 SATA SSD, not an NVMe SSD. The kit does not support NVMe.
- Egiaztatu USB konexioa: Ensure the USB 3.0 dongle connecting the Raspberry Pi to the SSD adapter board is securely seated at both ends.
- Raspberry Pi Bootloader: Ensure your Raspberry Pi's bootloader is updated and configured to boot from USB. This is essential for booting from an external SSD.
- OS Installation: Verify that the operating system is correctly installed and configured on the M.2 SATA SSD.
- Elikatze-iturria: Ensure you are using an adequate power supply for your Raspberry Pi, especially when using an SSD, as it draws additional power.
General Connectivity Problems:
Arazoa: Peripherals or network connections are unstable.
Irtenbidea:
- Egiaztatu kableak: Ensure all cables (HDMI, Ethernet, USB peripherals) are firmly connected.
- Potentzia-zikloa: Try restarting the Raspberry Pi.
- Software eguneraketak: Ensure your Raspberry Pi OS is up to date.
Zehaztapenak
| Marka | GeekPi |
| Ereduaren izena | Mini Tower NAS Kit |
| Kasu mota | Dorrea |
| Materiala | Akrilonitrilo Butadieno Estirenoa (ABS) |
| Kolorea | Beltza |
| Hozteko metodoa | Air (ICE Tower Cooler with PWM RGB Fan) |
| M.2 SSD Support | M.2 SATA SSD (2280/2260/2242), up to 2TB. Does NOT support NVMe SSD. |
| Bistaratzea | 0.96-inch OLED Display (I2C protocol) |
| GPIO Hedapena | GPIO 1 to 2 Edge Expansion Board |
| Elementuaren pisua | 13.1 ontza |
| Paketearen neurriak | 5.12 x 4.96 x 3.11 hazbete |
Bermea eta Laguntza
Bermearen informazioa:
Specific warranty details for this product may vary. Please refer to your purchase documentation or contact GeeekPi directly for warranty terms and conditions.
Laguntza teknikoa:
For further technical assistance, detailed guides, and community support, please visit the official GeeekPi resources:
- GeeekPi Official Store: Amazon GeeekPi Store
- GeeekPi Wiki for ZP-0130-4wire: wiki.52pi.com/index.php?title=ZP-0130-4wire
The GeeekPi team is dedicated to providing support for their products and assisting users with their projects.


