1. Sarrera
This manual provides detailed instructions for the installation, operation, and maintenance of your SANSCO 8-channel 2K Home Security Camera System. This system is designed to provide comprehensive surveillance for your home or business, featuring 2MP HD cameras, an 8-channel DVR with a pre-installed 3TB hard drive, and remote access capabilities. Please read this manual thoroughly before setup and use to ensure proper functionality and safety.
2. Paketearen edukia
Egiaztatu behean zerrendatutako elementu guztiak zure paketean sartuta daudela. Elementuren bat falta bada edo hondatuta badago, jarri harremanetan bezeroarentzako arreta-zerbitzuarekin.
- 1x DVR (Digital Video Recorder) with 3TB Hard Disk Drive preinstalled
- 8x HD Cameras (2MP)
- 8x 18.3m (60ft) Coaxial Cables for cameras
- 8x Screw sets for camera mounting
- 3x korronte-egokigailuak
- 2x 4-way power splitters
- 1x 1M Ethernet cable
- 1x USB sagua
- 1x Konfigurazio Bizkorreko Gida

3. Konfigurazioa
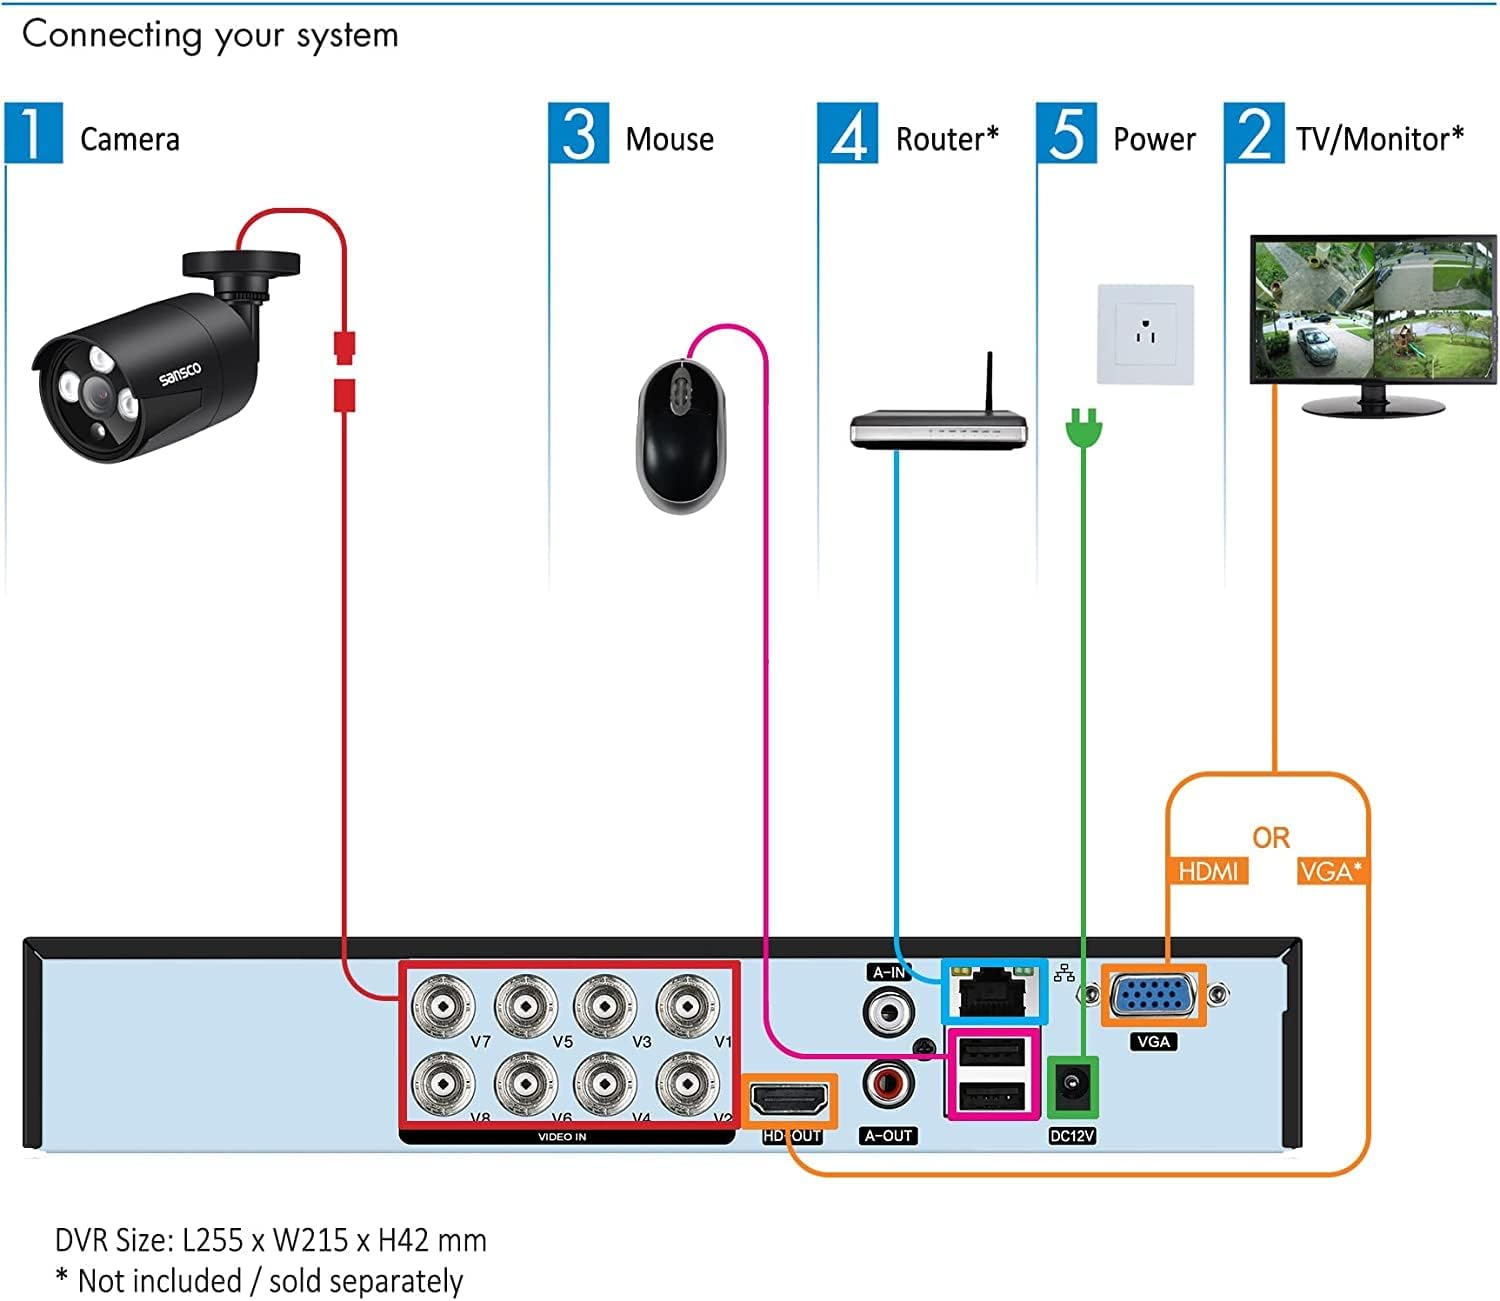
3.1 Connecting Your System
Follow these steps to connect the main components of your security system:
- Konektatu kamerak: Attach each camera to the DVR using the provided coaxial cables. Connect the BNC connector from the camera cable to the 'VIDEO IN' ports (V1-V8) on the back of the DVR.
- Potentzia kamerak: Use the 4-way power splitters and power adapters to supply power to the cameras. Connect the power cables from the cameras to the splitter, and then connect the splitter to a power adapter, which plugs into a wall outlet.
- Connect Monitor/TV: Connect the DVR to a monitor or TV using either an HDMI cable (for HD display) or a VGA cable. Ensure your display device supports at least 1080p resolution for optimal viewing.
- Sagua konektatu: Nabigatzeko, konektatu USB sagua DVRko USB ataka batean.
- Sarera konektatu (aukerakoa): For remote access features, connect the DVR to your router using the provided Ethernet cable.
- Potentzia DVR: Connect the DVR's power adapter to the DVR and then to a wall outlet.
3.2 Hasierako piztea eta konfigurazioa
After connecting all components, power on the DVR. The system will boot up and display the live view from your cameras on the connected monitor. Follow the on-screen prompts for initial setup, which may include setting the date/time, creating a password, and configuring network settings.
4. Funtzionamendu-argibideak
4.1 Bizi View eta Grabaketa
Once the system is powered on, you will see the live video feeds from all connected cameras on your monitor. The DVR is pre-configured for 24/7 continuous recording to the 3TB hard drive. You can switch between single-camera view, kamera anitzeko sareta view, and other display modes using the DVR's interface and mouse.

4.2 Remote Access (Mobile App/PC Client)
To access your security system remotely via smartphone, tablet, or computer, ensure the DVR is connected to your network. Download the official mobile application (TSEye or XVRView) from your device's app store or the PC client software from the SANSCO website. Follow the in-app instructions to add your DVR using its unique ID or QR code. This allows you to view live feeds, playback recordings, and receive alerts from anywhere with an internet connection.

4.3 Mugimenduaren detekzioa eta alertak
The system supports smart motion detection. You can configure specific areas within each camera's view to trigger alerts. When motion is detected, the system can send instant push notifications to your smartphone or tablet, and/or email alerts. This feature helps you stay informed of any activity on your property. Adjust sensitivity and define detection zones to minimize false alarms.

4.4 Erreprodukzioa eta babeskopia
Berrizview foo grabatuatage, navigate to the playback menu on the DVR interface or through the remote access app. You can search for recordings by date, time, or event (e.g., motion detection). The 3TB hard drive provides approximately 2 weeks of continuous recording for all 8 cameras in FHD 1080p before overwriting the oldest footage. For long-term storage, you can back up important video clips to a USB drive connected to the DVR.

5. Mantentzea
5.1 Disko gogorraren kudeaketa
The pre-installed 3TB hard drive is designed for 24/7 security recording. It automatically overwrites the oldest footage once full, ensuring continuous recording. Regularly check the hard drive status through the DVR's system settings to ensure it is functioning correctly.
5.2 Kameraren zaintza
The outdoor cameras are weatherproof. Periodically clean the camera lenses with a soft, damp zapi bat hautsa, zikinkeria edo ur orbanak kentzeko, oztopatu dezaketenak view. Ensure that the camera mounts are secure and that cables are not damaged. For outdoor installations, it is recommended to seal the cable connections (BNC and power) with waterproof tape or sealant to prevent moisture ingress, as these connections are not inherently waterproof.

6. Arazoak
If you encounter issues with your security system, refer to the following common problems and solutions:
- No Video Signal on Monitor:
Ensure the HDMI or VGA cable is securely connected between the DVR and the monitor. Verify that the monitor is powered on and set to the correct input source. Check if the DVR is powered on. Ensure your monitor has a resolution of at least 1080p; lower resolutions may not display the DVR interface correctly. - Cameras Not Displaying Video:
Check that each camera is properly connected to the DVR's 'VIDEO IN' port. Verify that all cameras are receiving power via the power adapters and splitters. Inspect coaxial cables for any damage or loose connections. - No Audio Recording/Playback:
The cameras in this system do not have built-in microphones or speakers. To enable audio, external microphones must be connected to the DVR's 'AUDIO IN' ports and an external speaker to the 'AUDIO OUT' port (Mic & Speaker are not provided). - Urruneko sarbidea ez dabil:
Confirm that the DVR is connected to your router via the Ethernet cable and has a stable internet connection. Check your router's settings to ensure the DVR is assigned an IP address. Verify that the mobile app or PC client is correctly configured with the DVR's ID and network settings. - Maiz gertatzen diren mugimendu faltsuen alertak:
Adjust the motion detection sensitivity settings for each camera through the DVR interface. Utilize the motion detectionErlazionatutako dokumentuak - 8508+8x8699(3TB)+CA03

SANSCO CCTV DVR User Manual: Features, Installation, and Operation Guide
Comprehensive user manual for the SANSCO CCTV DVR (Digital Video Recorder) covering product overview, main features, hardware installation, basic operations, menu navigation, recording, playback, alarm functions, system settings, and FAQs. Learn how to set up and use your SANSCO DVR for effective surveillance.
Sansco DVR Konfigurazio Azkarreko Gida eta Erabiltzailearen Eskuliburua
Gida honek Sansco DVR zaintza sistema bat konfiguratzeko eta erabiltzeko argibideak eskaintzen ditu, hasierako konexioa, sistemaren konfigurazioa, mugikorra... viewXMEYE aplikazioaren bidez, eta maiz egiten diren galderei erantzunak.
Sansco Wi-Fi Camera System Quick Setup Guide
Comprehensive quick setup guide for the Sansco Wi-Fi Camera System (App: TSEye), covering installation, configuration, mobile app usage, and troubleshooting.
SANSCO NVR Quick Setup Guide: Installation, Configuration, and Usage
This SANSCO NVR quick setup guide provides essential steps for installing and configuring your surveillance system. Learn about network connectivity, mobile viewing, recording setup, and troubleshooting for your SANSCO CCTV solution.
Sansco EseeCloud Battery Operated Security Camera QS13 Quick Setup Guide
A quick setup guide for the Sansco EseeCloud Battery Operated Security Camera, model QS13. This guide covers installation, app setup, live view, playback, push alerts, solar panel tips, and frequently asked questions.
Sansco EseeCloud Battery Operated Security Camera QS17 Quick Setup Guide
A quick setup guide for the Sansco EseeCloud Battery Operated Security Camera (Model: QS17). This guide covers before installation, tech support, FCC notices, app setup for remote viewing, device addition, live view and playback, push alerts, solar panel installation tips, and FAQs.