Sarrera
Thank you for choosing the Montech AIR 903 Base E-ATX Mid Tower Case. This manual provides detailed instructions for setting up, operating, maintaining, and troubleshooting your new PC case. Designed for high airflow and maximum capacity, the AIR 903 Base ensures superior thermal performance for your components, including support for large GPUs and extensive cooling solutions.

Figure 1: Montech AIR 903 Base E-ATX Mid Tower Case, showcasing its high airflow mesh front and spacious interior.
Ezaugarri nagusiak
- Aire-fluxu handiko diseinua: Innovative metal front panel with 51% ventilation rate for optimal cooling performance.
- Mantentze erraza: Meticulously designed mesh front panel acts as a dust filter and is easily detachable for cleaning.
- Aurrez instalatutako zaleak: Includes 3 x 140mm PWM fans for efficient cooling.
- Hozte-laguntza zabala: Accommodates 360mm AIO coolers at both the front and top, with 180mm height clearance for CPU tower coolers.
- Broad Component Compatibility: Supports graphics cards up to 400mm in length and 190mm in width, including NVIDIA GeForce RTX 40 series GPUs.
- Beira tenplatuko alboko panela: Argi bat ematen du view zure barne osagaien.
- Konektibitate modernoa: Features Type-C and USB 3.0 ports on the front I/O.
Konfigurazio Gida
1. Deskargatzea
Carefully remove the case from its packaging. Inspect the case for any signs of damage during transit. Retain the packaging for future transportation or storage.
2. Osagaia baino gehiagoview
Familiarize yourself with the internal layout of the case. The Montech AIR 903 Base features a spacious interior designed for easy installation and optimal cable management.

Figure 2: Internal layout of the Montech AIR 903 Base, highlighting component mounting areas.
3. Plaka amaren instalazioa
The case supports E-ATX, ATX, Micro-ATX, and Mini-ITX motherboards. Install the necessary standoffs for your motherboard form factor. Carefully align your motherboard with the standoffs and I/O shield, then secure it with screws.
4. Elikatze-horniduraren instalazioa
Install your ATX power supply into the dedicated compartment at the bottom rear of the case. Ensure the PSU fan faces the bottom ventilation cutout for optimal airflow. Secure the PSU with screws from the rear of the case.
5. Biltegiratze unitatearen instalazioa
The case provides mounting points for 2.5" SSDs and 3.5" HDDs. Locate the drive cages or mounting brackets and secure your storage devices using the provided screws or tool-less mechanisms.
6. Txartel grafikoen instalazioa
Remove the necessary expansion slot covers at the rear of the case. Insert your graphics card into the PCIe slot on your motherboard and secure it with the retention clip and screw. The case supports GPUs up to 400mm in length.
7. Kableen kudeaketa
Utilize the cable routing cutouts and tie-down points behind the motherboard tray to manage your cables. This improves airflow and gives your build a cleaner appearance.
Funtzionamendua
1. Piztea
After connecting all components and external peripherals, press the power button located on the top I/O panel to power on your system. Ensure all power cables are securely connected.
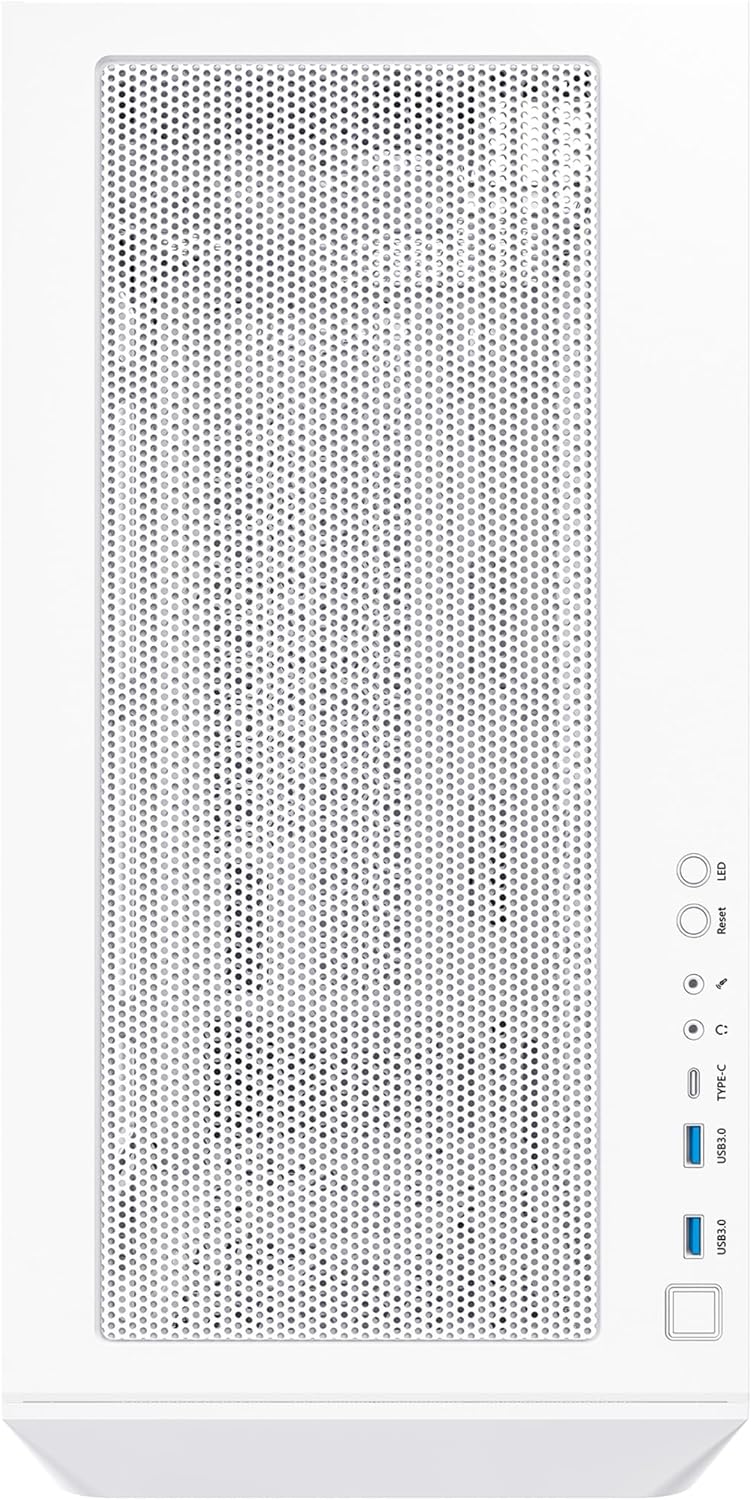
Figure 3: Top I/O panel with power button, USB 3.0, and Type-C ports.
2. Fan Kontrola
The pre-installed 140mm PWM fans can be controlled via your motherboard's fan headers and BIOS settings, allowing for dynamic speed adjustments based on system temperatures. If your model includes ARGB fans, connect them to a compatible ARGB header on your motherboard or a dedicated controller for lighting effects.
Mantentzea
1. Garbiketa
Regular cleaning is essential to maintain optimal airflow and prevent dust buildup. The mesh front panel and top filter are designed for easy removal and cleaning. Gently detach them and use compressed air or a soft brush to remove accumulated dust. Clean the interior of the case periodically with compressed air.

Figure 4: Detachable mesh front panel for convenient dust filter cleaning.
2. Aire-fluxuaren optimizazioa
Ensure that all case fans are oriented correctly to create a positive or neutral airflow pressure inside the case, pushing cool air in and exhausting hot air out. Avoid obstructing ventilation openings.
Arazoak konpontzea
- Potentziarik gabe:
Irtenbidea: Check all power connections, including the PSU to the wall outlet, the 24-pin ATX cable, and the 8-pin CPU power cable to the motherboard. Ensure the power button header is correctly connected to the motherboard. - Haizagailuak ez dira biratzen:
Irtenbidea: Verify that fan cables are securely connected to the motherboard fan headers. Check BIOS settings to ensure fan control is enabled and not set to 0 RPM. - Overheating Components:
Irtenbidea: Ensure proper fan orientation for optimal airflow. Clean dust filters and internal components. Verify CPU cooler and GPU cooler are properly seated and functioning. - Aurreko S/I atakak ez dira funtzionatzen:
Irtenbidea: Check that the USB and audio headers from the case are correctly connected to the corresponding pins on your motherboard.
Zehaztapen Teknikoak
| Kategoria | Xehetasuna |
|---|---|
| Eredua | AIR903BASEW |
| Kasu mota | Mid dorrea |
| Kolorea | Base White |
| Materiala | Tempered Glass, Metal |
| Produktuaren neurriak (LxWxH) | 19.69 x 19.69 x 11.02 hazbete (500 x 500 x 280 mm) |
| Elementuaren pisua | 18.39 libra (8.34 kg) |
| Plaka amaren bateragarritasuna | E-ATX, ATX, Mikro-ATX, Mini-ITX |
| Zabaltzeko Slots | 7 |
| Aurrez instalatutako zaleak | 3 x 140 mm-ko PWM haizagailuak |
| Erradiadorearen euskarria | Aurrealdea: Gehienez 360 mm; Goialdea: Gehienez 360 mm |
| GPU sakea | Up to 400mm (length), 190mm (width) |
| CPU hozkailuaren altuera-tartea | Gehienez 180 mm |
| Aurreko I / O Portuak | 2 x USB 3.0, 2 x USB 2.0, 1 x Type-C, Audio In/Out |

Figure 5: Montech AIR 903 Base case dimensions.
Bermea eta Laguntza
Montech products are manufactured to the highest quality standards. For specific warranty terms and conditions, please refer to the warranty information provided with your purchase or visit the official Montech website. If you encounter any issues or require technical assistance, please contact Montech customer support through their official channels.
Note: This manual is intended as a guide. Specifications and features may be subject to change without prior notice.


