1. Sarrera
This manual provides detailed instructions for the installation, operation, and maintenance of your Diamond Audio DMD600.4D 4-Channel Digital Amplifier. Please read this manual thoroughly before attempting installation or operation to ensure proper use and to prevent damage to the unit or connected components. Keep this manual for future reference.
2. Segurtasun-argibideak
Jarraitu segurtasun neurri hauek lesioak edo kalteak saihesteko:
- Energia iturria: Konektatu ampLikidatzailea 12V-ko korronte zuzeneko lurrerako sistema elektriko negatibo batera soilik.
- Kableatua: Ensure all wiring is correctly connected and insulated to prevent short circuits. Use appropriate gauge wires for power and ground connections.
- Muntaketa: Muntatu ampGorde likidorea ondo aireztatutako leku batean, hezetasunetik eta gehiegizko berotik babestuta.
- Bolumen mailak: Bolumen maila altuen eraginpean denbora luzez egoteak entzumen kalteak eragin ditzake. Doitu bolumena arduraz.
- Instalazio profesionala: Instalazioaren edozein alderdiri buruz ziur ez bazaude, kontsultatu profesional kualifikatu bati.
3. Paketearen edukia
Egiaztatu elementu guztiak paketean daudela:
- Diamond Audio DMD600.4D Ampbiziagoa
- Muntatzeko hardwarea (torlojuak, arandelak)
- Erabiltzailearen eskuliburua (dokumentu hau)
4. Produktuaren ezaugarriak
The Diamond Audio DMD600.4D amplifier-ek honako ezaugarri nagusi hauek eskaintzen ditu:
- 800W RMS power output.
- 4-channel configuration, suitable for various audio setups.
- Waterproof design for marine and motorsport applications.
- Tamaina trinkoa instalazio malgu baterako.
- Eraikuntza iraunkorra iraupen luzeko errendimendurako.
5. Konfigurazioa eta instalazioa
Instalazio egokia ezinbestekoa da errendimendu eta segurtasun optimoa lortzeko. Jarraitu urrats hauek arretaz.
5.1 Muntaketa Ampbiziagoa
- Choose a mounting location that is dry, well-ventilated, and secure. Avoid areas exposed to direct sunlight or excessive heat.
- Erabili amplifier as a template to mark the mounting screw locations.
- Drill pilot holes if necessary, ensuring not to damage any vehicle components behind the mounting surface.
- Ziurtatu amplifatzailea emandako muntatzeko hardwarea erabiliz.
5.2 Kableatutako konexioak
Refer to the diagrams below for proper wiring connections. Ensure the vehicle's battery is disconnected before making any power connections.
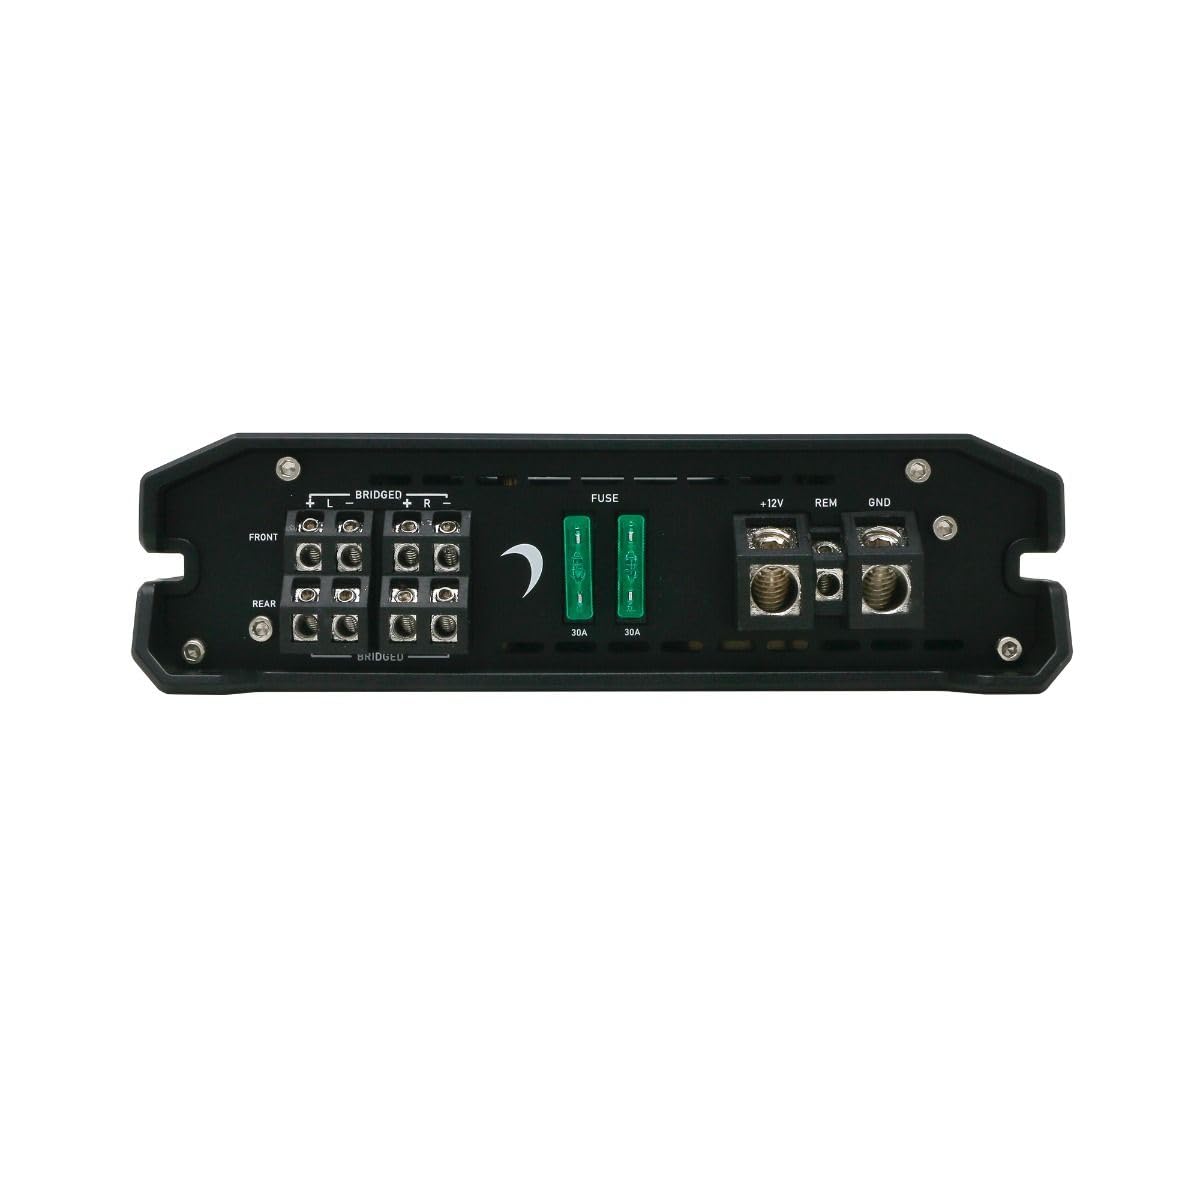
1. irudia: Rear panel connections for power, ground, remote, and speaker outputs.
- Energia (B+ / +12V): Connect a suitable gauge power cable directly from the positive terminal of the vehicle's battery to the +12V terminal on the amplifier. Install an in-line fuse (not supplied) within 18 inches of the battery.
- Lurra (GND): Connect a suitable gauge ground cable from the GND terminal on the ampIbilgailuaren xasisaren gainazal metaliko garbi eta margotu gabe batera konektatu kablea. Ziurtatu konexio sendo eta erresistentzia baxukoa dela.
- Urruneko (REM): Konektatu urrutiko pizte-kable bat zure unitate nagusiaren urrutiko irteeratik REM terminalera. amplififikatzailea. Hari honek pizten du amppiztu eta itzali lifatzailea unitate nagusiarekin.
- Bozgorailuaren irteerak: Connect your speakers to the designated speaker terminals (FRONT L/R, REAR L/R). Observe correct polarity (+ to + and - to -). For bridged mode, refer to the specific bridging instructions on the amplifier or in the specifications section.
- RCA sarrerak: Konektatu RCA kableak zure unitate nagusiaren aurre-konexiotik.amp outputs to the FRONT and REAR RCA input jacks on the ampbiziagoa.

2. irudia: Front panel with RCA inputs and audio control adjustments.
6. Funtzionamendu-argibideak
Behin instalatuta, egokitu ampLififier ezarpenak audio errendimendu optimoa lortzeko.
6.1 Hasierako konfigurazioa eta doikuntzak
The DMD600.4D features various controls for fine-tuning your audio system:
- GAIN Kontrola: Sarrerako sentsibilitatea doitzen du amplifier to match the output of your head unit. Start with the gain at minimum and slowly increase until desired volume is achieved without distortion.
- X-OVER (Crossover) Control: Allows you to set the frequency range that the amplifier sends to your speakers.
- HPF (Pasa handiko iragazkia): Allows frequencies above the set point to pass through. Useful for full-range speakers to prevent low-frequency distortion.
- LPF (pasa baxuko iragazkia): Ezarritako puntuaren azpiko maiztasunak igarotzen uzten ditu. Normalean subwooferretarako erabiltzen da.
- MODU etengailua: Selects the operating mode (e.g., 2-channel, 4-channel, bridged). Refer to the specific markings on the amplifier for available modes.
Garrantzitsua: Make adjustments incrementally and listen for clarity. Over-driving the amplifier or speakers can cause damage.
7. Mantentzea
The Diamond Audio DMD600.4D ampLifizer-ek mantentze-lan minimoa behar du epe luzeko errendimendua bermatzeko.
- Garbiketa: Aldian-aldian garbitu ampGarbitu garbigailuaren kanpoaldea oihal leun eta lehor batekin. Ez erabili produktu kimiko gogorrik edo garbitzaile urratzailerik.
- Aireztapena: Ziurtatu hori ampBeroa behar bezala xahutzen laguntzeko, hozte-hegatsak hautsik eta hondakinik gabe daude.
- Konexioak: Noizean behin egiaztatu kableatu-konexio guztiak estua eta korrosioa duten ikusteko. Konexio solteek errendimendu eskasa edo kalteak eragin ditzakete.
8. Arazoak
Zurearekin arazoak badituzu amplifier, consult the following table before seeking professional service.
| Arazoa | Kausa posiblea | Irtenbidea |
|---|---|---|
| Argirik ez / AmpLifizer-a ez da pizten | Fusible erreta; Elikatze/lurrera/urruneko agintearen kable askatua; Urrutiko agintearen pizteko seinalea akastuna. | Check in-line fuse and amplifier fuses; Verify all power, ground, and remote connections are secure; Test remote wire for 12V signal. |
| Audio-irteerarik ez | RCA kableak solteak; Irabazi-ezarpen okerra; Bozgorailuen kableak deskonektatuta; Ampbabes-moduan dagoen argitzailea. | Check RCA connections; Adjust gain; Verify speaker wiring; Check for short circuits in speaker wiring. |
| Soinu distortsionatua | Gain set too high; Incorrect crossover settings; Damaged speakers. | Reduce gain; Adjust crossover settings; Inspect speakers for damage. |
| AmpLifter gehiegi berotzea | Insufficient ventilation; Impedance too low; Prolonged high volume. | Ziurtatu aireztapen egokia inguruan amplifier; Verify speaker impedance matches amplifier specifications; Reduce volume. |
9. Zehaztapenak
Technical specifications for the Diamond Audio DMD600.4D Ampbiziagoa:
| Ezaugarri | Xehetasuna |
|---|---|
| Modelo zenbakia | DMD600.4D |
| Marka | Diamante Audioa |
| Kanal kopurua | 4 |
| Irteera Potentzia | 800 watt (RMS) |
| Muntatze Mota | Gainazaleko muntaia |
| Paketearen neurriak | 9 x 9 x 4 hazbete |
| Pisua | 4 kilo |
10. Bermea eta Laguntza
Diamond Audio products are designed and manufactured to the highest quality standards. This product is covered by a limited warranty against defects in materials and workmanship. For specific warranty terms, duration, and claim procedures, please refer to the warranty card included with your product or visit the official Diamond Audio webgunea.
For technical support or service inquiries, please contact Diamond Audio customer service through their official channels. Do not attempt to repair the amplifier yourself, as this may void your warranty.


