1. Segurtasun informazio garrantzitsua
Please read and understand all instructions before installing or operating this fixture. Failure to follow these instructions may result in electric shock, fire, or other hazards that could cause personal injury or property damage.
- OHARRA: Deskarga elektrikoaren arriskua. Deskonektatu fusible edo etengailu elektrikotik instalazioa edo mantentze-lanak egin aurretik.
- OHARRA: Risk of fire. Keep combustible materials away from the lamp.
- This fixture is intended for indoor use only. Do not use in wet locations or where directly exposed to water.
- Ziurtatu hornidura boltage is compatible with the fixture's requirements (120V-277V).
- All wiring connections must be made in accordance with local and national electrical codes. If you are unsure about wiring, consult a qualified electrician.
- Ez saiatu aparatua aldatzen edo desmuntatzen. Barruan ez dago erabiltzaileak konpondu dezakeen piezarik.
2. Zer dago kutxan
Instalazioa hasi aurretik, egiaztatu osagai guztiak daudela:
- LED Shop Light Fixture(s)
- Muntatzeko hardwarea (torlojuak, aingurak)
- Linking Cables (1.5" and 8" for daisy-chaining)
- Hari intxaurrak
3. Zehaztapenak
| Ezaugarri | Zehaztapena |
|---|---|
| Marka | Sunco Argiztapena |
| Ereduaren izena | LED Shop Light, 4ft Wraparound, Prismatic Lens, 8.5 Inch |
| Neurriak (L x W x H) | 48"L x 8.58"Z x 2.56"A |
| Wattage | 60 Watt |
| Distira | 7200 lumen |
| Eraginkortasuna | 120 LM/W |
| Kolore Tenperatura (CCT) | Hautagarria: 4000K, 5000K, 6000K |
| liburukiatage | 120V-277V |
| Erregulagarria | Ez (Ez-Lausogarria) |
| Materiala | Alloy Steel, Polycarbonate |
| Muntatze Mota | Ceiling Mount (Flush Mount) |
| Ezaugarri bereziak | Linkable, Wide Beam Angle (110°) |
| Ziurtagiriak | ETL, FCC, RoHS |
| Batez besteko Bizitza | 50,000 ordu |
The fixture features a durable build with an impact-resistant prismatic lens for wide and consistent light dispersion.

This image illustrates key features including impact resistance, the prismatic lens design, non-dimmable functionality, and the wide voltage compatibility of 120-277V.
4. Konfigurazioa eta instalazioa
Follow these steps for proper installation. Ensure power is disconnected before starting.
4.1. Prestatu instalazioa
- Itzali energia: Locate the circuit breaker controlling the installation area and turn off the power.
- Remove Diffuser: Gently remove the prismatic diffuser from the lamp base to access the internal components.
- Hautatu kolore-tenperatura (CCT): Before mounting, locate the CCT switch inside the fixture. Select your desired color temperature (4000K, 5000K, or 6000K). This setting cannot be changed easily after installation.

This image shows the internal CCT switch, allowing selection between 4000K, 5000K, and 6000K before installation.
4.2. Elementua muntatzea
The fixture is designed for flush mounting to a ceiling or surface. It includes keyhole slots for easy installation.
- Markatu Muntatze Puntuak: Hold the fixture in the desired mounting location and mark the positions for the mounting screws. Ensure these align with a junction box or suitable support structure.
- Muntatzeko hardwarea instalatu: Drill pilot holes if necessary and install the provided mounting screws, leaving a small gap for the fixture to slide onto.
- Prestatu kableatua: If connecting to a junction box, knock out the appropriate punch hole on the fixture's housing.

This diagram illustrates the three main steps for installation: securing the housing, connecting electrical wires, and attaching the light fixture.
4.3. Konexio elektrikoa
- Konektatu kableak: Using the provided wire nuts, connect the fixture's wires to the supply wires: Live (black) to Live, Neutral (white) to Neutral, and Ground (yellow/green) to Ground. Ensure all connections are secure.
- Hari-zuloak: Carefully tuck all wires and wire nuts into the junction box or fixture housing.
4.4. Linking Multiple Fixtures (Daisy Chain)
This fixture supports daisy-chaining to extend lighting coverage. Use the provided linking cables.
- Connect Linking Cable: Insert one end of a linking cable into the designated port on the first fixture and the other end into the port on the next fixture.
- Konexio seguruak: Ensure linking cables are securely connected and properly routed.
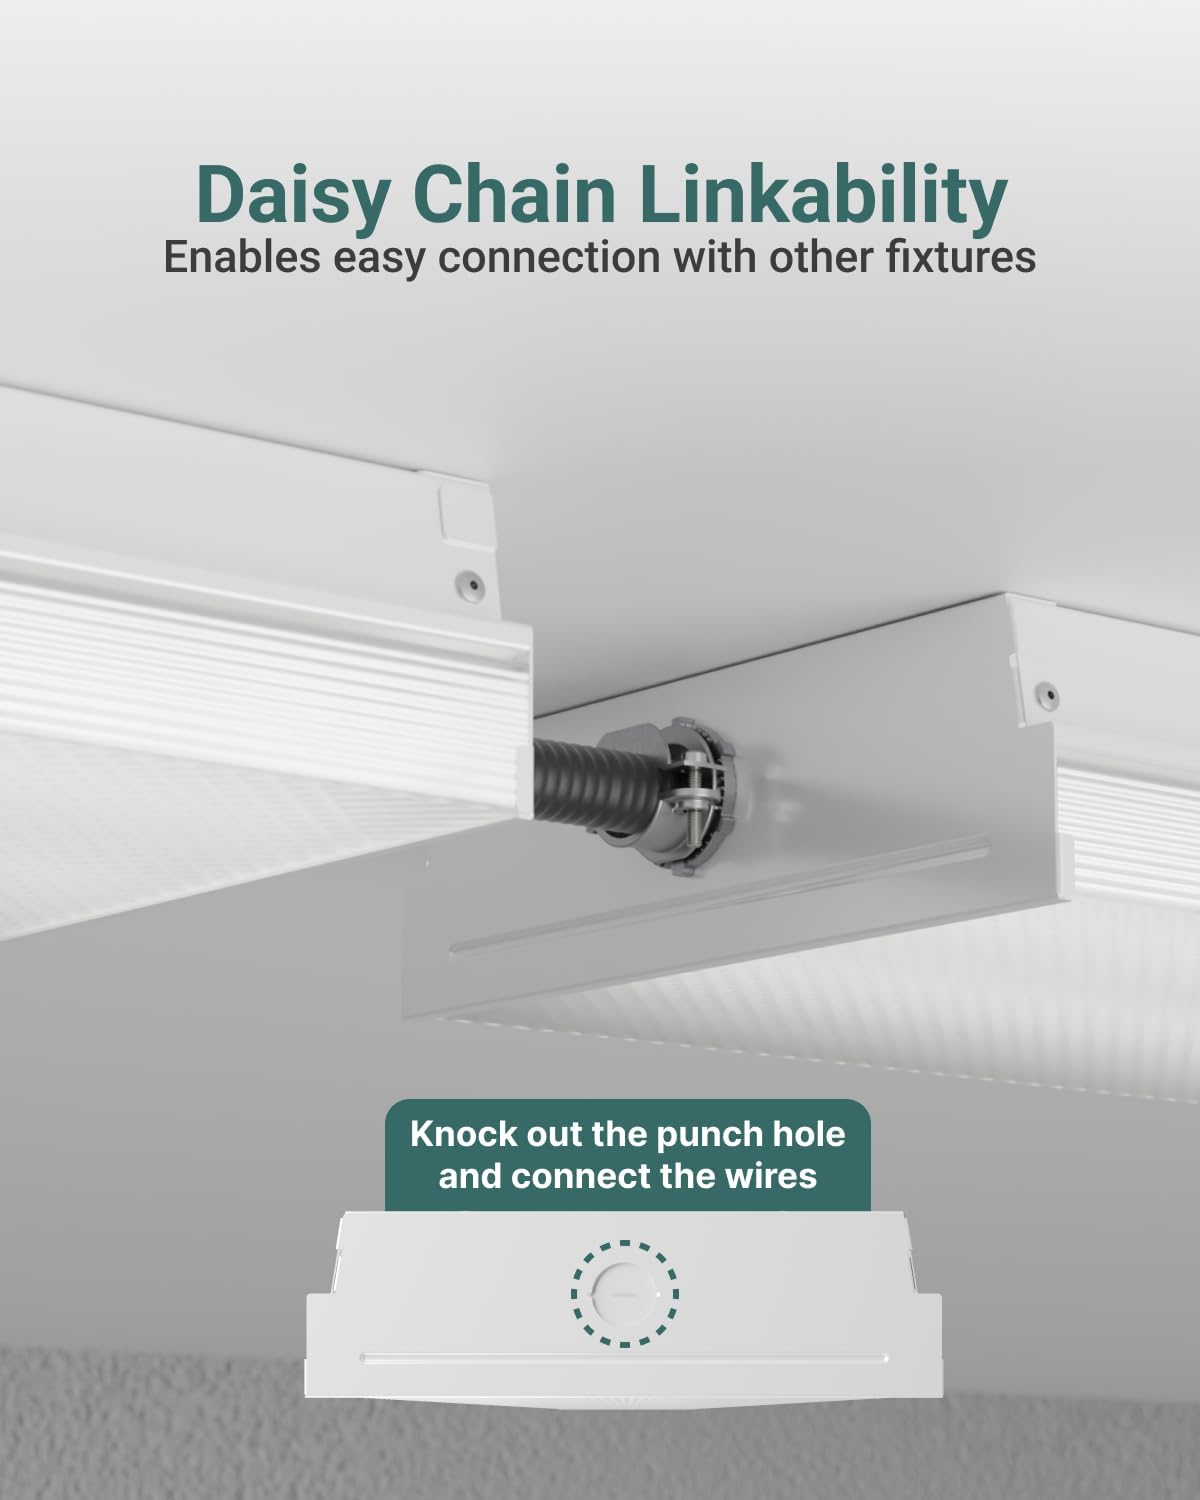
This image demonstrates how to daisy-chain multiple fixtures using the linking cables and highlights the knockout punch hole for electrical connections.
4.5. Azken urratsak
- Reattach Diffuser: Align one end of the diffuser with the aluminum base and push it into place until it snaps securely.
- Berrezarri boterea: Turn the circuit breaker back on to restore power to the fixture.
5. Funtzionamendu-argibideak
The Sunco Lighting LED Shop Light is designed for straightforward operation once installed.
5.1. Kolore Tenperaturaren Hautaketa (CCT)
This fixture features a selectable color temperature (CCT) switch, allowing you to choose between 4000K (Cool White), 5000K (Daylight), and 6000K (Bright White) to suit your preference or application. The CCT switch is located inside the fixture and must be set during installation before the diffuser is reattached.
- 4000K: Provides a neutral white light, suitable for offices or general workspaces.
- 5000K: Offers a bright, crisp daylight-like illumination, ideal for tasks requiring high visibility.
- 6000K: Delivers a very bright, cool white light, often preferred for industrial settings or areas needing maximum brightness.

This image displays the internal components and wiring, emphasizing the high efficiency of the LED fixture operating within a 120-277V range.
5.2. Piztu/Itzali
The fixture is non-dimmable and operates via a standard wall switch connected to its power supply. Simply toggle the wall switch to turn the light on or off.
6. Mantentzea
The Sunco Lighting LED Shop Light requires minimal maintenance. Always ensure power is disconnected before performing any maintenance.
- Garbiketa: Garbitu gailuaren kanpoaldea zapi leun, lehor edo apur bat lehor batekin.amp cloth. Do not use harsh chemicals or abrasive cleaners, as these can damage the finish or lens.
- Ikuskapena: Periodically inspect the fixture for any signs of damage, loose wiring, or wear. If any issues are found, disconnect power and consult a qualified electrician.
- Bonbilla ordezkatu beharrik ez: This fixture uses integrated LEDs, meaning there are no bulbs to replace. The LEDs are designed for a long lifespan of 50,000 hours.
7. Arazoak
If you experience issues with your LED Shop Light, refer to the following common troubleshooting steps:
- Argia ez da pizten:
- Egiaztatu etengailua piztuta dagoela ziurtatzeko.
- Verify all wire connections are secure and correct.
- Ziurtatu hormako etengailua ON posizioan dagoela.
- Argi-distirak:
- Confirm the fixture is not connected to a dimmer switch, as it is non-dimmable.
- Egiaztatu kable bidezko konexio solteak.
- Ziurtatu hornidura boltage egonkorra da eta zehaztutako tartearen barruan dago.
- Incorrect color temperature:
- The CCT switch must be set before installation. If the diffuser is already installed, carefully remove it to access and adjust the switch.
If these steps do not resolve the issue, contact Sunco Lighting customer support for assistance.
8. Bermea eta Laguntza
Sunco Lighting-ek bere produktuen kalitatea bermatzen du.
- Bermea: This product is backed by a 3-Year Warranty. Please refer to the official Sunco Lighting website or your purchase documentation for full warranty details and terms.
- Bezeroarentzako laguntza: For technical assistance, troubleshooting, or warranty claims, please contact Sunco Lighting customer support.