1. Sarrera
The MASTECH MS2109D is a precise and versatile 6000-count digital multimeter with True RMS capabilities, designed for comprehensive electrical diagnosis. It features a 23mm max jaw opening for clamp measurements, overload protection, and various functions including Diode/Continuity, NCV Detection, Backlight, Data Hold, and Auto Power Off. This manual provides detailed instructions for the safe and effective use of your MS2109D multimeter.
2. Segurtasun informazioa
Always observe safety precautions when using electrical testing equipment. Failure to do so may result in injury or damage to the meter or equipment under test.
- Ziurtatu neurgailua erabili aurretik funtzionamendu-egoera onean dagoela.
- Do not exceed the maximum input values for any function. The MS2109D is rated CAT III 600V.
- Kontuz ibili voltag30V AC RMS, 42V peak edo 60V DC-tik gorakoak. Bolumen hauektagshock arriskua dakar.
- Funtzioak aldatu aurretik, deskonektatu beti proba-kableak zirkuitutik.
- Do not operate the meter if the battery cover is not in place or if the meter appears damaged.
- Use only the specified type of batteries (1.5V AAA x 3).
3. Produktuaren ezaugarriak
- 6000 zenbaketa pantaila
- Egiazko RMS neurketa
- Frequency Measurement (up to 1000Hz)
- Neurketa erlatiboa
- LED / Flashlight for illumination
- Duty Cycle / Inrush Current Measurement
- Gainkargaren babesa
- Diodoaren eta jarraikortasunaren proba
- Kontaktu gabeko boltage (NCV) Detection / Live Wire Recognition
- Max Jaw Opening: 23mm
- Auto Power Off for battery saving
- Datuak gordetzeko funtzioa
- Backlight for easy reading in low light conditions
- Unitate bistaratzea
4. Osagaien eta piezen identifikazioa
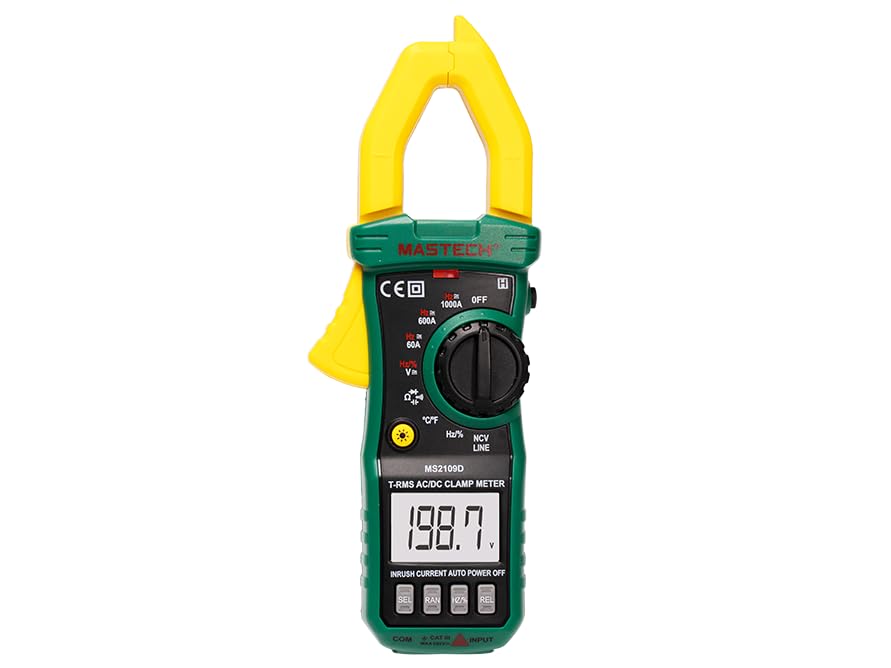
4.1. irudia: Aurrealdea view of the MASTECH MS2109D Digital Multimeter, showing the clamp jaw, display, rotary switch, and input terminals.
- Clamp Baraila: Kontakturik gabeko korronte alternoa/korronte zuzena neurtzeko erabiltzen da.
- LCD pantaila: Neurketa-irakurketak, unitateak eta funtzio-adierazleak erakusten ditu.
- Funtzio birakariaren etengailua: Nahi den neurketa-funtzioa hautatzen du.
- Funtzio-botoiak: Buttons for specific features like HOLD, SELECT, NCV, etc.
- Sarrerako Jackak: Terminals for connecting test leads (COM, VΩHz, A).
- Linterna/LED: Provides illumination for the measurement area.
5. Konfigurazioa
5.1 Bateriaren instalazioa
- Ziurtatu neurgailua itzalita dagoela.
- Bilatu bateriaren konpartimentua neurgailuaren atzealdean.
- Askatu bateriaren konpartimentuaren estalkia.
- Insert three 1.5V AAA batteries, observing the correct polarity (+/-) as indicated inside the compartment.
- Jarri bateriaren estalkia eta lotu torlojuarekin.
5.2 Proba-kableak konektatzea
- Bolumen gehienarentzattage, resistance, continuity, diode, frequency, and capacitance measurements, insert the black test lead into the 'COM' (common) jack and the red test lead into the 'VΩHz' jack.
- For current measurements using test leads (not clamp), refer to the specific current input jack (if available, typically 'A' or 'mA' for smaller currents). For the MS2109D, current is primarily measured via the clamp.
6. Funtzionamendu-argibideak
6.1 Piztu/Itzali
Turn the rotary switch from 'OFF' to any desired function to power on the meter. To power off, turn the rotary switch back to 'OFF'. The meter features Auto Power Off to conserve battery life after a period of inactivity.
6.2 DC/AC Voltage Neurketa (V)
- Set the rotary switch to the 'V' position. Use the 'SELECT' button to toggle between DCV and ACV if necessary.
- Connect the black test lead to the 'COM' jack and the red test lead to the 'VΩHz' jack.
- Connect the test probes in parallel to the circuit or component to be measured.
- Irakurri liburukiatagPantailako balioa.
6.3 AC/DC Current Measurement (A) - Clamp Funtzioa
- Set the rotary switch to the 'A' position (60A, 600A, or 1000A range). Use the 'SELECT' button to toggle between DCA and ACA.
- Ireki clamp masailezurra abiarazlea sakatuz.
- Zirkuituko eroale bakarra sartu cl-aren barruanamp masailezurra. Ziurtatu masailezurra guztiz itxita dagoela.
- Irakurri uneko balioa pantailan.
6.4 Erresistentziaren neurketa (Ω)
- Ezarri biraketa-etengailua 'Ω' posizioan.
- Konektatu proba-kable beltza 'COM'-era eta proba-kable gorria 'VΩHz'-era.
- Ensure the circuit or component is de-energized before connecting the probes.
- Konektatu proba-zundak neurtu beharreko osagaira.
- Irakurri erresistentziaren balioa pantailan.
6.5 Diodo eta jarraitutasun proba
- Set the rotary switch to the 'Diode/Continuity' position. Use 'SELECT' to toggle between functions.
- Konektatu proba-kable beltza 'COM'-era eta proba-kable gorria 'VΩHz'-era.
- For Continuity: Connect probes across the circuit. A continuous beep indicates continuity (low resistance).
- Diodoen proba egiteko: Konektatu zunda gorria anodora eta zunda beltza diodoaren katodora. Pantailak aurreranzko bolumena erakutsiko du.tage drop. Reverse the probes; an open circuit (OL) reading indicates a good diode.
6.6 Frequency (Hz) and Capacitance (F) Measurement
- Set the rotary switch to the 'Hz/%' or 'Capacitance' position. Use 'SELECT' to toggle if combined.
- Konektatu proba-kable beltza 'COM'-era eta proba-kable gorria 'VΩHz'-era.
- For Capacitance: Ensure the capacitor is fully discharged before testing. Connect probes across the capacitor.
- For Frequency: Connect probes across the signal source.
- Irakurri balioa pantailan.
6.7 Tenperaturaren neurketa (°C/°F)
- Set the rotary switch to the '°C/°F' position. Use 'SELECT' to toggle between Celsius and Fahrenheit.
- Connect the temperature probe (thermocouple) to the input jacks, observing polarity.
- Jarri tenperatura-sendaren punta neurtu beharreko tenperatura duen objektuaren gainean edo haren ondoan.
- Irakurri tenperaturaren balioa pantailan.
6.8 Harremanik gabeko Voltage (NCV) Detekzioa
- Ezarri biraketa-etengailua 'NCV' posizioan.
- Move the top end of the meter (where the NCV sensor is located) close to the live conductor.
- Neurgailuak bip entzungarri bat igortzen du eta NCV adierazlearen argia keinuka hasiko da AC bolumena dagoenean.tage detektatzen da.
6.9 Datuen atxikipena eta atzeko argiztapena
- Datuak gordetzea: Sakatu 'HOLD' botoia pantailan uneko irakurketa izozteko. Sakatu berriro askatzeko.
- Atzeko argia: Press the 'Backlight' button (often combined with another function button) to turn the display backlight on or off for improved visibility in dark environments.
7. Mantentzea
7.1 Garbiketa
Garbitu neurgailua casiniragarkiarekin gamp oihal eta detergente leun batekin. Ez erabili urratzailerik edo disolbatzailerik. Ziurtatu neurgailua lehor dagoela erabili aurretik.
7.2 Bateria ordezkatzea
When the battery indicator appears on the display, replace the batteries as described in Section 5.1. Always use fresh 1.5V AAA batteries.
7.3 Biltegiratzea
If the meter is not to be used for an extended period, remove the batteries to prevent leakage and store the meter in a cool, dry place away from direct sunlight and extreme temperatures.
8. Arazoak
- Ez dago pantailarik: Bateriaren instalazioa egiaztatu eta ziurtatu bateriak ez daudela agortuta.
- 'OL' (Gainezka) Irakurketa: The measured value exceeds the meter's range for the selected function. Select a higher range or ensure the input is within specifications.
- Irakurketa okerrak: Check test lead connections, ensure proper function selection, and verify battery level.
- Neurgailua ez da pizten: Ensure the rotary switch is moved from the 'OFF' position.
9. Zehaztapenak
9.1 Zehaztapen orokorrak
- Gehienezko pantaila: 6000 zenbaketa
- Segurtasunaren balorazioa: CAT III 600V
- Energia iturria: 3 x 1.5V AAA bateria (barne)
- Neurriak: Gutxi gorabehera 7.64 x 2.83 x 1.38 hazbete (19.4 x 7.2 x 3.5 cm)
- Pisua: Gutxi gorabehera 8.11 ontza (230 g)
- Max Jaw Opening: 23 mm
9.2 Neurketaren zehaztapenak
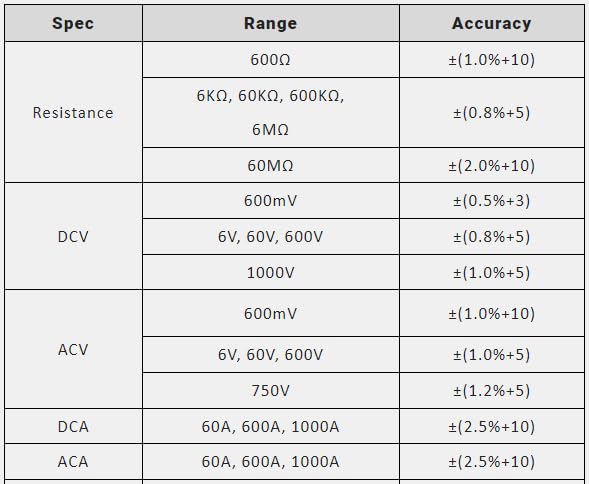
Figure 9.1: Measurement Specifications for Resistance, DCV, ACV, DCA, and ACA.
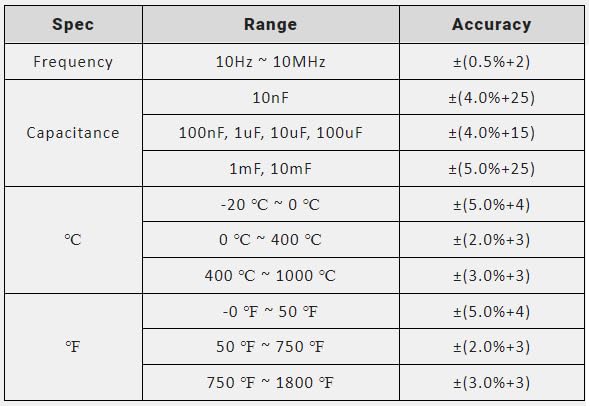
Figure 9.2: Measurement Specifications for Frequency, Capacitance, and Temperature (°C/°F).
10. Zer dago kutxan
Produktuaren ontzia irekitzean, elementu hauek aurkitu beharko zenituzke:
- MASTECH MS2109D Multimetro digitala
- Eraman poltsa
- Test leads (one pair)
- Erabiltzailearen eskuliburua (dokumentu hau)
- Tenperatura-zunda
- 3 x 1.5V AAA battery pack (pre-installed or separate)
11. Bermea eta Laguntza
For warranty information and technical support, please refer to the warranty card included with your product or visit the official Mastech webgunea. Gorde erosketa-agiria erosketaren frogagiri gisa berme-erreklamazioetarako.
If you encounter any issues not covered in this manual, please contact Mastech customer service for assistance.


