1. Sarrera
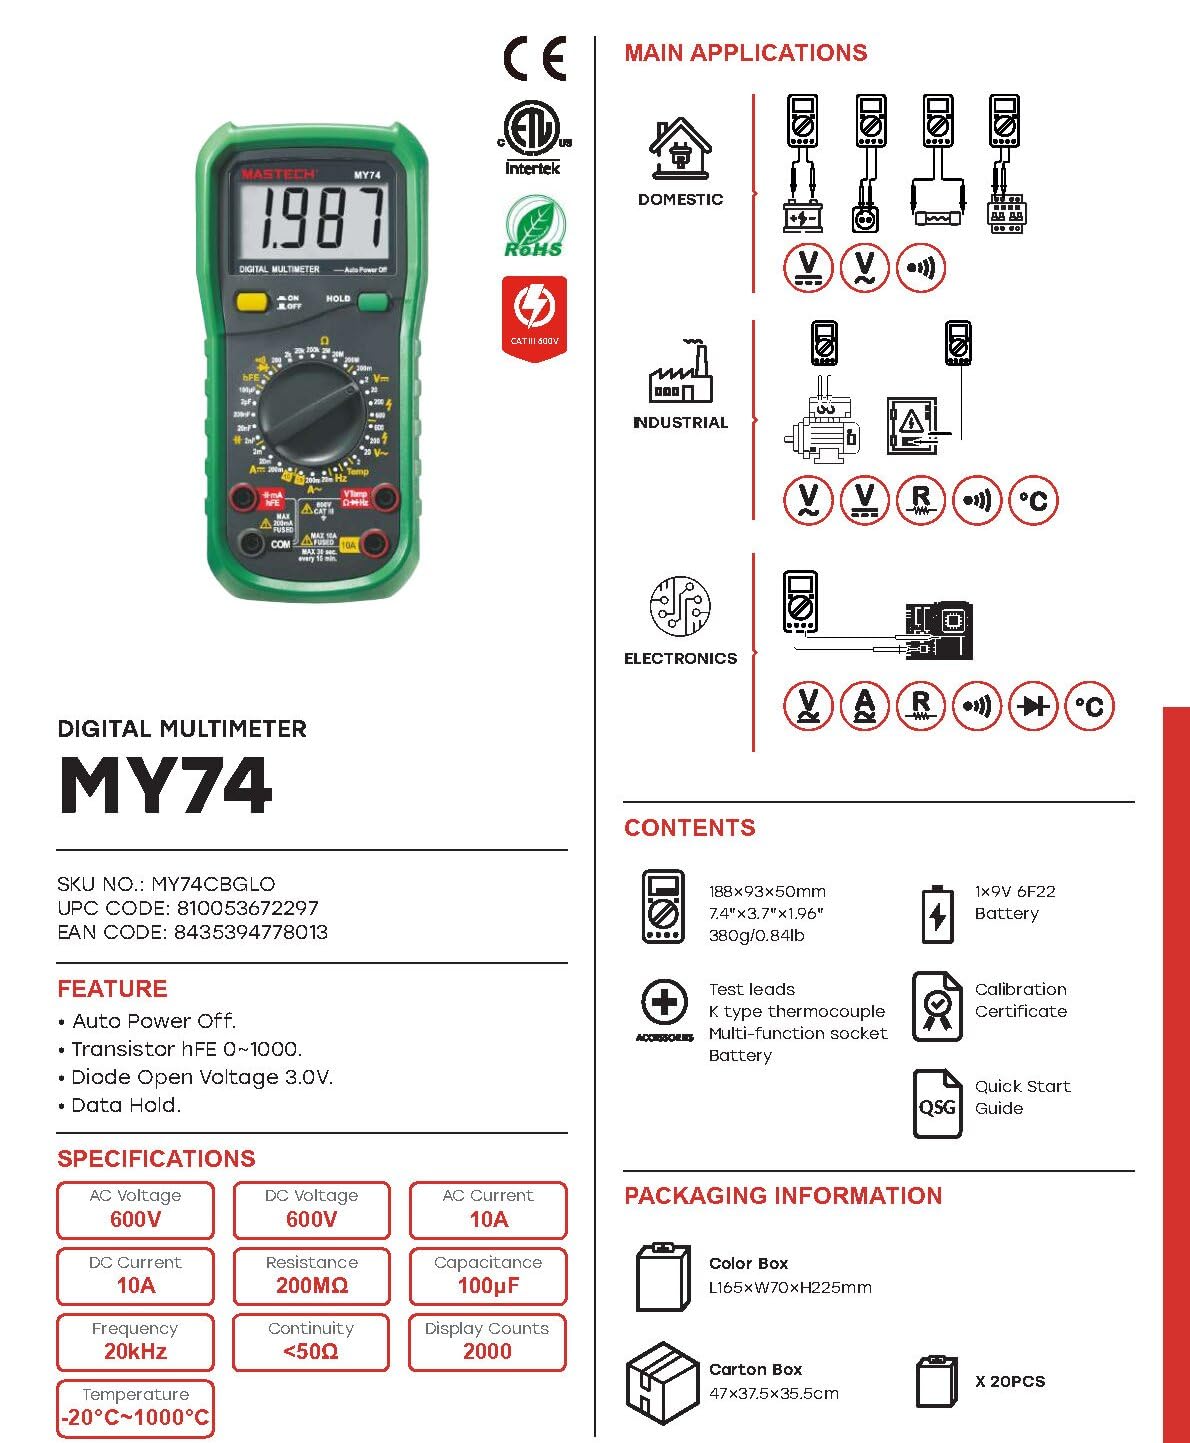
This manual provides detailed instructions for the safe and effective operation of your MASTECH MY74 Digital Multimeter. Please read this manual thoroughly before using the device and retain it for future reference. The MY74 is a compact, handheld digital multimeter designed for measuring AC/DC voltage, AC/DC current, resistance, capacitance, frequency, temperature, diode, continuity, and transistor hFE.
2. Segurtasun informazioa
WARNING: To avoid electric shock or personal injury, read and understand all safety information before using this multimeter.
- Always ensure the multimeter is in good working condition and free from damage.
- Ez aplikatu bolumen baloratua baino gehiagotage, neurgailuan markatuta dagoen moduan, terminalen artean edo edozein terminal eta lur-lurraren artean.
- Kontuz ibili voltag30V AC RMS, 42V peak edo 60V DC-tik gorakoak. Bolumen hauektagshock arriskua dakar.
- Funtzioak aldatu aurretik, deskonektatu beti proba-kableak zirkuitutik.
- Ez erabili neurgailua bateriaren estalkia behar bezala itxita ez badago.
- Ordeztu bateria bateria baxuaren adierazlea agertu bezain laster.
- Adhere to the measurement category (CAT III 600V) for safe operation.
3. Produktua amaitu daview
The MASTECH MY74 Digital Multimeter features a clear display, a rotary function switch, and input jacks for test leads. Familiarize yourself with the components shown below.

Osagai nagusiak honako hauek dira:
- LCD pantaila: Neurketa-irakurketak, unitateak eta funtzio-adierazleak erakusten ditu.
- Funtzio birakariaren etengailua: Nahi den neurketa-funtzioa hautatzen du.
- ON/OFF botoia: Gailua piztu edo itzaltzen du.
- HOLD botoia: Uneko pantailaren irakurketa izozten du.
- Sarrerako Jackak:
- COM: Neurketa guztietarako terminal komuna.
- VΩHz: Bolumenerako sarreratage, erresistentzia, maiztasuna, kapazitantzia, diodo eta jarraitutasun neurketak.
- mAµA: Milirako sarreraampere eta mikroampegungo neurketak.
- 10A: 10erako sarrera Ampegungo neurketak.
4. Ezaugarriak
The MASTECH MY74 Digital Multimeter offers the following key features:
- Pantaila: 2000 zenbaki
- Auto Power Off funtzioa
- Transistor hFE measurement (0~1000)
- Diodo Ireki Bolumenatage: 3.0V
- Continuity Buzzer: Activates below 50Ω
- Datuak gordetzeko funtzioa
- Low Battery Display indicator
5. Konfigurazioa
5.1 Bateriaren instalazioa
The MASTECH MY74 requires 2 LR44 batteries (included). To install or replace batteries:
- Ziurtatu multimetroa itzalita dagoela eta deskonektatu proba-kable guztiak.
- Bilatu bateriaren konpartimentua neurgailuaren atzealdean.
- Askatu bateriaren konpartimentuaren estalkia.
- Sartu bateriak, polaritate zuzena errespetatuz (+ eta -).
- Jarri bateriaren konpartimenduaren estalkia eta lotu torlojuarekin.
5.2 Proba-kableak konektatzea
Always connect the black test lead to the COM jack. Connect the red test lead to the appropriate input jack based on the measurement function:
- VΩHz: Liburukirakotage, erresistentzia, maiztasuna, kapazitantzia, diodoa eta jarraitutasuna.
- mAµA: 200mA-rainoko korronte neurketetarako.
- 10A: 10A-rainoko korronte neurketetarako.
6. Funtzionamendu-argibideak
Before taking any measurement, ensure the test leads are correctly connected and the rotary switch is set to the desired function.
6.1 DC Voltage Neurketa (V–)
- Connect the red test lead to the VΩHz jack and the black test lead to the COM jack.
- Ezarri biraketa-etengailua nahi den DC bolumenera.tage-tartea (adibidez, 200mV, 2V, 20V, 200V, 600V).
- Konektatu proba-kableak zirkuitu edo probatu beharreko osagaiarekin paraleloan.
- Irakurri liburukiatagPantailako balioa.
6.2 AC Voltage Neurketa (V∼)
- Connect the red test lead to the VΩHz jack and the black test lead to the COM jack.
- Ezarri biraketa-etengailua nahi den korronte alternoko bolumenera.tage tartea (adibidez, 2V, 20V, 200V, 750V).
- Connect the test leads in parallel to the AC circuit or component.
- Irakurri liburukiatagPantailako balioa.
6.3 Korronte zuzenaren neurketa (A–)
KONTUZ: Ez konektatu inoiz multimetroa paraleloan borne-neurgailu bati.tagKorrontea neurtzean iturria erabiltzen da. Honek fusiblea erre edo neurgailua kaltetu dezake.
- Konektatu probako kable beltza COM jackera.
- For currents up to 200mA, connect the red test lead to the mAµA jack. For currents up to 10A, connect the red test lead to the 10A jack.
- Ezarri biraketa-etengailua korronte zuzenaren tarte egokian (adibidez, 2mA, 20mA, 200mA, 10A).
- Ireki zirkuitua eta konektatu multimetroa kargarekin seriean.
- Irakurri uneko balioa pantailan.
6.4 Korronte alternoaren neurketa (A∼)
KONTUZ: Ez konektatu inoiz multimetroa paraleloan borne-neurgailu bati.tagKorrontea neurtzean iturria erabiltzen da. Honek fusiblea erre edo neurgailua kaltetu dezake.
- Konektatu probako kable beltza COM jackera.
- For currents up to 200mA, connect the red test lead to the mAµA jack. For currents up to 10A, connect the red test lead to the 10A jack.
- Set the rotary switch to the appropriate AC Current range (e.g., 2mA, 20mA, 200mA, 10A).
- Ireki zirkuitua eta konektatu multimetroa kargarekin seriean.
- Irakurri uneko balioa pantailan.
6.5 Erresistentziaren neurketa (Ω)
KONTUZ: Ziurtatu zirkuitua deskonektatuta dagoela eta kondentsadore guztiak deskargatuta daudela erresistentzia neurtu aurretik.
- Connect the red test lead to the VΩHz jack and the black test lead to the COM jack.
- Set the rotary switch to the desired Resistance range (e.g., 200Ω, 2kΩ, 20kΩ, 200kΩ, 2MΩ, 200MΩ).
- Konektatu proba-kableak neurtu beharreko osagaira.
- Irakurri erresistentziaren balioa pantailan.
6.6 Diodoen proba (→|–)
- Connect the red test lead to the VΩHz jack and the black test lead to the COM jack.
- Set the rotary switch to the Diode Test position.
- Konektatu proba-kable gorria diodoaren anodora eta proba-kable beltza katodora.
- Pantailak aurrerako bolumena erakutsiko dutage drop. Reverse the leads; the display should show "OL" (Open Loop) for a good diode.
6.7 Jarraitutasun-proba (♫)
- Connect the red test lead to the VΩHz jack and the black test lead to the COM jack.
- Set the rotary switch to the Continuity Test position.
- Konektatu proba-kableak zirkuituan edo osagaian zehar.
- Erresistentzia 50Ω baino txikiagoa bada gutxi gorabehera, txisteak joko du jarraitutasuna adieraziz.
6.8 Transistorearen hFE proba
- Jarri etengailu birakaria hFE posizioan.
- Insert the transistor's Emitter, Base, and Collector leads into the corresponding holes in the multi-function socket (NPN or PNP).
- Irakurri hFE balioa pantailan.
6.9 Kapazitantziaren neurketa (F)
CAUTION: Ensure the capacitor is fully discharged before measuring capacitance to avoid damage to the meter.
- Connect the red test lead to the VΩHz jack and the black test lead to the COM jack.
- Set the rotary switch to the Capacitance range (e.g., 2nF, 20nF, 200nF, 2µF, 20µF, 100µF).
- Konektatu proba-kableak kondentsadorearen artean.
- Irakurri kapazitantziaren balioa pantailan.
6.10 Maiztasunaren neurketa (Hz)
- Connect the red test lead to the VΩHz jack and the black test lead to the COM jack.
- Set the rotary switch to the Frequency range (20kHz).
- Connect the test leads in parallel to the signal source.
- Irakurri maiztasunaren balioa pantailan.
6.11 Tenperaturaren neurketa (°C/°F)
- Connect the K-type thermocouple to the VΩHz and COM jacks, observing polarity.
- Set the rotary switch to the Temperature range.
- Jarri termoparearen zunda tenperatura neurtu behar den puntuan.
- Irakurri tenperaturaren balioa pantailan.
7. Mantentzea
7.1 Garbiketa
Garbitu kasua iragarkiarekinamp oihal eta detergente leun batekin. Ez erabili urratzailerik edo disolbatzailerik. Ziurtatu neurgailua guztiz lehor dagoela erabili aurretik.
7.2 Bateria ordezkatzea
Refer to section 5.1 for battery replacement instructions. Replace batteries promptly when the low battery indicator appears to ensure accurate readings.
7.3 Fusiblearen ordezkapena
Korrontearen neurketa funtzioak huts egiten badu, baliteke fusiblea ordezkatu behar izatea. Kontsultatu zehaztapenak fusible mota eta balorazio zuzena jakiteko. Fusibleen ordezkapena langile kualifikatuek bakarrik egin behar dute.
8. Arazoak
| Arazoa | Kausa posiblea | Irtenbidea |
|---|---|---|
| Neurgailua ez da pizten. | Bateriak hilda edo gaizki instalatuta. | Egiaztatu bateriaren polaritatea edo ordezkatu bateriak. |
| "OL" (gainkarga) bistaratzen da. | Measurement exceeds selected range or open circuit. | Select a higher range or check for open circuit. |
| Incorrect current reading. | Blown fuse or incorrect input jack. | Check fuse and ensure test lead is in the correct current input jack (mAµA or 10A). |
| Ez dago jarraitutasun-txisturik. | Resistance is too high or circuit is open. | Check the circuit for breaks. Ensure resistance is below 50Ω. |
9. Zehaztapenak
Hurrengo taulan MASTECH MY74 multimetro digitalaren zehaztapen teknikoak ageri dira.

| Funtzioa | Barrutia | Ebazpena | Zehaztasuna |
|---|---|---|---|
| DC bolumenatage | 200mV/2V/20V/200V | 0.1mV/1mV/10mV/0.1V | ±(%0.5+2) |
| 600V | 1V | ±(%0.8+2) | |
| AC Boltage | 2V/20V/200V | 1mV/10mV/100mV | ±(%0.8+3) |
| 750V | 1V | ±(%1.2+3) | |
| Korronte DC | 2mA | 1µA | ±(%0.8+1) |
| 20mA | 10µA | ±(%1.5+1) | |
| 200mA | 0.1mA | ±(%1.5+1) | |
| 10A | 10mA | ±(%2.0+5) | |
| AC korrontea | 20mA | 10µA | ±(%1.0+5) |
| 200mA | 0.1mA | ±(%1.8+5) | |
| 10A | 0.01A | ±(%3.0+7) | |
| Erresistentzia | 200Ω | 0.1Ω | ±(%0.8+3) |
| 2kΩ/20kΩ/200kΩ/2MΩ | 1Ω/10Ω/100Ω/1kΩ | ±(%0.8+2) | |
| 20MΩ | 10 kΩ | ±(%1.0+2) | |
| 200MΩ | 0.1MΩ | ±(%6.0+10) | |
| Diodo Ireki Bolumenatage | 3.0V | N/A | N/A |
| Kapazitatea | 2nF/20nF/200nF/2µF | 1pF/10pF/0.1nF/1nF | ±(%4.0+3) |
| 20µF | 10nF | ±(%5.0+3) | |
| 100µF | 0.1µF | ±(%6.0+10) | |
| Maiztasuna | 20 kHz | 0.01 kHz | ±(%2.0+5) |
| Tenperatura | -20°C~0°C | 1°C | ±(%5.0+4) |
| 1°C~400°C | 1°C | ±(%2.0+3) | |
| 401°C~1000°C | 1°C | ±(%2.0+5) | |
| Transistorea hFE | 0~1000 | N/A | N/A |
| Bistaratzea | 2000 zenbaketa | ||
| Itzali automatikoa | Bai | ||
| Jarraitutasun zalaparta | <50Ω | ||
| Datuak gordetzea | Bai | ||
| Bateria baxuko pantaila | Bai | ||
| Energia iturria | 2 LR44 bateria (barne) | ||
| Produktuaren neurriak | 16 x 9 x 5 cm | ||
| Elementuaren pisua | 0.5 kilogramo | ||
| Segurtasun Balorazioa | CAT III 600V, CE, RoHS | ||
Note: Accuracy specifications are given for one year after calibration, at 18°C to 28°C (64°F to 82°F), with relative humidity up to 75%.
10. Bermea eta Laguntza
MASTECH products are designed for reliability and performance. For warranty information and technical support, please refer to the documentation included with your purchase or visit the official MASTECH website. The EU Spare Part Availability Duration is 1 year.


