1. Sarrera
The Mastech MS8250D is a high-performance digital multimeter designed for accurate measurement of AC/DC voltage, AC/DC current, resistance, capacitance, frequency, and temperature. It features a 6600-count display, auto/manual ranging, True RMS, Non-Contact Voltage (NCV) detection, diode and continuity testing, and a USB interface for PC connectivity. This manual provides detailed instructions for safe and effective use of the device.
Ezaugarri nagusiak:
- 6600-count digital display
- Automatic and Manual Ranging
- Egiazko RMS neurketa
- Kontaktu gabeko boltage (NCV) detekzioa
- Diode and Continuity Tester (buzzer < 50Ω)
- MAX/MIN value recording
- Datuak gordetzeko funtzioa
- Pantaila atzeko argia
- Itzali automatikoa
- Neurketa erlatiboa modua
- Bateria baxuaren adierazlea
- USB Interface for Windows OS
2. Segurtasun informazioa
OHARRA: To avoid electric shock or personal injury, and to avoid damage to the meter or to the equipment under test, read all safety information carefully before using the meter. This device complies with CE, RoHS, and UL safety standards.
- Ziurtatu beti proba-kableak egoera onean daudela eta behar bezala konektatuta daudela.
- Ez aplikatu bolumen baloratua baino gehiagotage, neurgailuan markatuta dagoen moduan, terminalen artean edo edozein terminal eta lur-lurraren artean.
- Kontuz ibili voltag30V AC RMS, 42V peak edo 60V DC-tik gorakoak. Bolumen hauektagshock arriskua dakar.
- Korrontea neurtu aurretik, ziurtatu zirkuitua deskonektatuta dagoela eta neurgailua seriean konektatuta dagoela.
- Funtzioak edo tarteak aldatu aurretik, deskonektatu beti proba-kableak zirkuitutik.
- Ez erabili neurgailua hondatuta dagoela dirudi edo kaxa irekita badago.
- Irakurketa zehatzak bermatzeko, aldatu bateria bateria baxuaren adierazlea agertzen den bezain laster.
- Adhere to the specified measurement categories (CAT III 1000V / CAT IV 600V) for safe operation.
3. Produktua amaitu daview
Familiarize yourself with the components of your Mastech MS8250D Digital Multimeter.

3.1. irudia: Aurrealdea view of the Mastech MS8250D Digital Multimeter, showing the display, function dial, and input jacks. The display shows "1.987 V", indicating a voltage measurement. The function dial is set to T-RMS. Input jacks are labeled for µA mA, A, VΩHz%, and COM.
Osagai nagusiak:
- LCD pantaila: Neurketa-irakurketak, unitateak eta funtzio-adierazleak erakusten ditu.
- Funtzio-markagailua: Nahi den neurketa-funtzioa hautatzeko erabiltzen da (adibidez, Boltage, Current, Resistance, Diode, Continuity, Temperature).
- Funtzio-botoiak:
- EUTSI: Uneko pantailaren irakurketa izozten du.
- GAMA: Eskuzko eta automatikoaren arteko neurketa aldatzen du.
- REL: Neurketa erlatiboaren modua aktibatzen du.
- MAX / MIN: Gehienezko eta gutxieneko balioak erregistratzen ditu.
- FUNTZIOA: Selects sub-functions within a dial position (e.g., AC/DC, Diode/Continuity).
- T-RMS: (Indicated on dial) True RMS measurement.
- NCV: Kontaktu gabeko boltage detekzioa.
- Atzeko argiaren botoia: Activates display backlight.
- Sarrerako Jackak:
- COM: Common terminal for all measurements (negative lead).
- VΩHz%: Bolumenerako sarreratage, resistance, frequency, capacitance, and diode/continuity measurements (positive lead).
- µA mA: Mikro sarreraampere eta milliampere current measurements (positive lead). Fused for protection.
- A: Sarrera ampere current measurements (positive lead). Fused for protection.
Dakarten osagaiak:
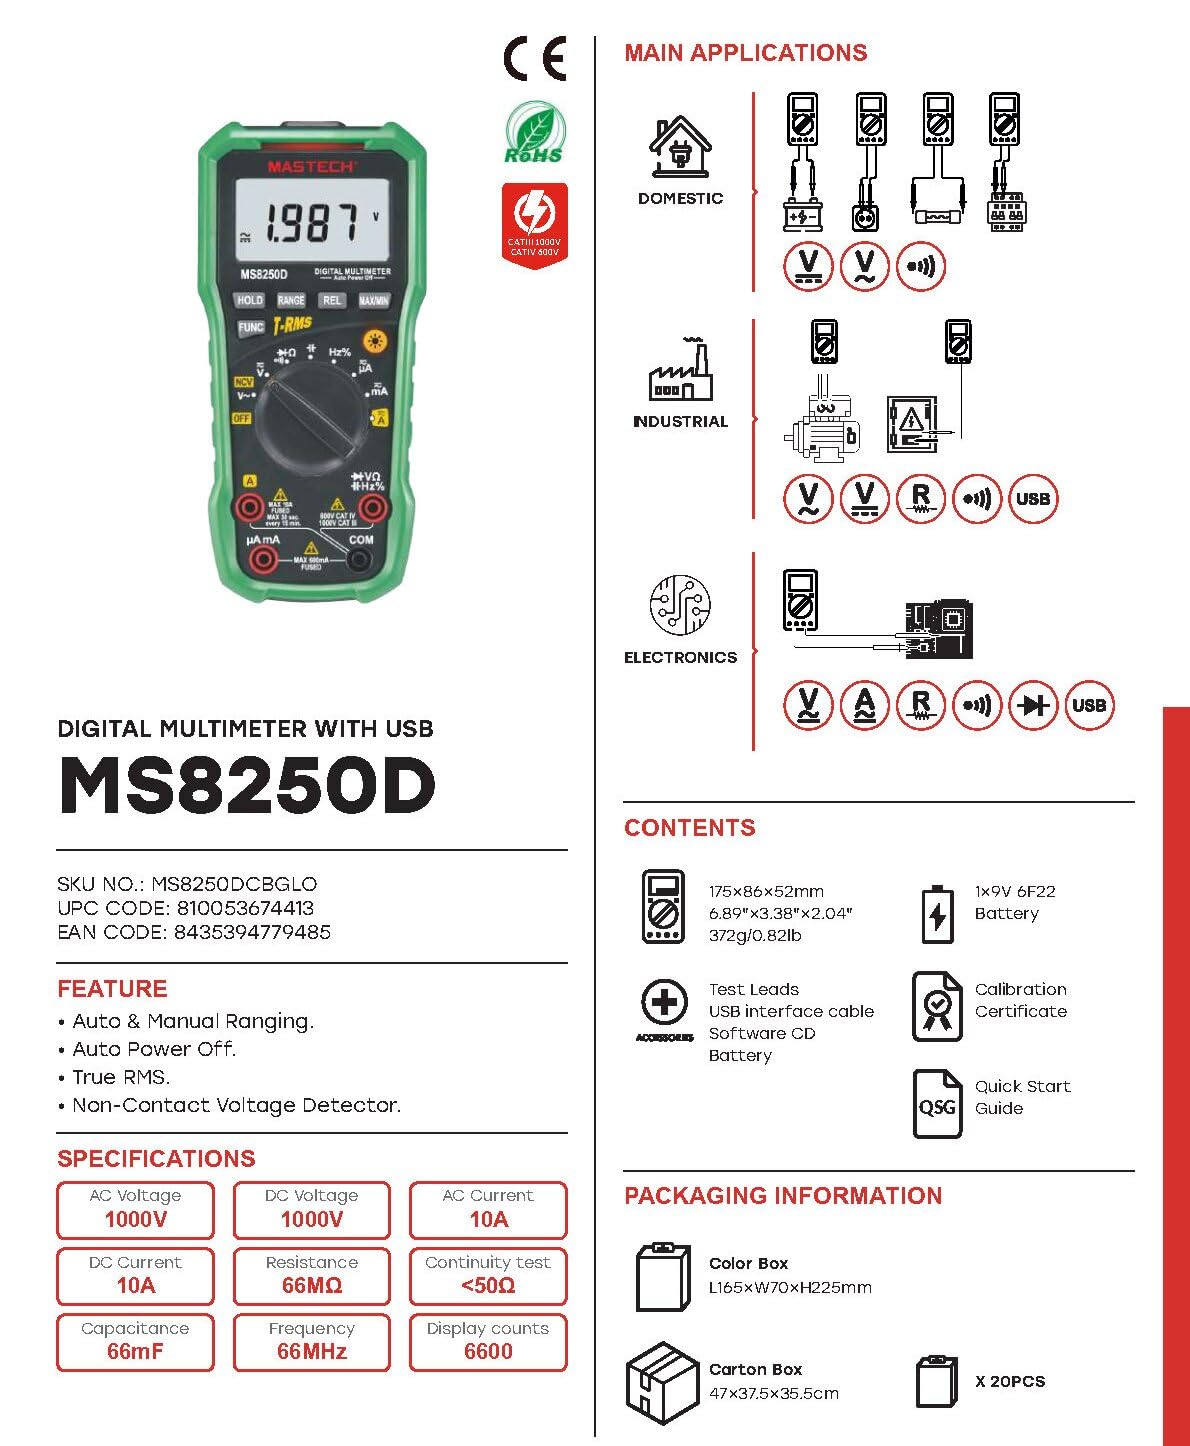
3.2. irudia: Diagram showing the Mastech MS8250D Multimeter and its included accessories. The image also illustrates typical applications in domestic, industrial, and electronics settings.
- Mastech MS8250D Digital Multimeter
- Proba-kableak (gorria eta beltza)
- 1x 9V 6F22 Battery (pre-installed or included separately)
- USB Interfazearen kablea
- Software CD (for Windows OS)
- Kalibrazio Ziurtagiria
- Abiadura Gida
4. Konfigurazioa
4.1 Bateriaren instalazioa
The MS8250D requires one 9V 6F22 battery for operation. Two LR44 batteries are also mentioned in specifications, likely for a different internal component or an error in data. For the main power, use the 9V battery.
- Ziurtatu multimetroa itzalita dagoela.
- Bilatu bateriaren konpartimentuaren estalkia neurgailuaren atzealdean.
- Erabili bihurkin bat estalkia lotzen duten torlojua(k) askatzeko.
- Kendu estalkia.
- Konektatu 9V-ko bateria bateriaren pintzelei, polaritate zuzena (+ eta -) errespetatuz.
- Jarri bateria konpartimentuan.
- Jarri berriro bateriaren konpartimentuaren estalkia eta finkatu torloju(ekin) erabiliz.
Oharra: The meter also uses 2 LR44 batteries, which are typically included and pre-installed for specific functions like the backlight or non-contact voltage detection. Refer to the quick-start guide for specific details on these smaller batteries if replacement is needed.
4.2 Proba-kableak konektatzea
Konektatu beti proba-kable beltza COM hartunera. Konektatu proba-kable gorria sarrera-hartune egokira, neurketa motaren arabera:
- Voltage, Resistance, Capacitance, Frequency, Diode, and Continuity measurements: Connect the red lead to the VΩHz% jack.
- For Current measurements (µA or mA): Connect the red lead to the µA mA jack.
- For High Current measurements (A): Connect the red lead to the A jack.
Ensure the test leads are fully inserted into the jacks.
5. Funtzionamendu-argibideak
5.1 Piztu/Itzali
To turn the meter ON, rotate the function dial from the "OFF" position to any desired measurement function. To turn the meter OFF, rotate the function dial back to the "OFF" position.
The meter features an Itzali automatikoa function to conserve battery life. It will automatically power off after a period of inactivity. To disable or re-enable this feature, refer to the quick-start guide or the full user manual provided on the software CD.
5.2 Auto Ranging and Manual Ranging
The MS8250D defaults to Automatikoki, which automatically selects the best measurement range. Press the RANGE botoira aldatzeko Eskuliburua. In manual ranging, each press of the RANGE button cycles through available ranges. To return to auto ranging, press and hold the RANGE botoia.
5.3 AC/DC Vol. neurtzeatage (V)
- Ezarri funtzio-markagailua posizioan V~ (AC bolumenatage) edo V- (DC Voltage) posizioa.
- Konektatu probako kable beltzara COM jack-a eta proba-kable gorria VΩHz% jack.
- Konektatu proba-zundak neurtu beharreko zirkuituan edo osagaian.
- Irakurri liburukiatage value on the display. The meter will automatically detect AC or DC if the dial is set to the combined V position, or you can use the FUNC button to toggle between AC and DC if available on your model.
5.4 Measuring AC/DC Current (A, mA, µA)
OHARRA: Never connect the meter in parallel to a voltagKorrontea neurtzean iturria erabiltzen da. Honek fusiblea erre edo neurgailua kaltetu dezake.
- Itzali zirkuituaren energia.
- Ezarri funtzio-markagailua posizioan A~ (korronte alternoa), A- (korronte zuzena), mA~, mA-, µA~, edo µA- posizioa.
- Konektatu probako kable beltzara COM jack.
- Konektatu proba beruna gorriarekin A jack for high current, or µA mA jack for low current.
- Open the circuit where the current is to be measured and connect the meter in series with the load.
- Jarri energia zirkuituari.
- Irakurri uneko balioa pantailan. Erabili FUNC botoia, behar izanez gero, AC eta DC artean txandakatzeko.
5.5 Erresistentzia neurtzea (Ω)
- Ezarri funtzio-markagailua posizioan Ω posizioa.
- Konektatu probako kable beltzara COM jack-a eta proba-kable gorria VΩHz% jack.
- Ziurtatu probatzen ari den zirkuitua edo osagaia desenergizatuta dagoela.
- Konektatu proba-zundak osagaiaren artean.
- Irakurri erresistentziaren balioa pantailan.
5.6 Diodoen proba eta jarraitutasun-proba
- Ezarri funtzio-markagailua posizioan Diodoa/Jarraitutasuna position (often shared with resistance or capacitance).
- Konektatu probako kable beltzara COM jack-a eta proba-kable gorria VΩHz% jack.
- Erabili FUNC button to select between Diode Test and Continuity Test.
- Diodoen probarako: Konektatu zunda gorria diodoaren anodora eta zunda beltza katodora. Pantailak aurreranzko bolumena erakutsiko du.tage drop (typically 0.5V to 0.8V for silicon diodes). Reversing the probes should show "OL" (Open Loop).
- Jarraitutasun probarako: Connect the probes across the circuit or component. If resistance is less than approximately 50Ω, the buzzer will sound, indicating continuity.
5.7 Kapazitantzia neurtzea (F)
- Ezarri funtzio-markagailua posizioan Kapazitatea position (often shared with resistance or diode).
- Konektatu probako kable beltzara COM jack-a eta proba-kable gorria VΩHz% jack.
- Ensure the capacitor is fully discharged before testing to avoid damage to the meter.
- Konektatu proba-zundak kondentsadorearen terminaletara.
- Irakurri kapazitantziaren balioa pantailan.
5.8 Measuring Frequency (Hz) and Duty Cycle (%)
- Ezarri funtzio-markagailua posizioan % Hz position (often shared with voltageta).
- Konektatu probako kable beltzara COM jack-a eta proba-kable gorria VΩHz% jack.
- Konektatu proba-zundak seinale-iturrira.
- The display will show the frequency. Press the FUNC button to toggle to Duty Cycle measurement if available.
5.9 Harremanik gabeko Voltage (NCV) Detekzioa
- Ezarri funtzio-markagailua posizioan NCV posizioa.
- Hold the meter with the NCV sensor (usually at the top of the meter) near a live AC voltage iturria.
- Neurgailuak korronte alternoaren bolumenaren presentzia adieraziko du.tage through an audible beep and/or visual indicator (e.g., LED).
5.10 USB Interface (Windows OS)
The MS8250D includes a USB interface for connecting to a computer running Windows OS. This allows for data logging and real-time monitoring of measurements. Install the provided software from the CD and follow the on-screen instructions for driver installation and software usage.
6. Mantentzea
6.1 Garbiketa
Garbitu neurgailuaren kaxa iragarkiarekinamp oihal eta detergente leun batekin. Ez erabili urratzailerik edo disolbatzailerik. Ziurtatu neurgailua guztiz lehor dagoela erabili aurretik.
6.2 Bateria ordezkatzea
When the low battery indicator appears on the display, replace the 9V battery immediately to ensure accurate readings. Follow the steps in Section 4.1 Battery Installation.
6.3 Fusiblearen ordezkapena
If the meter fails to measure current, the fuse may be blown. Fuses are located inside the meter. To replace a fuse:
- Ensure the meter is turned OFF and all test leads are disconnected.
- Open the battery compartment cover (and potentially the main case, depending on design).
- Kontu handiz kendu fusible zaharra.
- Replace with a fuse of the exact same type and rating (e.g., F600mA/250V for mA/µA range, F10A/250V for A range). Refer to the meter's internal markings or the full manual for specific fuse ratings.
- Reassemble the meter, ensuring all screws are tightened.
OHARRA: Never use a fuse with a different rating or bypass the fuse. This can damage the meter and pose a serious safety hazard.
7. Arazoak
| Arazoa | Kausa posiblea | Irtenbidea |
|---|---|---|
| Neurgailua ez da pizten. | Bateria agortuta. | Ordeztu 9Vko bateria. |
| "OL" (gainkarga) bistaratzen da. | Neurketak hautatutako tartea edo neurgailuaren gehienezko edukiera gainditzen du. | Switch to a higher range (if in manual ranging) or ensure the measurement is within the meter's limits. |
| No current reading. | Blown fuse; incorrect lead connection; open circuit. | Check and replace fuse if necessary. Ensure leads are connected correctly (in series). Verify circuit continuity. |
| Irakurketa okerrak. | Low battery; poor lead contact; external interference. | Replace battery. Ensure leads are firmly connected. Move away from strong electromagnetic fields. |
| Display shows "USB" but no PC connection. | Drivers not installed; incorrect software settings. | Install drivers from the provided CD. Refer to software manual for connection instructions. |
8. Zehaztapenak
The following table details the technical specifications of the Mastech MS8250D Digital Multimeter.

8.1. irudia: Detailed specifications table for the Mastech MS8250D, outlining ranges, resolutions, and accuracies for various measurement functions.
| Funtzioa | Barrutia | Ebazpena | Zehaztasuna |
|---|---|---|---|
| DC bolumenatage | |||
| 660mV | 0.1mV | ±(%0.8+3) | |
| 6.6V/66V/660V/1000V | 1mV/10mV/0.1V/1V | ±(%0.5+5) | |
| AC Boltage (Egiazko RMS) | |||
| 660mV | 0.1mV | ±(%1.5+5) | |
| 6.6V/66V | 1mV/10mV | ±(%1.2+5) | |
| 660V/1000V | 0.1V/1V | ±(%1.0+3) | |
| Korronte DC | |||
| 660µA/6600µA/66mA/660mA | 0.1µA/1µA/10µA/0.1mA | ±(%1.0+5) | |
| 10A | 10mA | ±(%2.0+5) | |
| Korronte katea (Egiazko RMS) | |||
| 660µA/6600µA/66mA/660mA | 0.1µA/1µA/0.01mA/0.1mA | ±(%1.5+5) | |
| 10A | 10mA | ±(%3.0+5) | |
| Erresistentzia | |||
| 660Ω / 6.6kΩ / 66kΩ / 660kΩ / 6.6MΩ | 0.1Ω / 1Ω / 10Ω / 100Ω / 1kΩ | ±(%0.8+5) | |
| 66 MΩ | 10kΩ | ±(%1.5+5) | |
| Kapazitatea | |||
| 6.6nF/66nF/660nF/6.6µF/66µF | 1pF/10pF/0.1nF/1nF/10nF | ±(%4.0+5) | |
| 600µF | 1µF | ±(%3.0+5) | |
| 6.6 mF/66 mF | 1µF/10µF | ±(%4.0+5) | |
| Maiztasuna | |||
| 66Hz/660Hz/6.6kHz/66kHz | 0.01Hz / 0.1Hz / 1Hz / 10Hz | ±(%1.5+5) | |
| 660kHz/6.6MHz/66MHz | 0.1 kHz/1 kHz/10 kHz | ±(%1.5+5) | |
| Betebehar Zikloa | |||
| %0.1~%99.9 | %0.1 | ±(%2.0+5) | |
Zehaztapen orokorrak:
- Pantaila: 6600 zenbaketa
- Energia iturria: 1x 9V 6F22 Battery (main power), 2x LR44 batteries (auxiliary, e.g., backlight)
- Itzali automatikoa: Bai
- Egiazko RMS: Bai
- Kontaktu gabeko boltage (NCV) detektagailua: Bai
- Diodo Ireki Bolumenatage: 3.2V
- Jarraitasun-buzzlea: < 50Ω
- MAX / MIN: Bai
- Datuak gordetzea: Bai
- Bateria baxuaren bistaratzea: Bai
- Pantailaren atzeko argia: Bai
- USB interfazea: Yes (Windows OS)
- Segurtasunaren balorazioa: CAT III 1000V / CAT IV 600V
- Neurketaren zehaztasuna: 0.4% (general, specific accuracies per function in table)
- Bolumen eragileatage (Min): 3.2 Volt
- Goiko Tenperaturaren Balorazioa: 50 gradu Celsius
- Neurriak (L x W x H): 20 x 15 x 25 cm
- Elementuaren pisua: 1 kg
- Materiala: Akrilonitrilo Butadieno Estirenoa (ABS)
- Kolorea: Urdina
- Fabrikatzailea: MASTECH
- Jatorrizko herrialdea: Taiwan
- Ziurtagiriak: CE, RoHS, UL
9. Bermea eta Laguntza
Mastech products are designed for reliability and durability. For specific warranty information, please refer to the warranty card included with your product or contact Mastech customer support directly. Typically, Mastech offers a limited warranty against defects in materials and workmanship.
For technical support, troubleshooting assistance, or warranty claims, please contact your authorized Mastech dealer or visit the official Mastech webharremanetarako informazioa lortzeko gunea.
EBko ordezko piezen erabilgarritasunaren iraupena: 1 Urte


