1. Sarrera
This instruction manual provides detailed guidance for the assembly, operation, and maintenance of your Domi 12x16FT Wall-Mounted Sunroom. Please read this manual thoroughly before beginning assembly or use to ensure safe and correct installation and to maximize the lifespan of your product. Keep this manual for future reference.
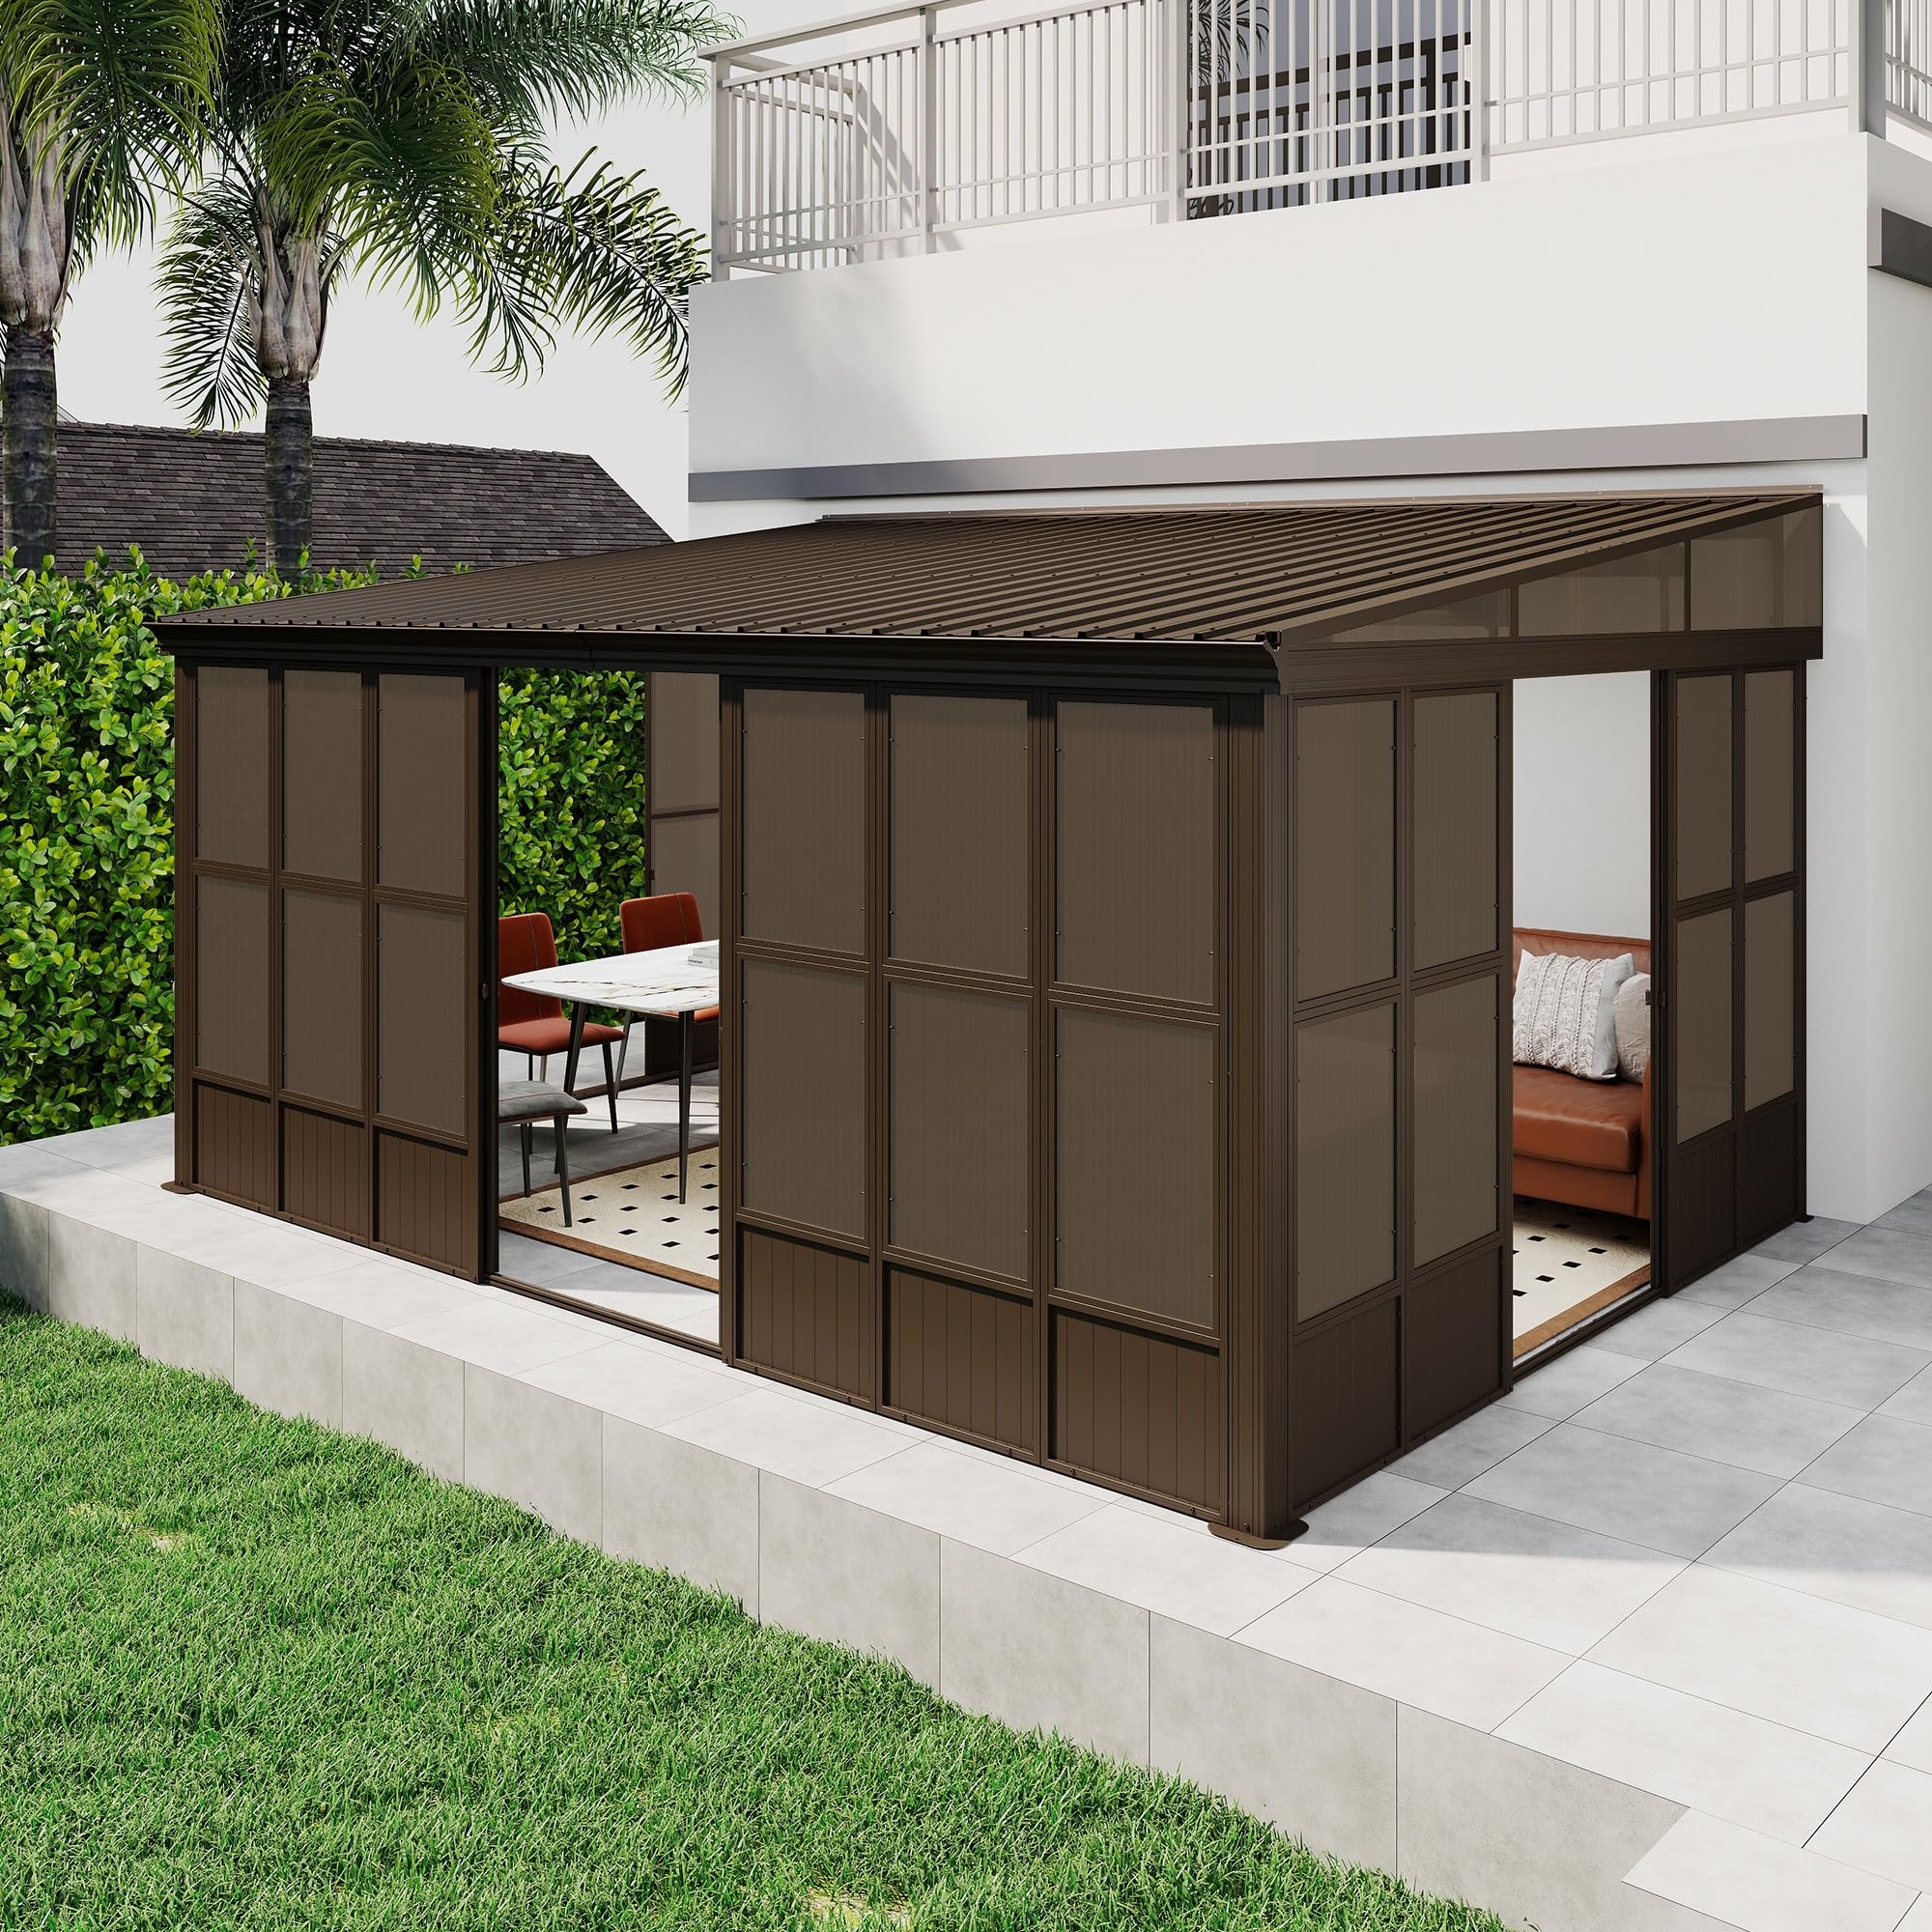
Figure 1: Domi 12x16FT Wall-Mounted Sunroom
2. Segurtasun informazioa
OHARRA: Always assemble and secure the shelter to a stable foundation. Do not assemble or disassemble in windy conditions. Be cautious when handling detachable parts. Inspect the shelter regularly for any damage caused by weather or normal wear and tear. Keep the shelter clean and dry when not in use. Do not use the shelter during severe weather conditions.
- Ziurtatu osagai guztiak daudela eta kalterik gabe muntatu aurretik.
- Wear appropriate safety gear, including gloves and eye protection, during assembly.
- Assembly requires at least two to three adults for safety and ease of installation.
- Do not climb on the roof or frame of the sunroom.
- Regularly check all bolts and fasteners to ensure they remain tight.
3. Produktuaren ezaugarriak
- All-Season Sunroom: Designed for year-round use, providing additional lounge space.
- Durable and Spacious: Measures 15.94' in length, 12.00' in width, and 8.35' in height. Engineered to withstand snow pressure up to 35 lbs./sq. ft. and wind speeds up to 60 mph. The frame is easy to care for and can be rinsed with water.
- Detachable PC Screen: Features a powder-coated thick aluminum frame with high-intensity detachable dark brown 6mm PC screens. These screens are adjustable for varying sunlight and enhance room lighting.
- Galvanized Steel Sloping Roof: The crafted sloped roof includes integrated drainage for effective rainwater management, protecting patio furniture. The galvanized steel roof offers superior durability.
- Breathable Mesh Windows: Durable windows with mesh allow air circulation, protect privacy, and offer excellent views. They are designed to withstand strong winds, providing additional security.
- Double Sliding Door & Both Side Entrance: Stylish double doors on the front can be positioned on any side. Both side entrances meet different patio needs, offering private and open room options.
- Extra Support Column: Two detachable columns enhance stability and firmness in snowy conditions. With a diameter of Φ1.65", they offer increased thickness and safety. Columns can be stored away during daily use.

Figure 2: Sunroom Dimensions and Resistance Ratings

Figure 3: Detachable PC Windows

Figure 4: Efficient Drainage System

Figure 5: Double Sliding Doors

Figure 6: Additional Support Columns
4. Zehaztapenak
| Atributua | Xehetasuna |
|---|---|
| Marka | domi kanpoko bizimodua |
| Modelo zenbakia | 1646-0523 |
| Materiala | Aluminum Frame, Steel Roof, PC Screen |
| Produktuaren neurriak | 191.3"L x 143.5"Z x 100.2"A (15.94'L x 12.00'Z x 8.35'A) |
| Solairua | 190.67 Oin Karratu |
| Elementuaren pisua | 508 kilo |
| Snow Pressure Resistance | Up to 35 lbs./sq. ft. |
| Haizearen Erresistentzia | Gehienez 60 mph |
| Uraren Erresistentzia Maila | Iragazgaitza |
| Muntaia Beharrezkoa | Bai |
5. Muntatzeko jarraibideak
Before starting assembly, carefully unpack all components and verify against the parts list (not included in this document, refer to the physical manual). Ensure you have all necessary tools. Assembly typically requires 2-3 people.
5.1 Gunearen prestaketa
- Choose a level and stable foundation for installation.
- Clear the area of any debris or obstructions.
- Ensure adequate clearance around the sunroom for assembly and future use.
5.2 Markoen Muntaketa
- Begin by assembling the main aluminum frame components according to the detailed diagrams in your physical instruction manual.
- Utilize the pre-drilled holes for accurate alignment and secure fastening. Do not overtighten fasteners until the entire frame is aligned.
- Attach the frame securely to your wall using appropriate mounting hardware (not included, consult a professional for specific wall types).
Figure 7: Wall-Mounted Design with Pre-drilled Holes
5.3 Roof and Wall Panel Installation
- Install the galvanized steel roof panels, ensuring proper overlap and alignment for the integrated drainage system.
- Carefully insert the detachable PC screen panels into the designated frame channels.
- Install the breathable mesh window panels.
5.4 Atearen instalazioa
- Assemble and install the double sliding doors. Ensure they slide smoothly and close securely without significant gaps. Adjust as needed.
5.5 Azken egiaztapenak
- Once fully assembled, tighten all fasteners.
- Verify the stability and rigidity of the entire structure.
6. Funtzionamendu-argibideak
6.1 ate lerragarri
- To open, gently slide the door panels along their tracks.
- To close, slide the panels back until they meet and engage the latch mechanism.
6.2 Detachable PC Screens and Mesh Windows
- The PC screens can be detached and reattached as needed to adjust sunlight and ventilation. Refer to the physical manual for specific removal and installation steps.
- The mesh windows allow for airflow while keeping insects out.
6.3 Additional Support Columns
- In regions with heavy snowfall or during anticipated severe winter weather, install the two provided detachable support columns for enhanced roof stability.
- Position the columns as indicated in your physical manual and secure them firmly.
- Remove columns during warmer seasons or when not needed for daily use.
7. Mantentzea
7.1 Garbiketa
- Clean the aluminum frame with mild soap and water. Rinse thoroughly.
- Wipe PC screens with a soft cloth and non-abrasive cleaner to avoid scratching.
- Regularly clear debris from the roof and drainage system to prevent water buildup.
7.2 Ikuskapena
- Periodically inspect all structural components, bolts, and fasteners for tightness and signs of wear or damage.
- Check PC screens and mesh windows for tears or cracks.
7.3 Neguko Prestaketa
- Install the additional support columns before the onset of heavy snow.
- Regularly remove accumulated snow from the roof to prevent excessive load.
8. Arazoak
8.1 Gaps in Structure
- If gaps are present, re-check all connections and ensure the frame is level and square.
- Adjust sliding doors if they do not close completely.
- Consider applying weather stripping or sealant to minor gaps if necessary, especially around the base and wall attachment points.
8.2 Wind Resistance Concerns
- Ensure the sunroom is securely anchored to a stable foundation.
- During high winds, ensure all doors and windows are closed and latched.
- Do not use the sunroom during severe weather conditions.
8.3 Ur-ihesa
- Check the roof panels for proper overlap and ensure the drainage system is clear of debris.
- Inspect all seals and connections for any damage or improper installation.
9. Bermea eta bezeroarentzako laguntza
For specific warranty details regarding your Domi 12x16FT Wall-Mounted Sunroom, please refer to the documentation included with your purchase or visit the official Domi Outdoor Living website. For any questions, missing parts, or technical assistance, please contact Domi Outdoor Living customer service through their official channels.


