1. Sarrera
This manual provides detailed instructions for the installation, operation, and maintenance of your Reobiux D20-1P 2K Outdoor Surveillance Camera. Please read this manual thoroughly before using the product to ensure proper functionality and safety.
2. Paketearen edukia
Egiaztatu behean zerrendatutako elementu guztiak zure paketean sartuta daudela. Elementuren bat falta bada edo hondatuta badago, jarri harremanetan bezeroarentzako arreta-zerbitzuarekin.
- 1x Reobiux D20-1P Solar PTZ Camera
- 1x Solar Collector
- 1x Erabiltzailearen eskuliburua
- 1x Muntatzeko oinarria
- 1x Power Supply (for initial charging)
- 1x Torlojuen poltsa (instalaziorako)
- 1x Type-C Charging Line
3. Produktua amaitu daview
The Reobiux D20-1P is a 2K outdoor surveillance camera designed for comprehensive home security. It features dual lenses, 360° Pan-Tilt-Zoom (PTZ) capabilities, and operates wirelessly via Wi-Fi. Key features include PIR motion detection, color night vision, two-way audio, and an IP66 weatherproof rating, powered by a solar panel and rechargeable battery.
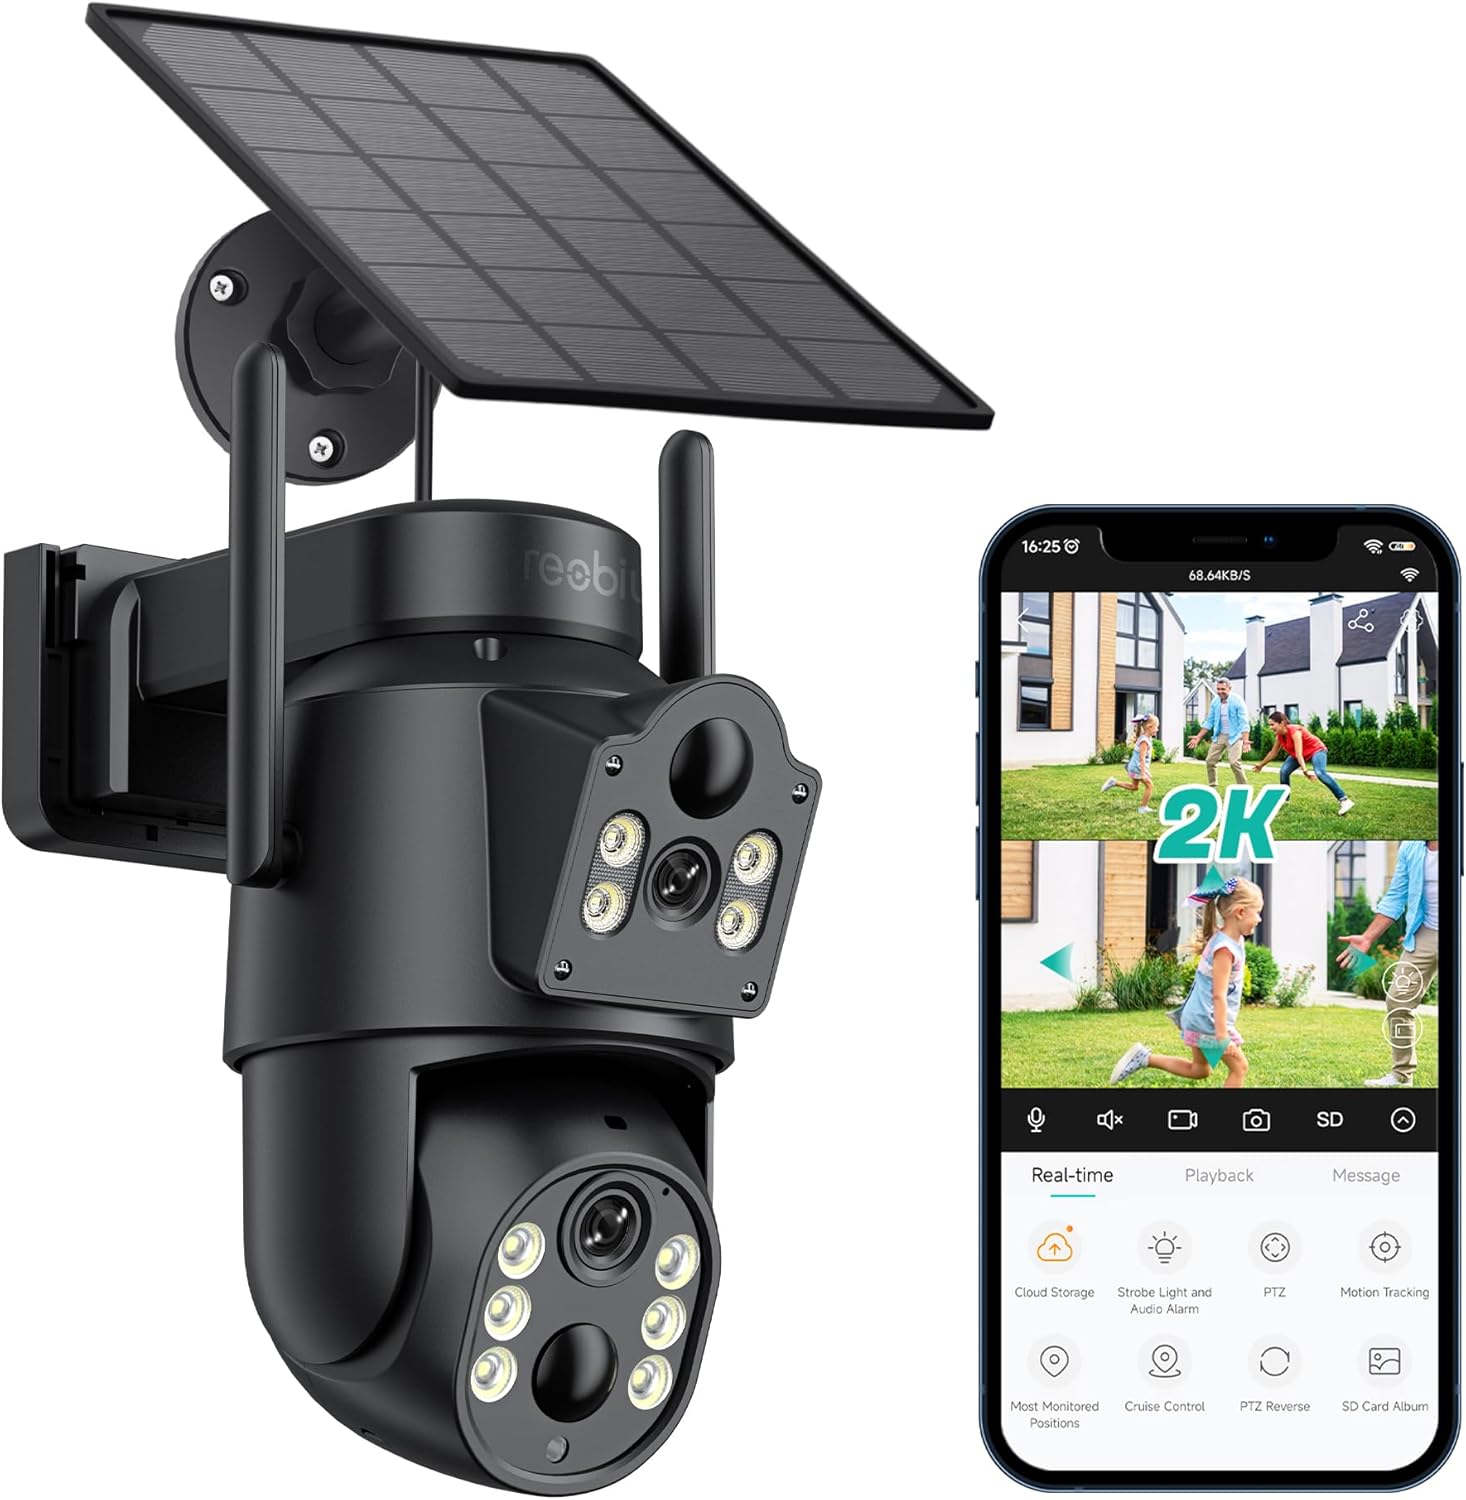
3.1. irudia: Reobiux D20-1P Solar PTZ Camera and its mobile application interface showing real-time monitoring, playback, and various control options.
Ezaugarri nagusiak:
- 2K QHD High Resolution: Bideo argi eta zehatza eskaintzen dutage.
- Dual-Lens Design: Combines a fixed lens with a rotating lens for comprehensive coverage.
- 360° PTZ Functionality: Allows remote control of pan, tilt, and zoom for flexible viewangeluak.
- Solar Powered with Rechargeable Battery: Ensures continuous operation with minimal manual charging.
- PIR Mugimendu Detekzioa: Intelligently detects human movement to reduce false alarms.
- Kolore Gaueko Ikusmena: Offers full-color video even in low-light conditions, alongside infrared night vision.
- Bi norabideko audioa: Bisitariekin komunikatzea edo intrusoak uxatzea ahalbidetzen du.
- IP66 Eguraldiarekiko erresistentea: Kanpoko hainbat eguraldi baldintza jasateko diseinatua.
- Wireless Wi-Fi Connectivity: Easy setup and remote access via smartphone.
4. Konfigurazio gida
4.1 Hasierako karga
Before first use, fully charge the camera's internal battery using the provided Type-C charging line and power supply. This ensures the camera has sufficient power for initial setup and operation, especially if solar charging conditions are not optimal immediately after installation.
4.2 Aplikazioaren instalazioa eta kontuaren sorrera
- Deskargatu iCSee app from your smartphone's app store (iOS App Store or Google Play Store).
- Instalatu aplikazioa eta ireki.
- Follow the on-screen instructions to create a new account or log in if you already have one.
4.3 Camera Connection to Wi-Fi
- Ziurtatu kamera piztuta dagoela.
- In the iCSee app, tap the "+" icon to add a new device.
- Select the option for "Wi-Fi Camera" or "Add Device by AP Hotspot" (refer to app for exact wording).
- Follow the app's instructions to connect the camera to your 2.4GHz Wi-Fi network. You may need to scan a QR code displayed on your phone with the camera, or listen for a sound prompt.
- Behin konektatuta, kamerari izena jarri eta monitorizazioa has dezakezu.
4.4 Kamera muntatzea
Choose a location that provides optimal surveillance coverage and receives direct sunlight for the solar panel. Ensure the camera is within range of your Wi-Fi network.
- Aukeratu kokapena: Identify a suitable wall or surface for mounting. Consider the camera's viewing angle (355° pan, 90° tilt) and the solar panel's exposure to sunlight.
- Markatu zulatzeko puntuak: Use the mounting base as a template to mark the screw holes on the wall.
- Zulatzeko zuloak: Drill pilot holes at the marked positions. Insert wall anchors if necessary.
- Muntatzeko oinarria erantsi: Lotu oinarria horman emandako torlojuak erabiliz.
- Erantsi kamera: Mount the camera onto the secured base.
- Doitu eguzki-panela: Position the solar panel to maximize sunlight exposure throughout the day.

4.1. irudia: Illustration of the camera mounted with its solar panel, highlighting the fixed and rotating lenses and the benefit of continuous solar power.
5. Funtzionamendu-argibideak
5.1 Bizi View eta Erreprodukzioa
Open the iCSee app and select your camera to access the live view. From here, you can:
- Denbora errealeko jarraipena: View zuzeneko bideo-jarioa.
- PTZ kontrola: Use the on-screen joystick to pan (355°) and tilt (90°) the camera.
- Zoom digitala: Pinch to zoom on the live feed.
- Erreprodukzioa: Sartu grabatutako footage stored on the SD card or cloud storage.

5.1. irudia: Demonstrates the superior clarity of 2K QHD resolution compared to 1080P, providing more details for monitoring.
5.2 Mugimenduaren detekzioa eta alertak
The camera utilizes PIR (Passive Infrared) intelligent detection to identify human movement, minimizing false alarms from pets or swaying branches.
- Gaitu/Desgaitu: Activate or deactivate motion detection in the app settings.
- Sentikortasunaren doikuntza: Adjust the PIR sensor's sensitivity to suit your environment.
- Alarma jakinarazpenak: Jaso berehalako push jakinarazpenak zure telefonoan mugimendua detektatzen denean.
- Soinu eta argiaren alarma: Configure the camera to trigger a strobe light and audible alarm upon detection.

5.2. irudia: The camera's PIR intelligent detection distinguishes human movement from other objects, reducing unnecessary alerts.

5.3. irudia: When motion is detected, the camera can send real-time push notifications and activate a sound and light alarm to deter intruders.
5.3 Gaueko ikusmen moduak
The camera offers two night vision modes for clear visibility in the dark:
- Spotlight Full Color Night Vision: Utilizes built-in spotlights to provide full-color video in low-light conditions.
- Spotlight Infrared Night Vision: Uses infrared LEDs for black-and-white video in complete darkness, with a range of up to 30 meters.
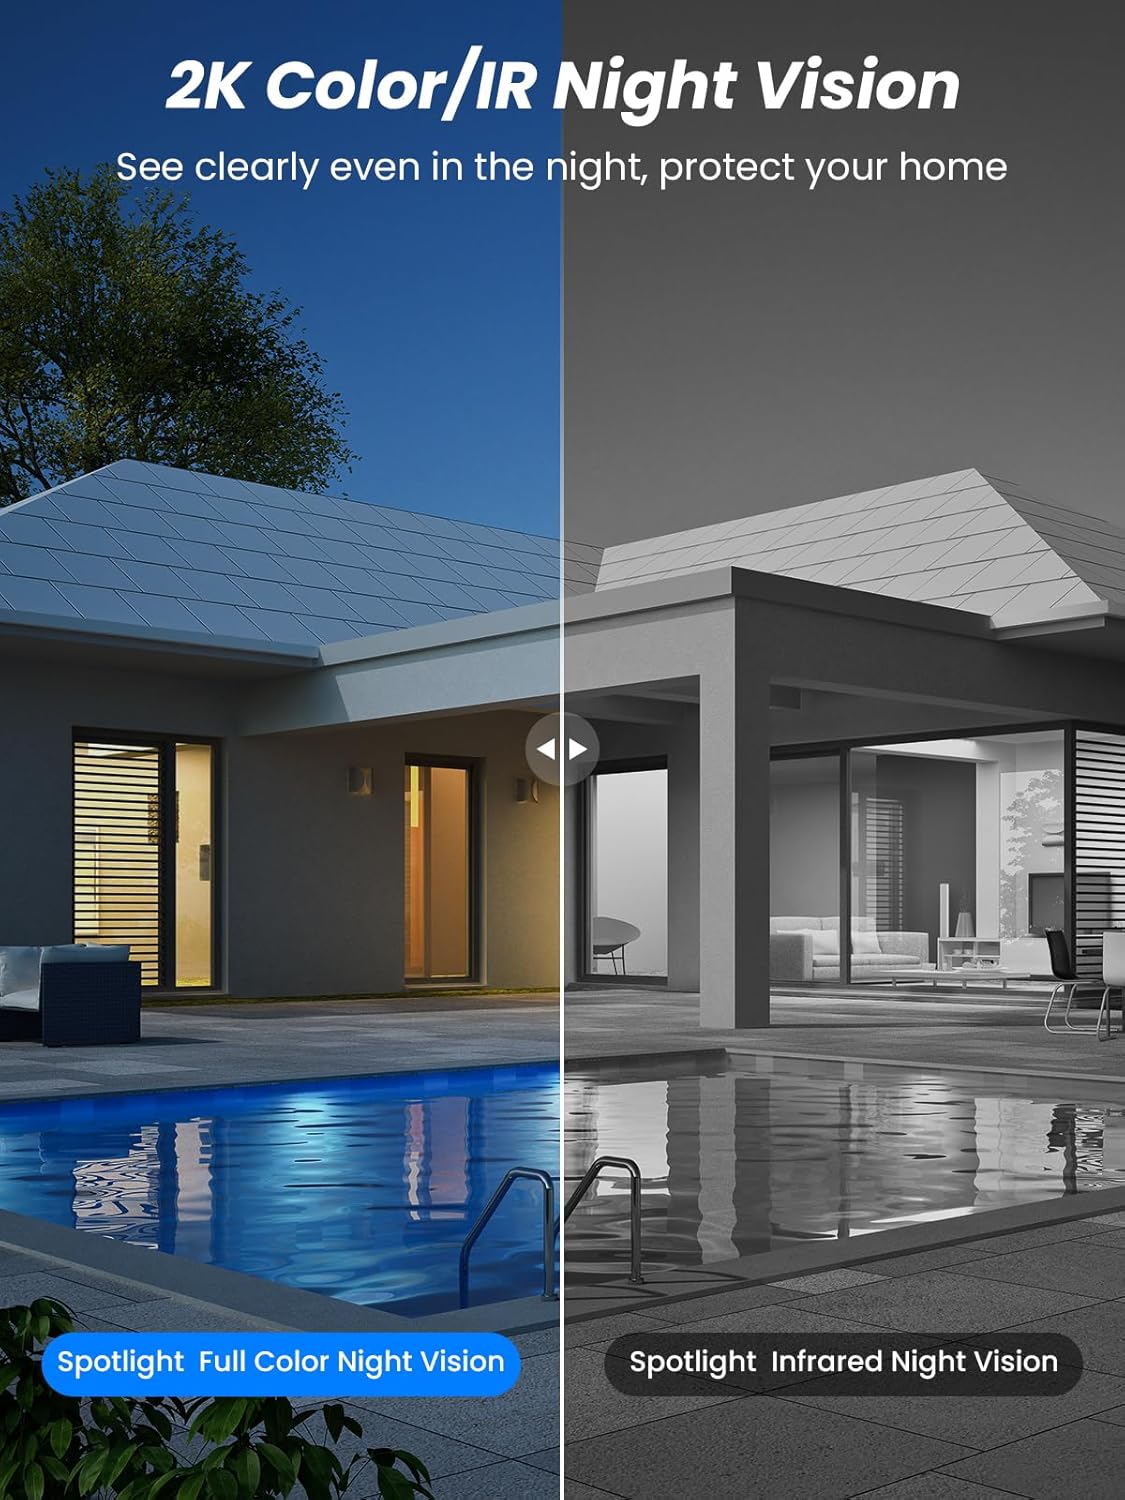
5.4. irudia: Illustrates the difference between full-color night vision, enabled by spotlights, and traditional infrared night vision.
5.4 Bi norabideko audioa
The integrated microphone and speaker allow for two-way communication.
- Hitz egin: Sakatu aplikazioko mikrofonoaren ikonoa kameraren bozgorailutik hitz egiteko.
- Entzun: The camera's microphone captures audio from its surroundings.

5.5. irudia: The two-way audio function allows for direct communication through the camera, useful for interacting with visitors or delivery personnel.
6. Mantentzea
- Garbiketa: Aldian-aldian garbitu kameraren lentea eta eguzki-panela oihal leun eta lehor batekin.amp oihal bat erabili errendimendu optimoa eta irudiaren kalitate garbia bermatzeko. Saihestu garbitzaile urratzaileak.
- Bateria osasuna: While solar-powered, extreme weather or prolonged periods of low sunlight may require manual charging. Monitor battery levels via the app.
- Firmware eguneraketak: Check the iCSee app regularly for available firmware updates to ensure your camera has the latest features and security enhancements.
- Eguraldiaren babesa: The camera is IP66 weatherproof, designed to withstand rain, snow, and sun. However, ensure all connections are secure to maintain water resistance.

6.1. irudia: The IP66 rating ensures the camera's durability and functionality in various outdoor weather conditions, including snow, rain, and direct sunlight.
7. Arazoak
- Kamera ez da Wi-Fi-ra konektatzen:
- Ensure the camera is within range of your 2.4GHz Wi-Fi network. 5GHz networks are not supported.
- Egiaztatu zure Wi-Fi pasahitza zuzena dela.
- Berrabiarazi zure bideratzailea eta kamera.
- If issues persist, try resetting the camera (refer to app or product for reset button location).
- Battery not charging or draining quickly:
- Ziurtatu eguzki-panelak garbi dagoela eta egunero hainbat orduz eguzki-argia zuzenean jasotzen duela.
- Egiaztatu eguzki-panelaren eta kameraren arteko konexioa.
- If in a low-light environment, manually charge the camera using the Type-C cable.
- Frequent motion detection events or live view streaming can consume battery faster. Adjust settings if needed.
- False motion detection alarms:
- Adjust the PIR motion detection sensitivity in the iCSee app.
- Ziurtatu kamera ez dagoela etengabeko mugimendua dagoen eremuetara zuzenduta (adibidez, errepide jendetsuetara, zuhaitz kulunkarietara), monitorizaziorako pentsatuta ez badago.
- Irudiaren kalitate eskasa:
- Garbitu kameraren lentea.
- Ensure sufficient lighting for optimal image capture, especially at night.
- Egiaztatu zure Wi-Fi seinalearen indarra; seinale ahul batek bideoaren erreprodukzioaren kalitatea eragin dezake.
8. Zehaztapenak
| Ezaugarri | Xehetasuna |
|---|---|
| Ereduaren izena | D20-1P |
| Bideo Harrapaketa Ebazpena | 2.5K |
| Bideo Ebazpen eraginkorra | 2K QHD |
| Haririk gabeko Komunikazio Teknologia | Wi-Fi (2.4 GHz) |
| Forma-faktorea | Kupula |
| Viewangelua | 355 gradu (panoramikoa), 90 gradu (inklinatua) |
| Instalazio mota | Horman muntatuta |
| Gaueko Ikusmenaren barrutia | 30 metro |
| Fotograma-tasa | 25 fps |
| Materiala | Plastikoa |
| liburukiatage | 12 voltio (DC) |
| Wattage | 5 watt |
| Energia iturria | Bateriaz elikatzen da, eguzki-energiaz elikatzen da |
| Pilak | 3 litio ioizko bateriak (barne) |
| Konektibitate-protokoloa | Wi-Fi |
| Kontrolagailu mota | iCSee aplikazioa |
| Ezaugarri bereziak | Night Vision (Color/IR), PIR Motion Detection, Two-Way Audio, IP66 Weatherproof |
| Elementuaren pisua | 1.06 kg |
| Paketearen neurriak | 21.7 x 19.5 x 13.8 cm |
9. Bermea eta Laguntza
Reobiux offers a 1 urteko bermea for this product. For any issues or inquiries, please do not hesitate to reach out to our customer service. We provide 20 hours of online service to assist you.
For support, please refer to the contact information provided with your purchase or within the iCSee application.


