1. Segurtasun-argibide garrantzitsuak
Please read all safety instructions carefully before using this projector. Keep this manual for future reference.
- Energia iturria: Erabili zehaztutako energia-egokitzailea soilik. Ziurtatu bolumenatage proiektorearen eskakizunekin bat dator.
- Aireztapena: Ez blokeatu aireztapen-irekidurak. Ziurtatu aire-fluxu egokia dagoela proiektorearen inguruan gehiegi berotzea saihesteko.
- Ura eta hezetasuna: Ez jarri proiektorea euriaren, hezetasunaren edo beste likido batzuen eraginpean.
- Garbiketa: Deskonektatu proiektorea garbitu aurretik. Erabili zapi leun eta lehor bat. Ez erabili garbitzaile likido edo aerosolik.
- Beroa: Keep the projector away from heat sources such as radiators, heat registers, stoves, or other apparatus that produce heat.
- Zerbitzua: Ez saiatu produktu hau zuk zeuk ematen. Bidali zerbitzu guztiak zerbitzu kualifikatuko langileengana.
- Begietako babesa: Ez begiratu zuzenean proiektorearen lenteari l dagoenean.amp piztuta dago.
2. Paketearen edukia
Egiaztatu elementu guztiak zure paketean daudela:
- Optex Compact WiFi Projector
- Urruneko Kontrola
- Elikatze-moldagailua
- Erabiltzailearen eskuliburua (dokumentu hau)
3. Produktua amaitu daview
3.1 Aurrealdea eta Goialdea View
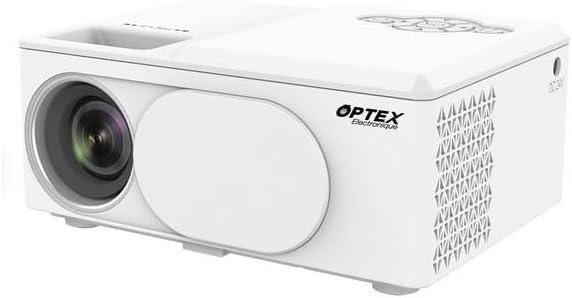
This image displays the Optex Compact WiFi Projector from a three-quarter front and top perspective. Visible components include the projection lens on the front left, a protective lens cover, and the main body of the projector. The top surface shows a recessed area for focus adjustment and a control panel with navigation buttons.
3.2 Kontrol panela eta atakak

This image highlights two key areas of the projector. On the left, a close-up of the top control panel shows a circular array of navigation buttons (up, down, left, right, OK), power button, and return button, allowing for direct interaction with the projector's menu. On the right, a close-up of the side panel reveals the various input/output ports: DC 21V power input, IR receiver, two USB ports, an HDMI port, and a Type-C port, enabling diverse connectivity options.
4. Konfigurazio gida
4.1 Jartzea
- Jarri proiektorea gainazal egonkor eta lau batean.
- Ensure the projector is positioned at an appropriate distance from the projection surface (wall or screen) to achieve the desired image size.
- For optimal image quality, project in a dark environment.
4.2 Energia-konexioa
- Connect the power adapter to the 'DC 21V' port on the side of the projector.
- Entxufatu korronte-egokigailuaren beste muturra hormako entxufe batera.
- Proiektorearen pizte-adierazlearen argia piztuko da.
5. Funtzionamendu-argibideak
5.1 Piztu/Itzali
- Piztu: Sakatu pizteko botoia proiektorearen edo urrutiko agintearen.
- Itzali: Sakatu berriro pizteko botoia. Berretsi itzaltzea eskatzen bazaizu.
5.2 Fokuaren doikuntza
- Biratu lentearen ondoan dagoen fokatze-eraztuna proiektatutako irudia garbi eta zorrotz agertu arte.
5.3 Sarrera iturriaren hautaketa
- Press the 'Source' button on the remote control or navigate through the projector's menu to select the desired input source (e.g., HDMI, USB, WiFi).
- HDMI: Connect an HDMI cable from your device (laptop, game console) to the projector's HDMI port.
- USBa: Sartu USB unitate bat USB ataka batean multimedia erreproduzitzeko files.
5.4 WiFi Connection and Screen Mirroring
- Navigate to the 'Settings' or 'WiFi' menu on the projector.
- Hautatu zure WiFi sarea eta idatzi pasahitza.
- Once connected, select the 'Screen Mirroring' or 'Wireless Display' option.
- On your smartphone or tablet, enable screen mirroring (e.g., Miracast, AirPlay, Smart View) and select the projector from the list of available devices.
6. Mantentzea
6.1 Lentea garbitzea
- Erabili lente optikoetarako bereziki diseinatutako zapi leun eta lihorik gabekoa.
- Gently wipe the lens to remove dust or smudges. Do not use abrasive cleaners.
6.2 Proiektorearen gorputza garbitzea
- Garbitu proiektorearen kanpoaldea zapi leun eta lehor batekin.
- Ez erabili produktu kimiko edo disolbatzaile gogorrik.
6.3 Biltegiratzea
- When not in use, store the projector in a cool, dry place.
- Cover the lens with its protective cap to prevent dust accumulation.
7. Arazoak
Arazoak badituzu, jo ezazu honako arazo eta irtenbide ohikoenei:
- Potentziarik gabe: Ensure the power adapter is securely connected to both the projector and the power outlet. Try a different outlet.
- Irudirik ez: Check the input source selection. Ensure the connected device is powered on and sending a signal. Verify all cables are securely connected.
- Irudi lausoa: Adjust the focus ring on the projector lens. Ensure the projection surface is flat and the projector is at an optimal distance.
- Soinurik ez: Check the volume settings on both the projector and the connected source device. Ensure external speakers are properly connected if used.
- Urruneko kontrola ez dabil: Egiaztatu urrutiko agintearen bateriak. Ziurtatu ez dagoela oztoporik urrutiko agintearen eta proiektorearen IR hargailuaren artean.
8. Zehaztapen Teknikoak
| Ezaugarri | Zehaztapena |
|---|---|
| Marka | Optex |
| Bistaratzeko Teknologia | LED |
| Berezko Ebazpena | 800 x 400 |
| Gehienezko pantailaren bereizmena | 1920 x 1080 (HD osoa) |
| Distira | 2100 lumen |
| Konektibitate Teknologia | HDMI, USB, WiFi |
| Hardware interfazea | HDMI, USB, Type-C |
| Kontrolagailu mota | Urruneko Kontrola |
| Energia-kontsumoa | 43 Watt |
| Forma-faktorea | Eramangarria |
| Muntatze Mota | Mahai-muntaia |
9. Bermea eta bezeroarentzako laguntza
This product comes with a standard manufacturer's warranty. For specific warranty terms and conditions, please refer to the documentation provided with your purchase or contact your retailer.
For technical support or customer service inquiries, please contact the Optex customer support team through their official webgunea edo erosketa-dokumentazioan emandako harremanetarako informazioa.


