1. Sarrera
This manual provides essential information for the safe and efficient operation of your Pretul DESI-36P2 3.6V Cordless Screwdriver. Please read it thoroughly before first use and keep it for future reference. This compact cordless screwdriver is designed for light-duty fastening tasks, featuring a two-position handle and an integrated LED work light.

1. irudia: Pretul DESI-36P2 Cordless Screwdriver. This image shows the screwdriver in its straight configuration, highlighting its compact design and yellow and black color scheme.
2. Segurtasun informazioa
Beti jarraitu oinarrizko segurtasun neurriak tresna elektrikoak erabiltzean, sute, deskarga elektriko eta lesio pertsonalen arriskua murrizteko.
- Lan eremuko segurtasuna: Mantendu zure lan-eremua garbi eta ondo argiztatuta. Eremu nahasiak edo ilunek istripuak gonbidatzen dituzte.
- Segurtasun elektrikoa: Ez jarri tresna elektrikoak euria edo hezetasunera. Erreminta elektriko batean sartzeak deskarga elektrikoaren arriskua areagotuko du.
- Segurtasun pertsonala: Egon adi, ikusi zer egiten ari zaren eta erabili zentzua erreminta elektrikoa ustiatzean. Ez erabili tresna elektrikorik nekatuta edo drogen, alkoholaren edo botiken eraginpean zauden bitartean.
- Tresnaren erabilera eta zaintza: Ez behartu tresna elektrikoa. Erabili tresna elektriko egokia zure aplikaziorako. Lana hobeto eta seguruago egingo du diseinatu zen erritmoan.
- Bateria zaintzea: Kargatu fabrikatzaileak zehaztutako kargagailuarekin soilik. Bateria mota baterako egokia den kargagailu batek sute-arriskua sor dezake beste bateria batekin erabiltzen denean.
3. Produktuaren osagaiak eta ezaugarriak
Familiarize yourself with the parts of your Pretul DESI-36P2 cordless screwdriver.
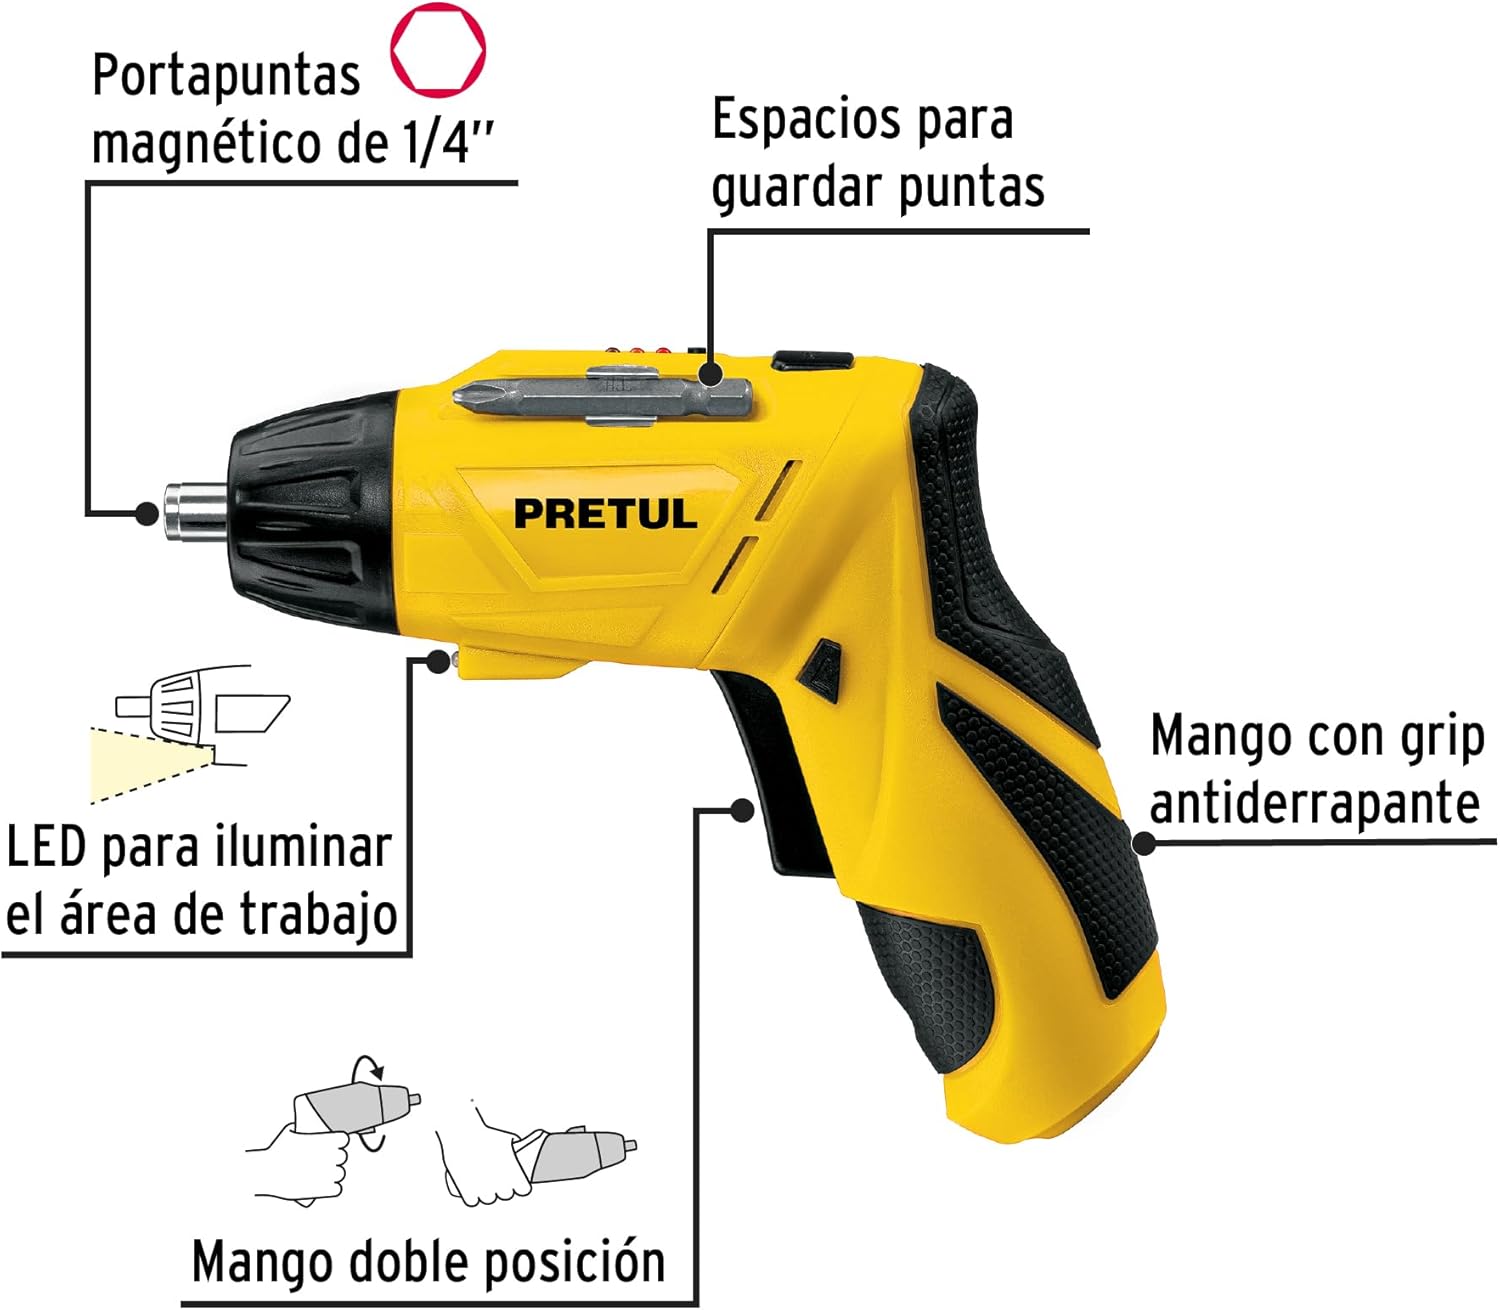
2. irudia: Key features of the Pretul DESI-36P2. This diagram illustrates the magnetic 1/4" bit holder, bit storage slots, anti-slip grip handle, LED work light, and the two-position handle mechanism.
- Magnetic 1/4" Hex Bit Holder: Securely holds screwdriver bits for quick changes.
- Bit Storage Slots: Conveniently located on the tool for storing extra bits.
- Anti-slip Grip Handle: Provides comfortable and secure handling during operation.
- Laneko LED argia: Lan-eremua argitzen du, argi gutxiko espazioetan ikusgarritasun hobea lortzeko.
- Bi posizioko heldulekua: Allows the screwdriver to be used in a straight or pistol-grip configuration for versatility and access in tight spaces.
- Aurrera/Atzera etengailua: Controls the direction of rotation for tightening and loosening screws.
- Pizteko botoia: Activates the screwdriver.
4. Konfigurazioa
4.1 Hasierako karga
Before first use, fully charge the screwdriver's internal battery. Connect the charger to a standard electrical outlet and then to the charging port on the screwdriver. The charging indicator (if present) will show the charging status. Disconnect the charger once the battery is fully charged.
4.2 Attaching Screwdriver Bits
- Select the appropriate 1/4" hex screwdriver bit for your task.
- Insert the bit firmly into the magnetic bit holder at the front of the screwdriver until it is securely seated.
- To remove a bit, simply pull it out from the holder.
4.3 Adjusting Handle Position
The screwdriver features a two-position handle for enhanced versatility:
- Pistol Grip: Standard configuration for most tasks.
- Straight Grip: For reaching into confined spaces. To change the handle position, firmly grasp the handle and the body of the screwdriver, then pivot the handle until it locks into the desired position.
5. Funtzionamendu-argibideak
5.1 Piztu/Itzaltzea
Press and hold the power button to activate the screwdriver. Release the button to stop operation. The LED work light will activate when the power button is pressed.
5.2 Selecting Rotation Direction
Use the forward/reverse switch, typically located near the trigger, to select the desired rotation direction:
- Aurrerantz biratzeko (torlojuak estutuz) bultzatu etengailua ezkerrera.
- Alderantzizko biraketa egiteko (torlojuak askatzeko), bultzatu etengailua eskuinera.
- Ensure the switch is in the center position to lock the tool and prevent accidental activation.
5.3 Fastening Screws
- Ensure the correct bit is installed and the rotation direction is set to forward.
- Place the bit onto the screw head, applying gentle pressure.
- Press the power button to start driving the screw. Release the button once the screw is fully seated or the desired torque is reached.
5.4 Torlojuak askatzea
- Ensure the correct bit is installed and the rotation direction is set to reverse.
- Place the bit onto the screw head, applying gentle pressure.
- Press the power button to start loosening the screw. Release the button once the screw is free.
6. Mantentzea
Mantentze-lan erregularrak errendimendu optimoa bermatzen du eta zure tresnaren bizitza luzatzen du.
- Garbiketa: Mantendu tresnaren aireztapen-irekidurak garbi eta hondakinik gabe. Erabili eskuila leun eta lehor bat.amp zapi bat kanpoaldea garbitzeko. Ez erabili produktu kimiko gogorrik edo garbitzaile urratzailerik.
- Bit-euskarria: Periodically inspect the bit holder for wear or damage. Clean any accumulated dust or metal shavings.
- Bateria biltegiratzea: Store the screwdriver in a cool, dry place away from direct sunlight and extreme temperatures. For long-term storage, ensure the battery is partially charged (around 50%).
- Ikuskapena: Regularly check for loose screws, damaged cords (if applicable), or any other conditions that may affect safe operation.
7. Arazoak
Zure bihurkinarekin arazoak badituzu, jo ezazu honako arazo eta irtenbide ohikoenei:
| Arazoa | Kausa posiblea | Irtenbidea |
|---|---|---|
| Bihurkinak ez du pizten. | Bateria deskargatuta dago. | Kargatu bateria guztiz. |
| Screwdriver lacks power. | Bateria gutxi dago. | Kargatu bateria. |
| Punta torloju-burutik irrist egiten du. | Broka-tamaina okerra edo broka higatua. | Use the correct bit size; replace worn bits. |
| Handle does not lock into position. | Not fully pivoted. | Ensure the handle is fully pivoted until it clicks into place. |
Irtenbide hauek saiatu ondoren arazoa konpontzen ez bada, jarri harremanetan bezeroarentzako arreta-zerbitzuarekin.
8. Zehaztapenak
Technical specifications for the Pretul DESI-36P2 Cordless Screwdriver.

3. irudia: Dimensions of the Pretul DESI-36P2. This image shows the screwdriver with measurements indicating a length of 17.5 cm and a height of 13 cm.
| Ezaugarri | Zehaztapena |
|---|---|
| Modelo zenbakia | DESI-36P2 (26402) |
| Marka | Pretul |
| Energia iturria | Bateria |
| Bateria Voltage | 3.6 Volt |
| Abiadura | 230 RPM |
| Momentua | 3E+1 Pound-inches (approximately 30 in-lbs) |
| Bit titularra | 1/4" Hex Magnetic |
| Materiala | Plastikoa, Metala |
| Neurriak (L x H) | 17.5 cm x 13 cm (approximate, based on image) |
| Pisua | 530 g (0.53 kg) |
| Dakarten osagaiak | 5 Phillips bits 1" (PH1, PH2, PH3), Charger, 2 Phillips bits 2" (PH1, PH2), 1/4" Magnetic extension |
9. Bermea eta Laguntza
The Pretul DESI-36P2 Cordless Screwdriver comes with a 1 urteko bermea erosketa-datatik aurrera. Gorde erosketaren egiaztagiria berme-erreklamazioetarako.

4. irudia: Product packaging showing the included components and a "1 year warranty" seal.
For technical support, service, or warranty inquiries, please contact Pretul customer service through their official channels or the retailer where the product was purchased.