1. Sarrera
The virtavo VistaFlask 2K Security Camera is a wireless, battery-powered outdoor camera designed to enhance your home security. Featuring 2K QHD imaging, AI motion detection, starlight lens for colorful night vision, and weatherproof construction, it provides reliable surveillance in various conditions. This manual provides detailed instructions for setting up, operating, maintaining, and troubleshooting your camera.

Image: Two virtavo VistaFlask 2K security cameras, designed for outdoor use.
2. Segurtasun informazioa
- Ziurtatu kamera ondo instalatuta dagoela erortzea saihesteko.
- Use only the specified charging cable and power adapter to charge the battery.
- Ez jarri kamera bere funtzionamendu-eremutik kanpo dauden tenperatura altuetan.
- Avoid disassembling or modifying the camera, as this will void the warranty and may cause damage.
- Gorde kamera eta haren osagarriak haurren eskura ez dauden lekuetan.
3. Paketearen edukia
- virtavo VistaFlask 2K Security Camera(s)
- Muntatzeko euskarria(k)
- USB kargatzeko kablea
- Erabiltzailearen eskuliburua
- Muntatzeko Torlojuak eta Aingurak
4. Produktua amaitu daview
The virtavo VistaFlask camera features a compact design with essential components for optimal performance. Key elements include the lens, IR LEDs for night vision, a microphone for audio input, a speaker for two-way communication, and a motion sensor. The power switch, sync button, and charging port are located at the bottom of the camera, alongside the microSD card slot for local storage.

Irudia: Barnekoa view highlighting the battery and electronic components.

Irudia: Behealdea view of the camera with power switch, charging port, sync button, and microSD card slot.
5. Konfigurazio gida
5.1 Hasierako konfigurazioa
- Kamera kargatu: Before first use, fully charge the camera using the provided USB cable. The battery lasts 1-3 months per charge depending on usage.
- Deskargatu aplikazioa: Bilatu 'HOME V' in your smartphone's app store (iOS or Android) and download the application.
- Sortu kontu bat: Open the 'HOME V' app and follow the on-screen instructions to register a new account or log in if you already have one.
5.2 Camera Pairing and Connection
Follow these steps to pair your virtavo VistaFlask camera with the 'HOME V' app. For a visual guide, please refer to the official installation video below.
Video: Official virtavo VistaFlask Installation Guide Setup. This video demonstrates the step-by-step process of binding the camera to the 'HOME V' app using QR codes, including powering on the camera, confirming the red light flashing, connecting to the camera's hotspot, and connecting to your home Wi-Fi network.
- Gehitu gailua: In the 'HOME V' app, tap the '+' icon to add a new device.
- Eskaneatu QR kodea: Grant camera access to the app. Scan the QR code located on the back of your virtavo VistaFlask camera.
- Piztu: Ensure the camera is powered on. The power switch is located at the bottom.
- Confirm Flashing Light: Confirm that the camera's red indicator light is flashing rapidly. If not, press and hold the 'Sync' button for 5-10 seconds until you hear a 'Du' sound or see rapid flashing.
- Connect to Camera Hotspot: The app will prompt you to connect to the camera's Wi-Fi hotspot (e.g., 'IPC365_AP-XXXX'). Confirm and join this network.
- Select Home Wi-Fi: Choose your home 2.4GHz Wi-Fi network from the list and enter the correct password. Note: This device only supports 2.4GHz Wi-Fi.
- Izendatu zure kamera: Once connected, name your camera for easy identification (e.g., 'Front Door', 'Living Room').
5.3 Instalazio fisikoa
The virtavo VistaFlask camera is designed for easy installation, both indoors and outdoors. Its weatherproof design ensures durability.

Image: Easy installation on smooth surfaces like glass or tiles, no drilling required.

Image: Wireless connection for remote access.
- Aukeratu kokapena: Select a location with good Wi-Fi signal strength and a clear view kontrolatu nahi duzun eremuarena.
- Muntaketa: Use the provided mounting bracket, screws, and anchors to securely attach the camera to a wall or other suitable surface. Ensure the camera is positioned to capture the desired field of view.
- Eguraldi erresistentea: The camera is designed to withstand various weather conditions, making it suitable for outdoor use.
6. Funtzionamendu-argibideak
6.1 Bizi View eta bi norabideko audioa
Access real-time video feed and communicate through the camera using the 'HOME V' app.
- Zuzenean View: Ireki aplikazioa eta hautatu zure kamera view zuzeneko jarioa.
- Bi norabideko audioa: Sakatu mikrofonoaren ikonoa zuzeneko emanaldian view to speak through the camera's speaker, and listen through its microphone.
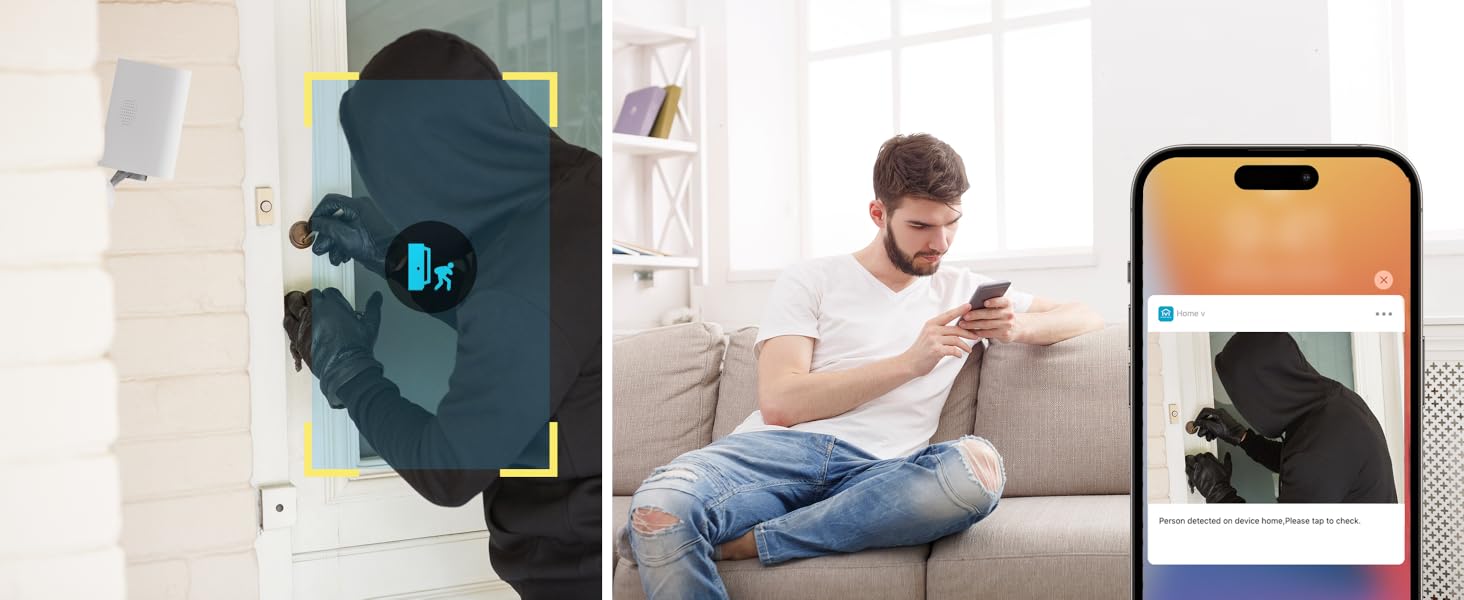
Image: Two-way audio feature for communication.
6.2 Mugimenduaren detekzioa eta alertak
The camera features advanced PIR motion detection and AI capabilities to minimize false alarms.
- PIR Mugimendu Detekzioa: 30 oin arteko mugimendua detektatzen du.
- Alerta adimendunak: Jaso berehalako jakinarazpenak zure telefonoan mugimendua detektatzen denean.
- AI Detection (Cloud Subscription): With an optional cloud subscription, the camera can differentiate between humans, vehicles, and animals, reducing irrelevant alerts.
- Detekzio-eremu pertsonalizagarriak: Set specific areas for motion detection to focus on critical zones and ignore others.
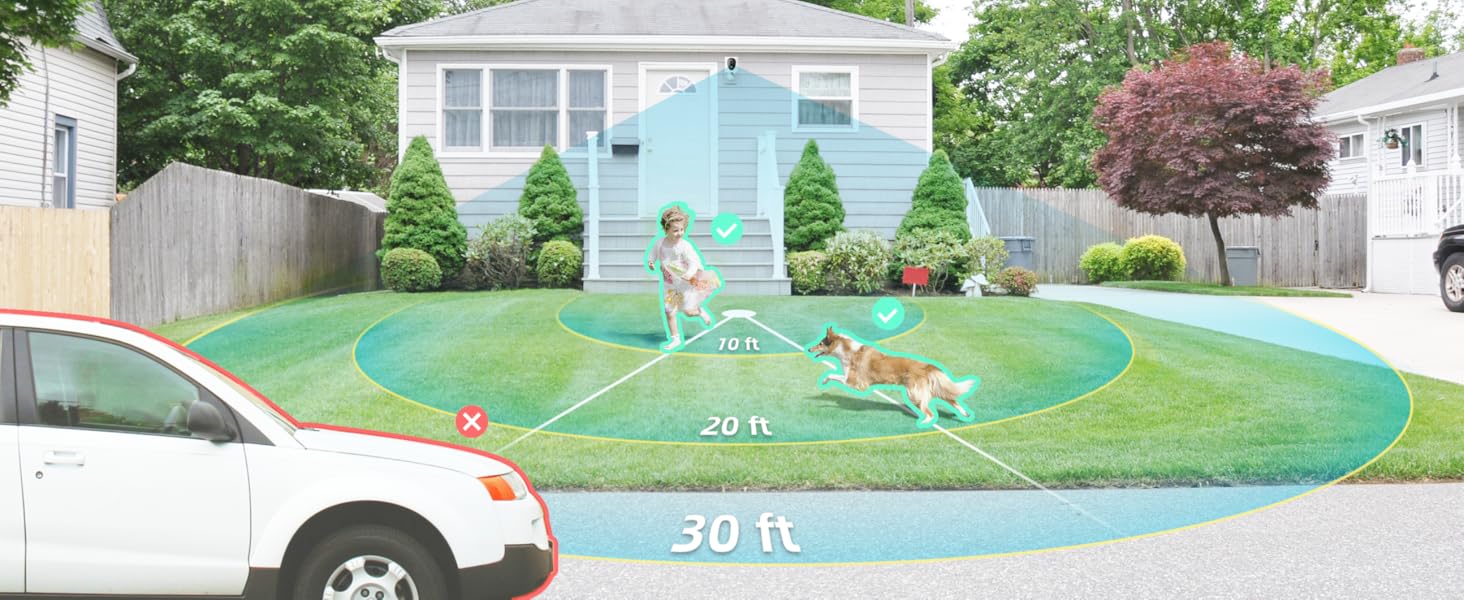
Image: Smart detection distinguishing between people, vehicles, and animals.
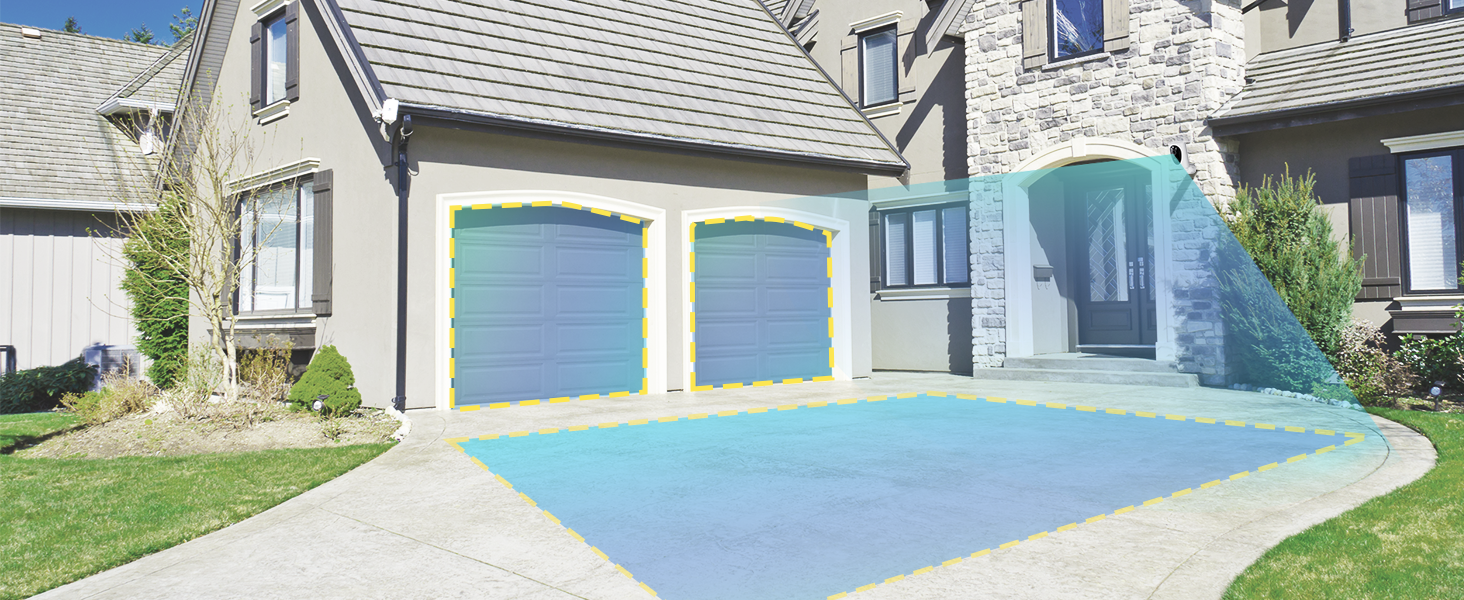
Image: Customizable motion detection zones.

Image: Instant alerts with image previews.
6.3 Gaueko ikusmena
The camera provides clear vision even in low-light conditions.
- Kolore Gaueko Ikusmena: Utilizes Starlight technology and a wide F1.6 aperture for vivid, color-rich images in low light.
- IR gaueko ikuspegia: Equipped with 2 high-intensity IR LEDs for clear black-and-white viewing in complete darkness.

Image: Superior 2K QHD imaging and color-rich night vision.
6.4 Grabaketa eta biltegiratzea
Your data is secured with flexible storage options.
- Tokiko biltegiratzea: Supports microSD cards from 32GB to 256GB for continuous recording, even without network access. (MicroSD card not included).
- Hodeiko biltegiratzea: Optional cloud storage plans offer additional features like snapshot alerts and advanced AI capabilities. Video encryption ensures privacy.
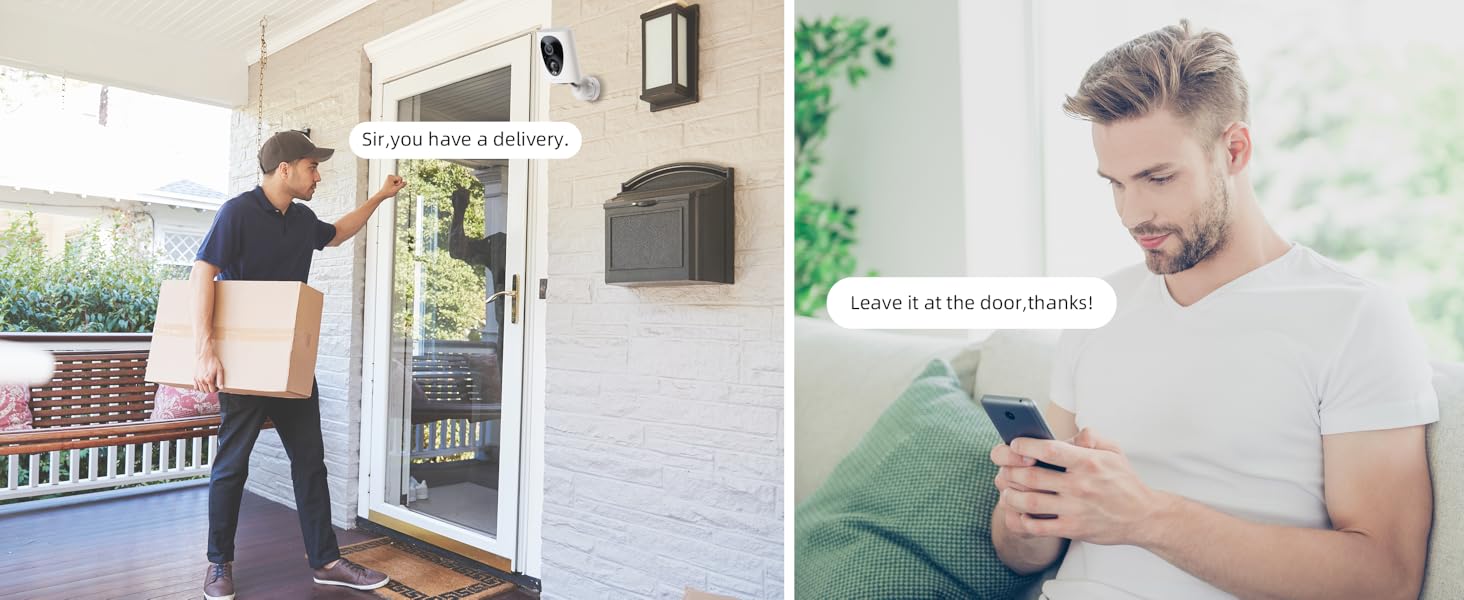
Image: Comparison of no-fee basic storage (SD card) and cloud storage options.
6.5 App Features and Remote Access
Manage and control your security remotely via the 'HOME V' app.
- Urruneko monitorizazioa: Monitor your home from anywhere with an internet connection.
- Erabiltzaile anitzeko sarbidea: Partekatu kameraren sarbidea familiako kideekin.
- Programazioa: Set schedules for recording or alerts.

Image: Remote access and multi-user monitoring via the 'HOME V' app.
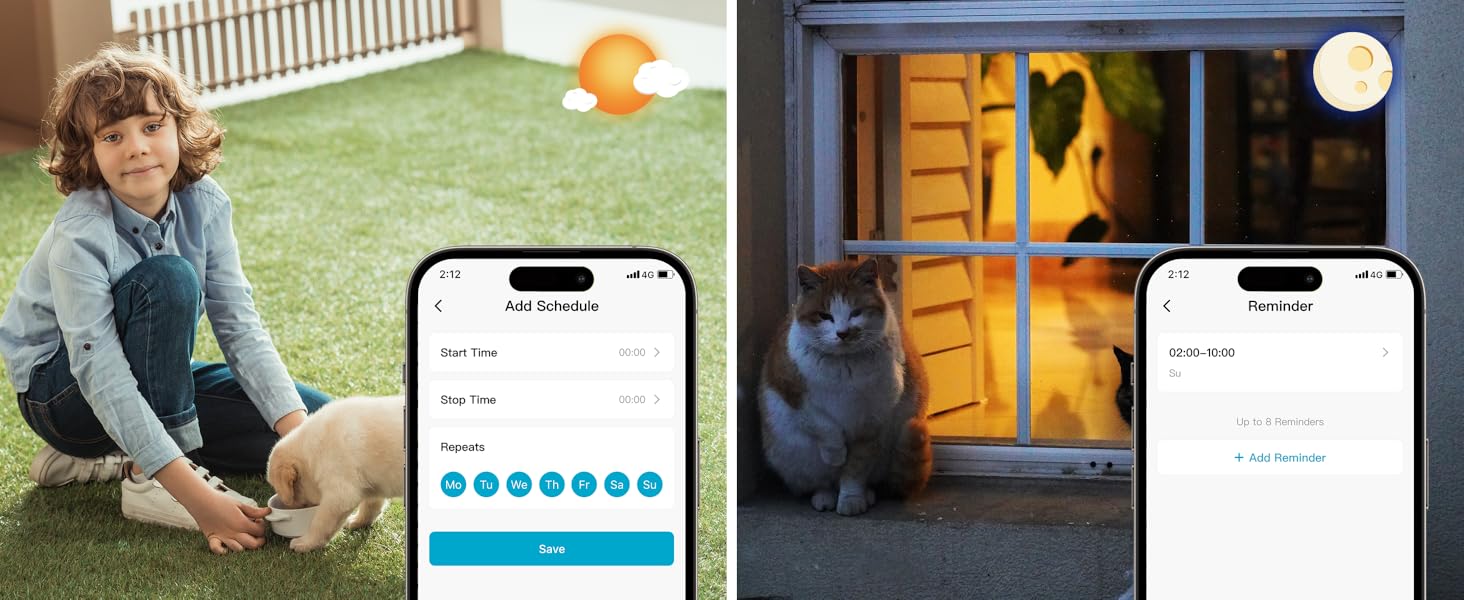
Image: App features including scheduling and reminders.
7. Mantentzea
- Bateria kargatzea: Recharge the camera battery when prompted by the app. A full charge can last 1-3 months depending on activity.
- Garbiketa: Garbitu astiro kameraren lentea eta gorputza zapi leun batekin,amp oihal. Saihestu garbitzaile urratzaileak.
- Firmware eguneraketak: Regularly check the 'HOME V' app for firmware updates to ensure optimal performance and security.
8. Arazoak
| Gaia | Kausa posiblea | Irtenbidea |
|---|---|---|
| Kamera ez da pizten | Battery depleted; Power switch off | Charge the camera fully; Ensure power switch is in the 'ON' position. |
| Ezin da wifira konektatu | Incorrect Wi-Fi password; 5GHz Wi-Fi network; Weak Wi-Fi signal | Verify password; Ensure you are connecting to a 2.4GHz network; Move camera closer to router or use a Wi-Fi extender. |
| Alarma faltsuak maiz | High motion sensitivity; Unfiltered motion sources (e.g., trees, animals) | Adjust motion sensitivity in app; Set up detection zones to exclude irrelevant areas; Consider cloud subscription for AI detection. |
| Poor night vision clarity | Dirty lens; Obstruction in front of camera; Insufficient ambient light for color night vision | Clean the lens; Remove obstructions; Ensure adequate ambient light for color mode or switch to IR night vision. |
| Bateria azkar agortzen da | High activity/recordings; Frequent live view access; Weak Wi-Fi signal | Reduce motion detection sensitivity; Limit live view sessions; Improve Wi-Fi signal strength. |
9. Zehaztapenak
| Ezaugarri | Xehetasuna |
|---|---|
| Ereduaren izena | LJH10 |
| Barruko/Kanpoko erabilera | Barruan, Kanpoan |
| Energia iturria | Battery Powered (4400mAh rechargeable Lithium battery) |
| Konektibitate-protokoloa | Wi-Fi (2.4 GHz bakarrik) |
| Kontrolagailu mota | HOME V aplikazioa |
| Muntatze Mota | Hormako Muntaia |
| Bideo Harrapaketa Ebazpena | 2K QHD |
| Viewangelua | 120 Degrees (Field of View130 gradu) |
| Gaueko Ikusmenaren barrutia | 30 Oin |
| Argi gutxiko teknologia | Starlight (F1.6 aperture, 3.0mm focal length) |
| IR LED kopurua | 2 |
| Uraren Erresistentzia Maila | Iragazgaitza |
| Neurriak (L x W x H) | 2.7 x 1.3 x 3.2 hazbete |
| Elementuaren pisua | 1.41 kilo |
| Biltegiratze-aukerak | MicroSD (32GB-256GB), hodeiko biltegiratzea |
| Ezaugarri bereziak | 2-Way Audio, Battery Powered, Local Recording, Motion Sensor, Night Vision, AI Motion Detection |
10. Bermea eta Laguntza
virtavo products are designed for reliability and performance. For information regarding product warranty, please refer to the warranty card included in your product packaging or visit the official virtavo website. If you encounter any issues or have questions not covered in this manual, please contact virtavo customer support through the 'HOME V' app or their official support channels for assistance.


