1. Sarrera
This manual provides detailed instructions for the setup, operation, and maintenance of your JoFomp 17.3" Large Digital Wall Clock. Please read this manual thoroughly before use to ensure proper functionality and longevity of the product.
2. Segurtasun informazioa
- Ensure the clock is connected to a stable power source (5V/2A adapter included).
- Ez jarri gailua tenperatura altuen, eguzki-argiaren eraginpean edo hezetasun handiaren eraginpean.
- Mantendu haurren eskura.
- Ez saiatu gailua zuk zeuk desmuntatzen edo konpontzen. Jarri harremanetan bezeroarentzako laguntza eskatzeko.
- Urruneko kontrolak 2 AAA pila behar ditu (ez daude barne).
- A 1 AAA battery (not included) is required for the memory function to retain settings during power outages.
3. Paketearen edukia
Egiaztatu elementu guztiak paketean daudela:
- JoFomp 17.3" Digital Wall Clock
- Urruneko Kontrola
- 5V/1A DC korronte egokitzailea
- Elikatze kablea
- Mounting Hooks (2)
- Mounting Template Ruler
- Erabiltzailearen eskuliburua (dokumentu hau)

3.1. irudia: Osagarriak eta unitate nagusia barne.
4. Produktua amaitu daview
The JoFomp 17.3" Large Digital Wall Clock features a clear LED display and multiple functions for convenience.

Figure 4.1: Front display of the digital wall clock.
4.1 Bistaratzeko Ezaugarriak
- Denbora bistaratzea: Large 17.3" LED digits.
- Data bistaratzea: Month and Day.
- Asteko eguna: Indicated by illuminated text (Mon-Sun).
- Tenperatura: Displays in Celsius or Fahrenheit.
- Hezetasuna: Displays relative humidity percentage.
- Alarma bikoitzak: Two independent alarm settings.
- DST adierazlea: Daylight Saving Time status.

Figure 4.2: Labeled display functions.
4.2 Back Panel and Buttons
The back of the clock houses control buttons and connection ports.

Figure 4.3: Back panel with labeled components.
- Ezartzeko botoiak: Five buttons for manual adjustments (Light, SET, +, -, Alarm).
- Memory Battery Compartment: For 1 AAA battery (not included) to retain settings.
- Potentzia ataka: Korronte-egokigailua konektatzeko.
- Muntatzeko zuloak: Horman instalatzeko.
5. Konfigurazioa
5.1 Energia-konexioa
- Connect the power cord to the clock's power port.
- Plug the 5V/2A power adapter into a standard electrical outlet. The clock will power on and display.
Oharra: The clock requires continuous power to operate. It is not battery-powered for primary display.
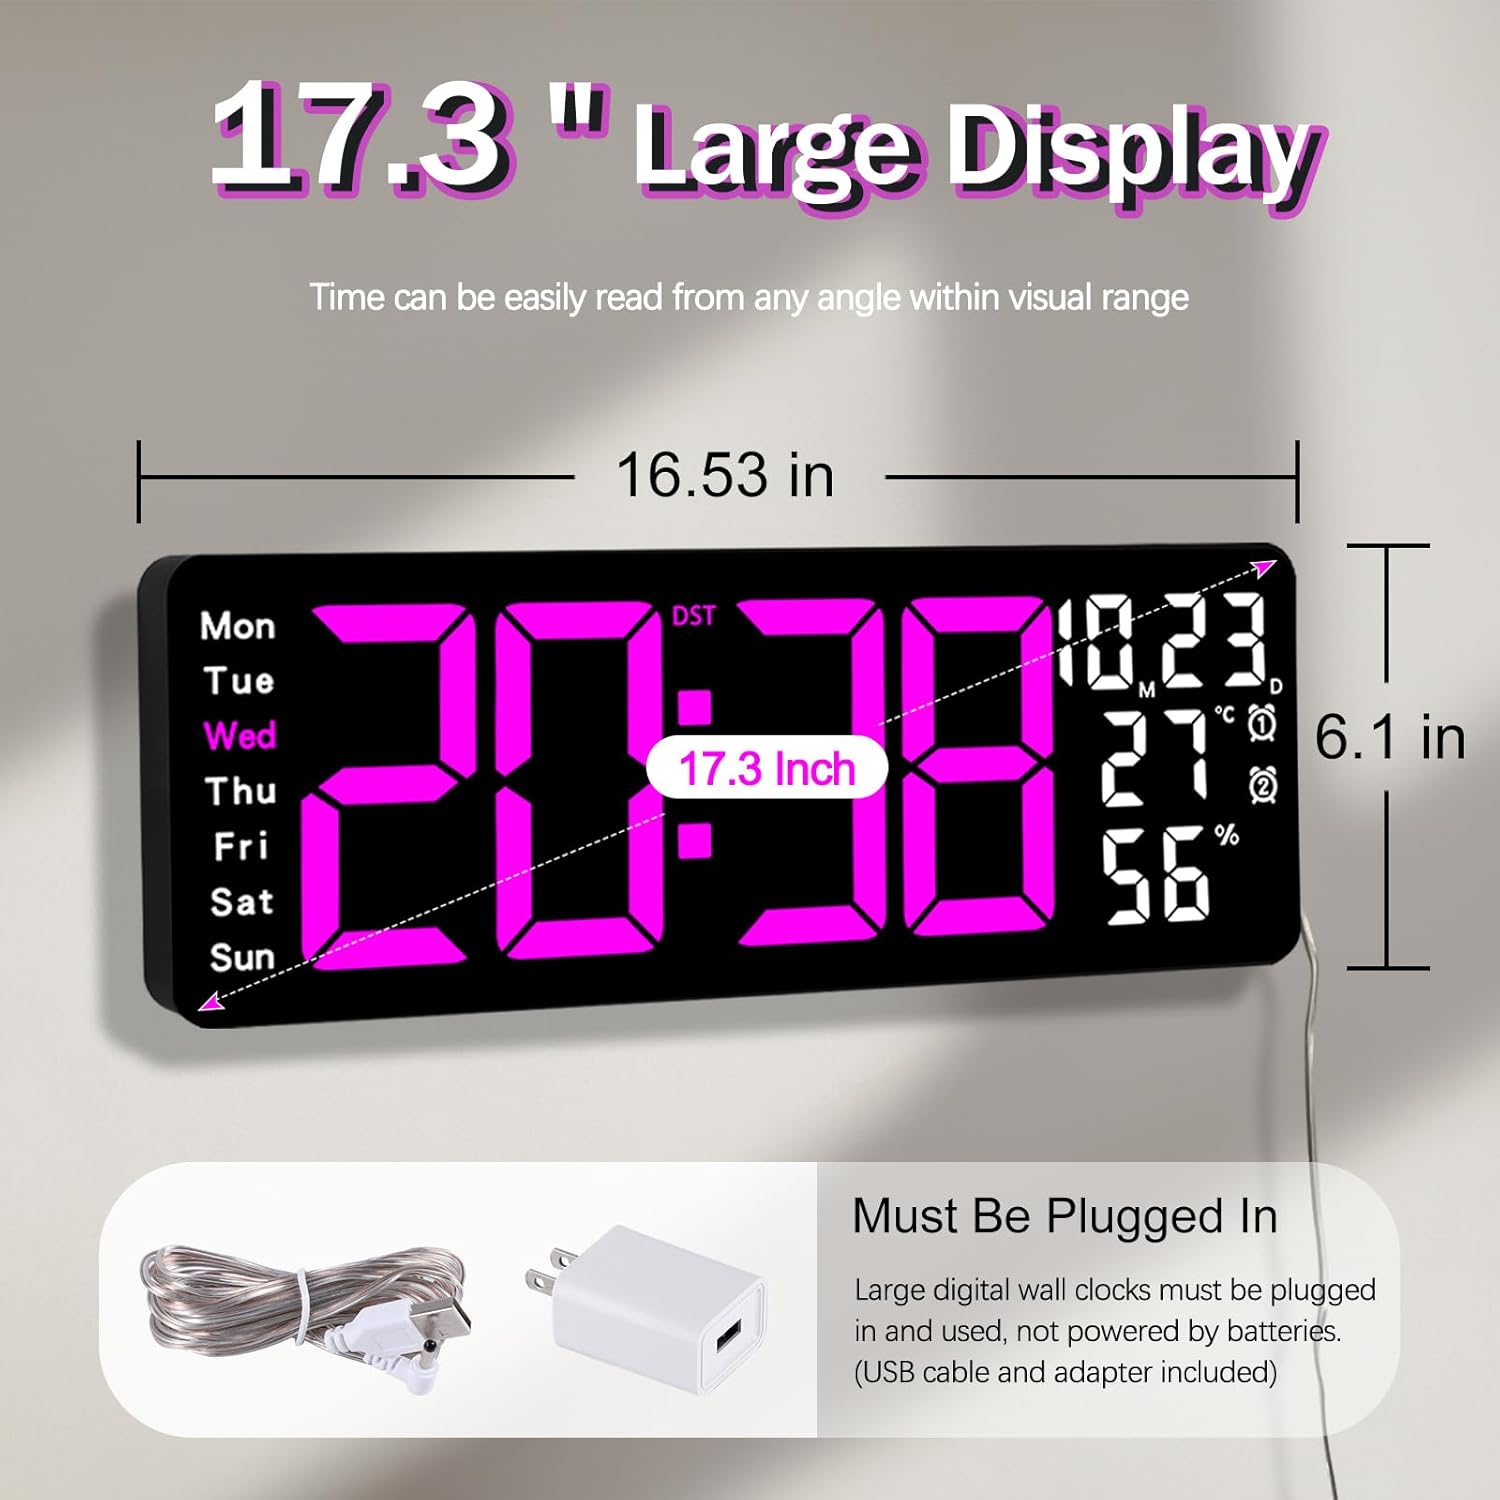
Figure 5.1: Power connection and dimensions.
5.2 Memory Battery Installation (Optional)
To retain time and settings during a power outage, install a 1 AAA battery (not included) into the memory battery compartment on the back of the clock.
- Locate the memory battery compartment on the back of the clock.
- Ireki konpartimenduaren estalkia.
- Insert one 1.5V AAA battery, ensuring correct polarity (+/-).
- Itxi konpartimenduaren estalkia ongi.
5.3 Horman muntatzea
Use the included mounting template ruler and hooks for easy wall installation.
- Determine the desired location for your clock.
- Place the mounting template ruler on the wall at the desired height.
- Mark the positions for the mounting hooks according to the ruler's indications.
- Install the mounting hooks into the wall at the marked positions.
- Carefully hang the clock onto the installed hooks, ensuring it is level and secure.
6. Funtzionamendu-argibideak
The clock can be operated using either the remote control or the buttons on the back.
6.1 Ordua eta data ezarpena
Use the remote control or the "SET" button on the back of the clock.
- Sakatu EZARTU button (on remote or back of clock) to enter setting mode.
- Erabili + eta - botoiak keinuka ari den balioa doitzeko (adibidez, ordua, minutua, urtea, hilabetea, eguna).
- Sakatu EZARTU again to confirm the current setting and move to the next parameter.
- Repeat until all settings are configured.
6.2 12/24 Hour Format Conversion
To switch between 12-hour and 24-hour time formats:
- Sakatu dedikatua. 12/24H urrutiko aginteko botoia.
- Alternatively, during time setting, the format option will appear.

Figure 6.1: 12/24H format conversion.
6.3 Tenperatura unitateen bihurketa (°C/°F)
Celsius eta Fahrenheit tenperatura-unitateen artean aldatzeko:
- Sakatu ° C / ° F urrutiko aginteko botoia.
6.4 Alarmaren ezarpena (alarma bikoitzak)
Erlojuak bi alarma independente onartzen ditu.
- Sakatu ALARMA button on the remote control or the back of the clock.
- Erabili + eta - nahi duzun alarma-ordua ezartzeko.
- Sakatu ALARMA again to confirm and move to the next alarm or exit.
- To activate/deactivate an alarm, press the corresponding alarm button (e.g., AL1 or AL2) urruneko gailuan.
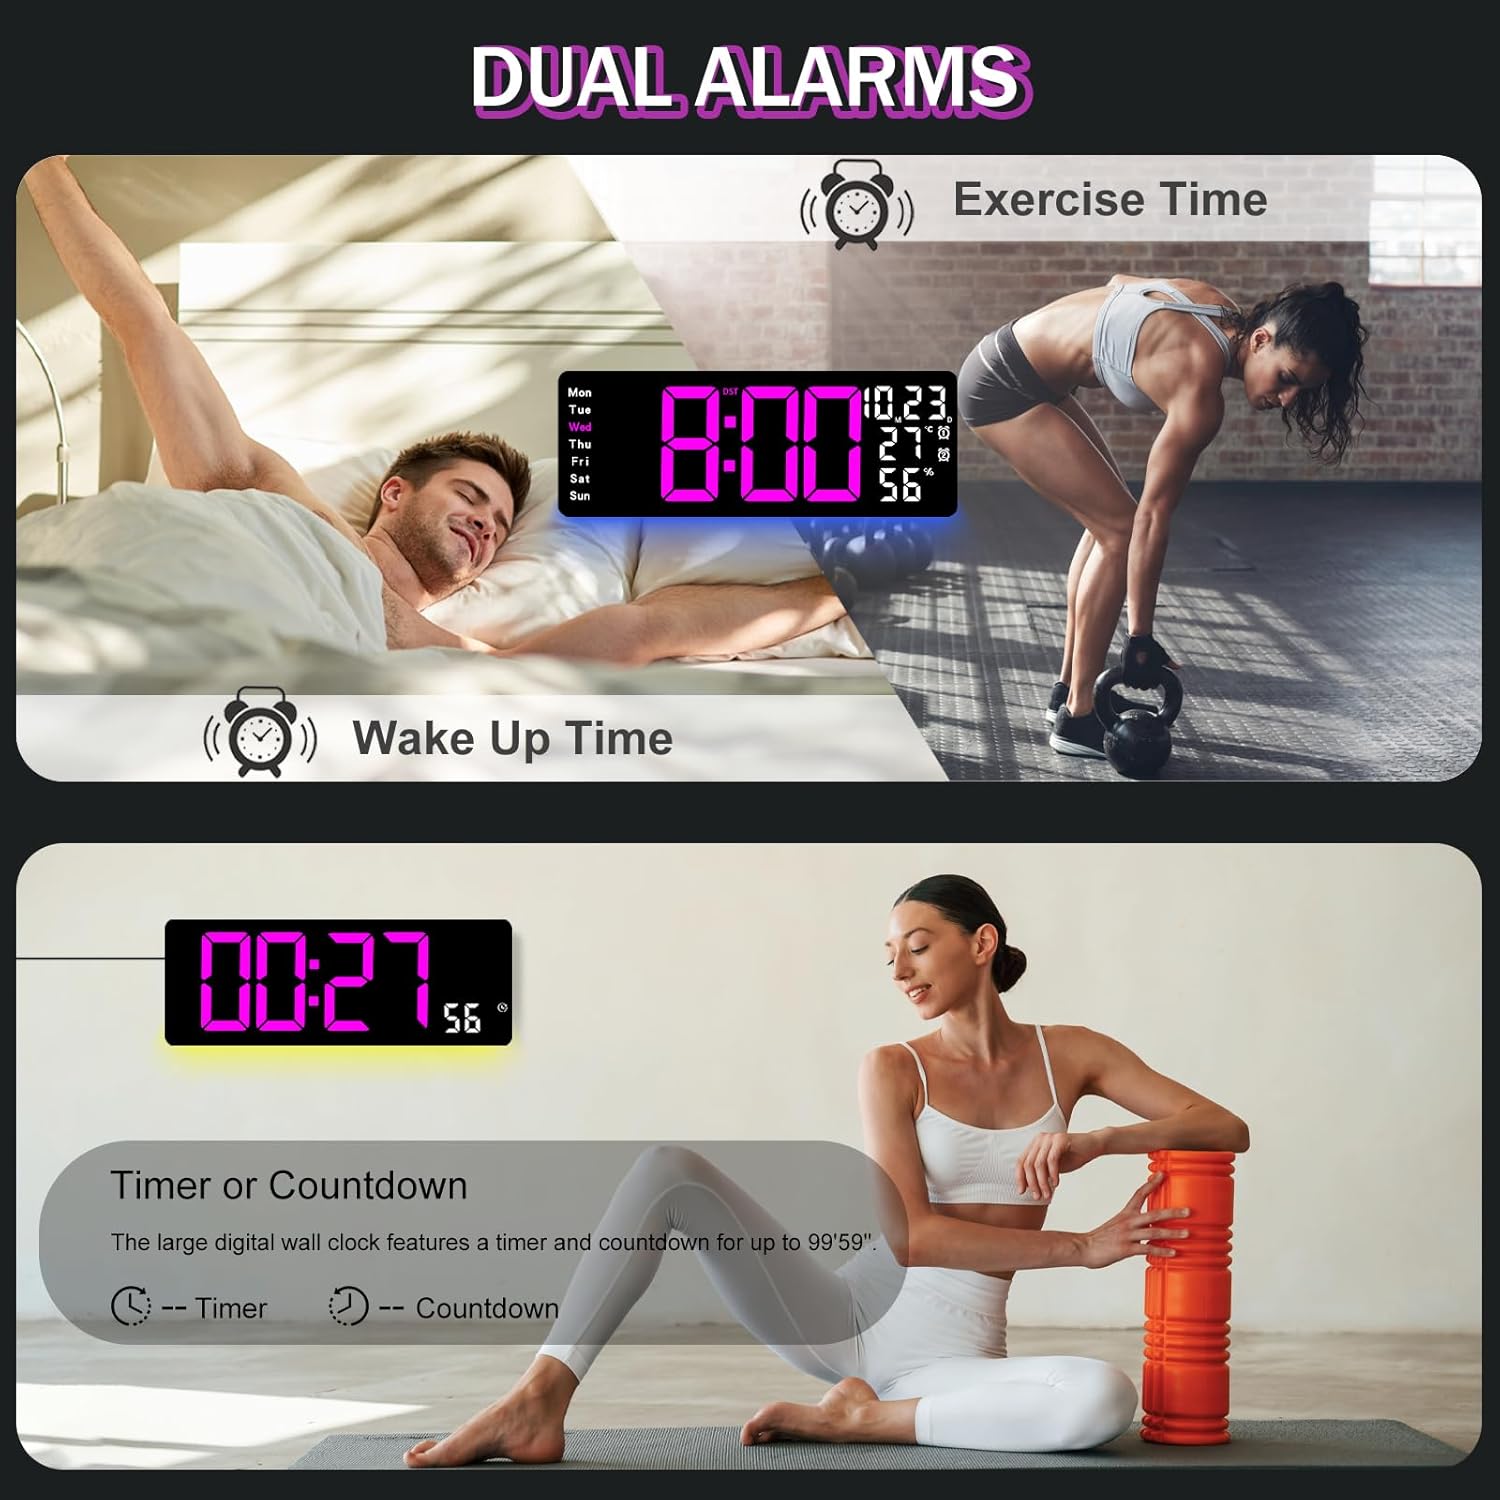
Figure 6.2: Dual alarm and timer functions.
6.5 Distira doitzea
The clock offers 10 levels of brightness, adjustable manually or automatically.
- Distira automatikoa: The built-in light sensor adjusts brightness based on ambient light. Activate this mode by pressing the AUTO urruneko botoia.
- Eskuzko distira: Sakatu DISSIRA button on the remote, then use + eta - to select one of the 10 levels.

Figure 6.3: Custom and auto-brightness settings.

Figure 6.4: Brightness regulator illustration.
6.6 Ambient Light Features
The clock includes a night light feature at the bottom with multiple color options.
- Sakatu ARGIA button on the remote control or the back of the clock to cycle through 8 fixed colors and 1 multi-color mode.
- In multi-color mode, the colors automatically convert. Press OK to fix a favorite color.
- Adjust the brightness of the ambient light using the + eta - buttons when the ambient light is active.

Figure 6.5: Multiple ambient night light options.

Figure 6.6: 9 color ambient light options.
6.7 Timer and Countdown Function
The clock features a timer (count-up) and countdown function up to 99 minutes and 59 seconds.
- Sakatu tenporizadorea urrutiko aginteko botoia.
- Erabili + eta - to set the desired time for countdown.
- Sakatu HASI/GELDITU to begin or pause the timer/countdown.
- Sakatu Berrezarri tenporizadorea garbitzeko.

Figure 6.7: Timing function (count-up/countdown).
Video 6.1: Demonstration of multi-functional features including night light change, brightness control, count-up, and countdown. This video also shows the time, date, day, alarm clock, temperature, and humidity displayed on the same screen, along with 12/24 hour conversion, Celsius/Fahrenheit conversion, and DST enablement. The back design and buttons are also briefly shown.
6.8 Udako Ordutegia (UdG)
If DST is observed in your region, you can enable or disable it.
- Luze sakatu - button on the remote control to enable or disable DST. The DST indicator will appear/disappear on the display.

Figure 6.8: Enabling and disabling Daylight Saving Time.

Figure 6.9: Daylight Saving Time (DST) functionality.
6.9 Urruneko kontrolaren erabilera
The remote control provides convenient access to all clock functions without needing to reach the clock directly.

Figure 6.10: Remote control and its functions.

6.11 irudia: Urrutiko agintea erabiltzen ari da.
- Ensure the remote control has 2 AAA batteries installed (not included).
- Point the remote control directly at the clock for optimal response.
- Each button on the remote corresponds to a specific function as described in this manual.
7. Mantentzea
- Clean the clock's display and body with a soft, dry cloth. Avoid abrasive cleaners or solvents.
- Ensure the power adapter and cord are free from damage.
- Replace the memory battery annually to ensure settings are retained during power interruptions.
8. Arazoak
| Arazoa | Kausa posiblea | Irtenbidea |
|---|---|---|
| Erlojuaren pantaila itzalita dago. | Ez dago elikadura hornidurarik. | Check if the power adapter is securely plugged into the clock and the outlet. Ensure the outlet is functional. |
| Urruneko kontrola ez dabil. | Low or dead batteries in remote; obstruction; remote out of range. | Replace remote batteries (2 AAA). Ensure no obstructions between remote and clock. Point directly at the clock within effective range. |
| Ezarpenak galdu dira energia itzaltzeantage. | No memory battery or dead memory battery. | Install a fresh 1.5V AAA battery in the memory compartment. |
| Incorrect temperature/humidity reading. | Sensor interference or placement. | Ensure the clock is not placed near heat sources, direct sunlight, or in areas with extreme drafts. Allow time for the sensor to stabilize. |
| Inguruko argiak ez ditu koloreak aldatzen. | Stuck in fixed color mode. | Press the LIGHT button on the remote to cycle through modes. If stuck on a fixed color, press the OK button to release it from fixed mode. |
9. Zehaztapenak
| Ezaugarri | Xehetasuna |
|---|---|
| Marka | JoFomp |
| Modelo zenbakia | 6669 |
| Bistaratzeko mota | LED digitala |
| Bistaratzeko tamaina | 17.3 hazbetekoa |
| Produktuaren neurriak | 16.5"Z x 6.7"A |
| Energia iturria | Corded Electric (5V/2A adapter included) |
| Memoria Bateria | 1 x AAA (ez dago barne) |
| Distira-mailak | 10 (Auto/Manual) |
| Ambient Light Colors | 8 Fixed + 1 Multi-color |
| Ezaugarri bereziak | Large Display, Adjustable Brightness, Temperature Display, Humidity Display, Dual Alarms, Timer, Countdown, DST, Remote Control |
| Muntatze Mota | Hormako Muntaia |
| Elementuaren pisua | 1.95 kilo |
10. Bermea eta Laguntza
JoFomp products are designed for reliability and performance. For warranty information or technical support, please refer to the contact details provided with your purchase or visit the official JoFomp webgunea. Gorde erosketa-agiria erosketaren frogagiri gisa.


