Segurtasun informazio garrantzitsua
Always follow the instructions provided. Keep children and pets away from the moving parts. Ensure the awning is properly secured and anchored to prevent it from being blown away by strong winds. Do not operate the awning in severe weather conditions.
Produktua amaituview
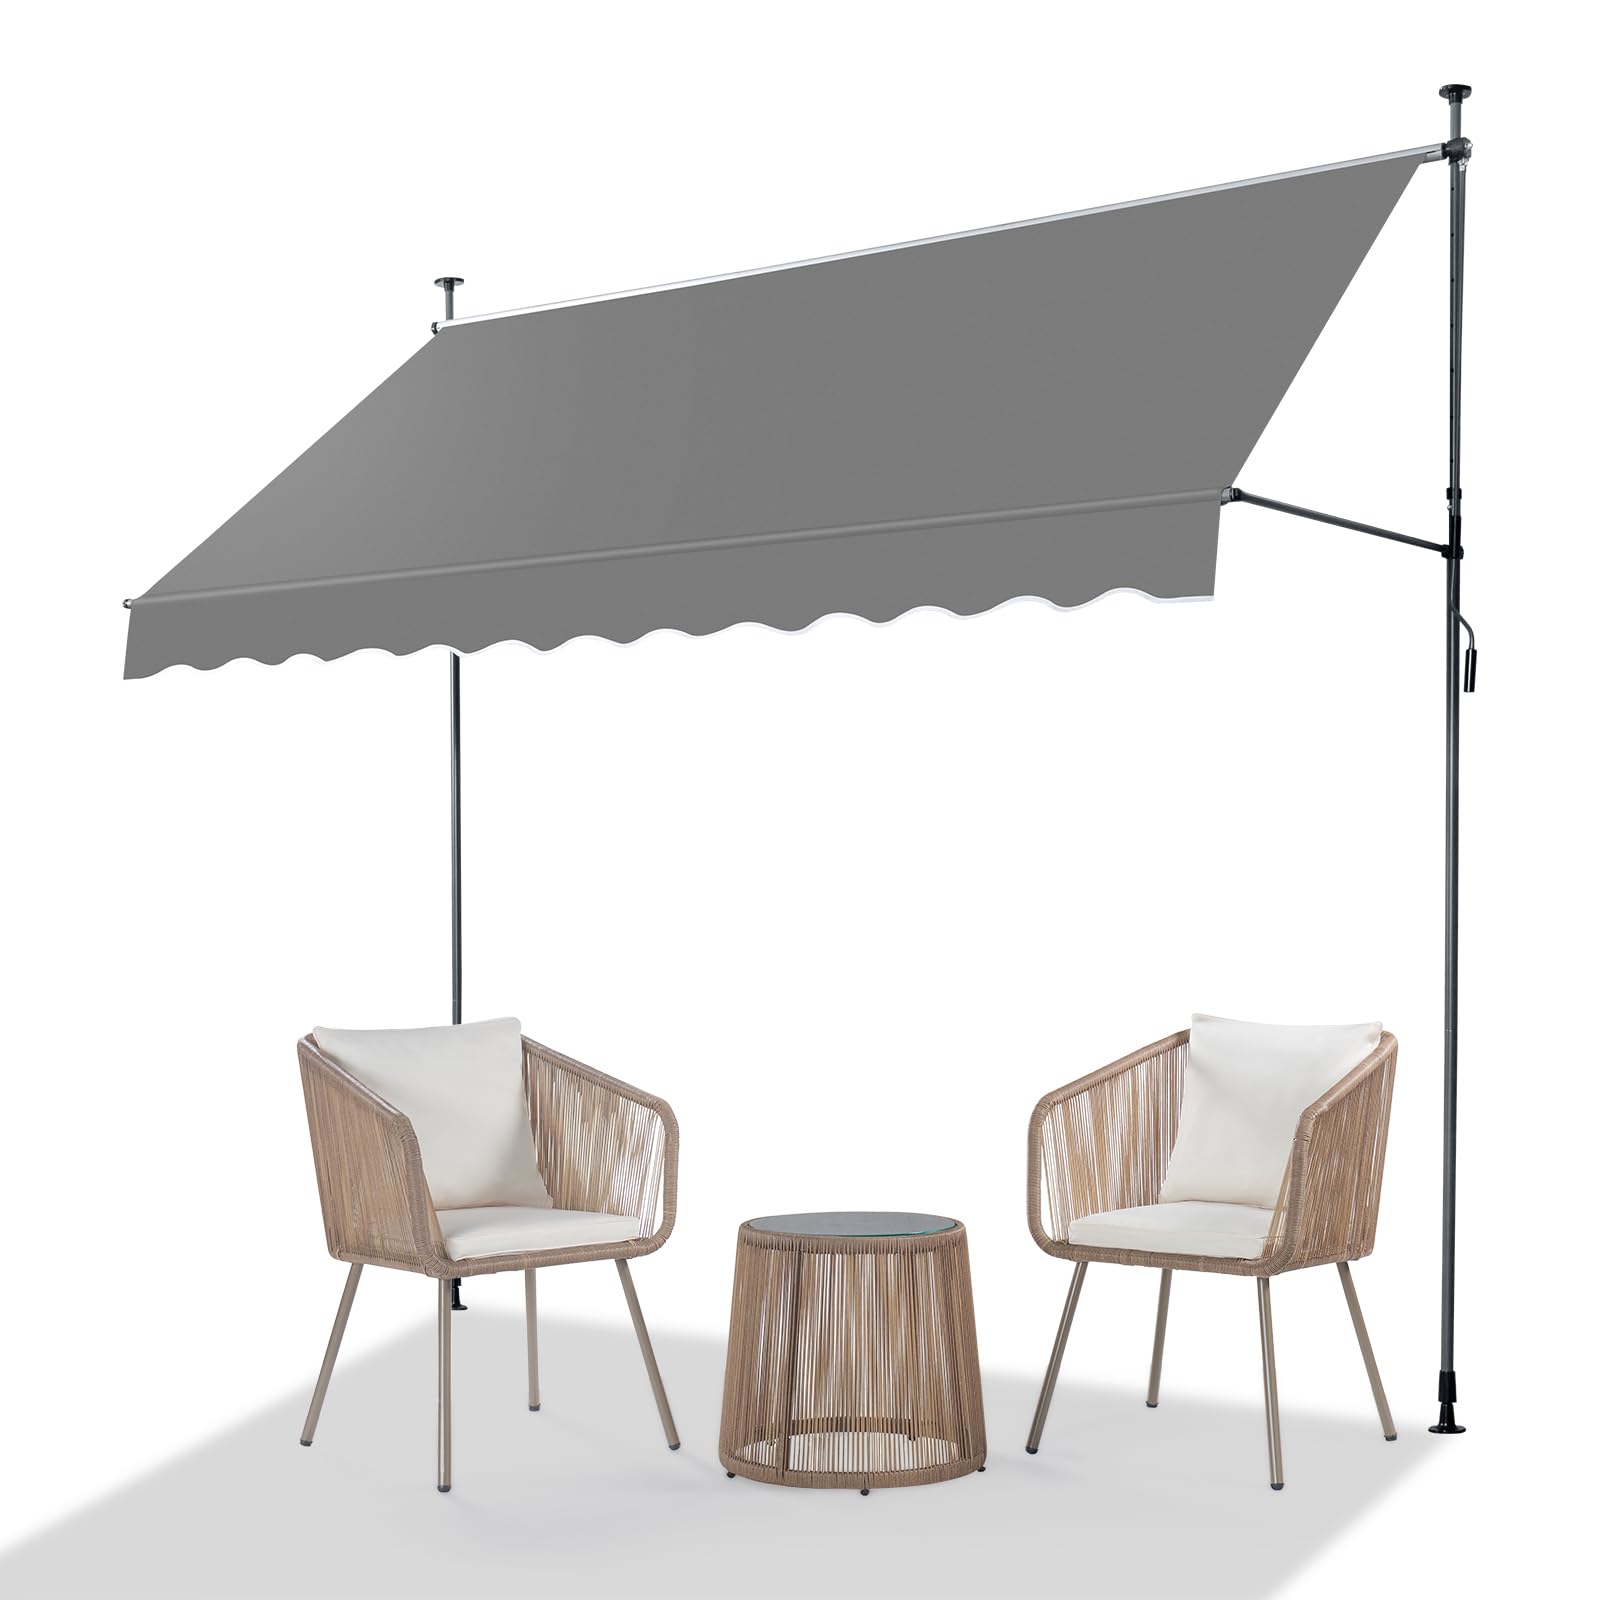
The VINGLI Manual Retractable Awning provides versatile sun and rain protection for various outdoor spaces. Its design focuses on ease of use and durability.
- Sun Protection and Privacy: Crafted with premium 180g polyester and waterproof PU coating, this awning delivers excellent UV50+ protection. It can also be used as a privacy curtain to create a secluded outdoor sanctuary.
- Height & Width Adjustable: The adjustable support poles range from 78" to 118" in height, accommodating various door and window installations. The crank handle provides smooth 0-90° angle adjustment for optimal shade control.
- No Drilling Installation: This awning requires no drilling for installation and is designed for assembly by two people. All necessary hardware and instructions are included. It is compatible with multiple surfaces including concrete, solid brick, and wood.
- Strong & Durable Frame: The retractable shade is built with thickened aluminum rollers and a heavy-duty steel frame. Secure screw connections ensure stability and durability. Anti-slip pads keep the awning firmly in place on windy days. It is recommended to retract the awning during severe weather to protect it and extend its life.
- Erabilera polifazetikoa: This awning brings outdoor comfort to patios, gardens, balconies, and entryways, providing reliable protection from sun and rain while creating an inviting private space.
Paketearen edukia
Please ensure all parts are present before beginning assembly.
- Awning Fabric (Cloth)
- Threading Strip
- Esku biradera
- Roller Fitting (x2)
- Roller (x2)
- Laguntza-barra (x2)
- Front Rod (x2)
- Upper Pillar (x2)
- Lower Pillar (x2)
- Middle Pillar (x2)
- Various Screws, Nuts, Washers, Knobs, and Anti-slip Pads
Konfigurazioa eta Instalazioa
Installation requires two people. Follow these steps carefully.
Step 1: Assemble Vertical Support Rods
- Connect the Upper, Middle, and Lower Pillar sections for each vertical rod. Ensure the spring mechanism is correctly placed in the base.
- Insert the long screws and small screw caps to secure the connections.
- Attach the anti-slip base pads to the bottom of each assembled vertical rod.
- Adjust the height of the vertical rods by selecting the appropriate holes and securing them with screws, ensuring the total length is 2-3 cm lower than your floor-to-ceiling measurement.

Step 2: Assemble Awning Fabric and Roller
- Slide the threading strip into the designated slot along the top edge of the awning fabric.
- Connect the roller parts (C1 and C2) with the fabric part at the top, ensuring C1 is installed on the right side. Secure them with the provided screws.
Step 3: Attach Hand Crank
- Attach the hand crank to the designated fitting on the roller assembly. Ensure it is securely fastened.
Step 4: Install Front Rod
- Connect the sections of the front rod.
- Insert the assembled front rod into the bottom hem of the awning fabric. Secure it with the provided keyhole mechanism.
Step 5: Erect the Awning
- With two people, carefully position the assembled awning. Place the top anti-slip pads against the ceiling/eave and the bottom pads on the floor.
- Ensure that the vertical posts are perpendicular to the ground and that the tarpaulin support rod is parallel to the posts.
- Hold each column with one hand and rotate the expansion part of the column base clockwise until the column firmly presses against the roof/ceiling, creating a secure tension fit.

Instalazio bideoak
Video 1: KELIXU Retractable Awning for Patio - This video demonstrates the assembly process for a similar manual retractable awning, including connecting poles and fabric.
Video 2: Installation Guide for Smonter Manual Retractable Patio Awning - Provides a step-by-step visual guide for installing a manual retractable patio awning.
Video 3: How to Install LIFERUN Manual Retractable Awning - A detailed video showing the assembly and installation of a manual retractable awning.
Funtzionamendua
The VINGLI Manual Retractable Awning is designed for easy operation.
Toldoa luzatu eta itzultzea
To extend the awning, rotate the hand crank counter-clockwise. To retract the awning, rotate the hand crank clockwise. The awning can be fully extended or retracted as needed.
Angelua doitzea
The crank handle allows for a smooth angle adjustment from 0° to 90°, providing optimal shade control throughout the day. Adjust the angle to block direct sunlight or to allow more light as desired.

Mantentzea
Regular maintenance will ensure the longevity and optimal performance of your awning.
- Garbiketa: Clean the awning fabric with mild soap and water. Avoid harsh chemicals or abrasive cleaners that could damage the material or coating.
- Ikuskapena: Periodically inspect the frame, connections, and fabric for any signs of wear, damage, or loose parts. Tighten any loose screws or knobs as needed.
- Eguraldiaren babesa: Always retract the awning during severe weather conditions such as strong winds, heavy rain, or snow to prevent damage.
Arazoak konpontzea
Arazoren bat izanez gero, jo ezazu honako ohiko irtenbide hauetara:
- Toldoa ez da leunki luzatzen/erretiratzen: Check for any obstructions in the mechanism or along the fabric path. Ensure all connections are secure and consider lubricating moving parts if necessary.
- Awning feels unstable: Verify that the vertical support poles are securely tightened against both the floor and the overhead surface. Check that the anti-slip pads are properly positioned and providing adequate grip.
- Water pooling on fabric: Ensure the awning is extended with a sufficient angle to allow water to run off. Adjust the angle using the hand crank if pooling occurs.
Zehaztapenak
- Materiala: Metala, poliesterra
- Kolorea: Grisa
- Tamaina: 118"x118"x47" roll out
- Produktuaren neurriak: 47" L x 118" W x 118" H
- Eragiketa modua: Eskuliburua
- Min. Clearance: 78 hazbete
- Proiekzio distantzia: 118 hazbete
- Elementuaren pisua: 22.6 kilo
- Modelo zenbakia: manualawning
- UPC: 111424003406
Bermea eta Laguntza
For warranty information or product support, please contact VINGLI customer service through the retailer where the product was purchased. Keep your purchase receipt for any warranty claims.