1. Segurtasun-argibide garrantzitsuak
Mesedez, irakurri arretaz argibide guztiak tresna hau erabili aurretik. Gorde eskuliburu hau etorkizunean erreferentzia gisa.
- Ziurtatu elikadura hornidura boltage etxetresna elektrikoaren balorazio-etiketarekin bat dator.
- Ez murgildu gailua, kablea edo entxufea uretan edo beste likido batzuetan.
- Unplug from the outlet when not in use and before cleaning. Allow to cool before attaching or removing parts, and before cleaning the appliance.
- Ez erabili aparaturik kablea edo entxufea hondatuta dagoenean, edo aparatuak gaizki funtzionatzen duenean edo nolabait hondatu ondoren.
- Gailuaren fabrikatzaileak gomendatzen ez dituen osagarri osagarriak erabiltzeak sua, deskarga elektrikoa edo pertsonetan zauriak eragin ditzake.
- Ez erabili kanpoan.
- Ez utzi kablea mahai edo mostrador baten ertzetik zintzilik, ezta gainazal beroak ukitu ere.
- Ez jarri gas edo erregailu elektriko bero baten gainean edo inguruan, edo berotutako labe batean.
- Ziurtatu beti ur-depositua maila egokira beteta dagoela erabili aurretik.
- Use caution when handling hot surfaces and steam.
2. Produktua amaitu daview
The KEENSTAR Espresso Coffee Machine JH-C5211 is designed to provide a versatile coffee experience, offering hot and iced coffee, rapid cold brew, and milk frothing capabilities. It features a 20-bar professional pump, pre-soak technology, and a user-friendly touch screen interface.

2.1. irudia: Included Components Diagram
This diagram labels all included components: control panel, 1-shot filter, 2-shot filter, portafilter, portafilter handle, cup plate, removable drip tray, tank cover, water tank, steam knob, milk tank, steam nozzle, and coffee spoon & tamper.

2.2. irudia: KEENSTAR Espresso Coffee Machine JH-C5211
The KEENSTAR Espresso Coffee Machine, model JH-C5211, featuring a sleek silver design, a touch control panel, a portafilter, and an integrated milk tank for frothing. Two prepared coffee beverages are displayed on the drip tray.
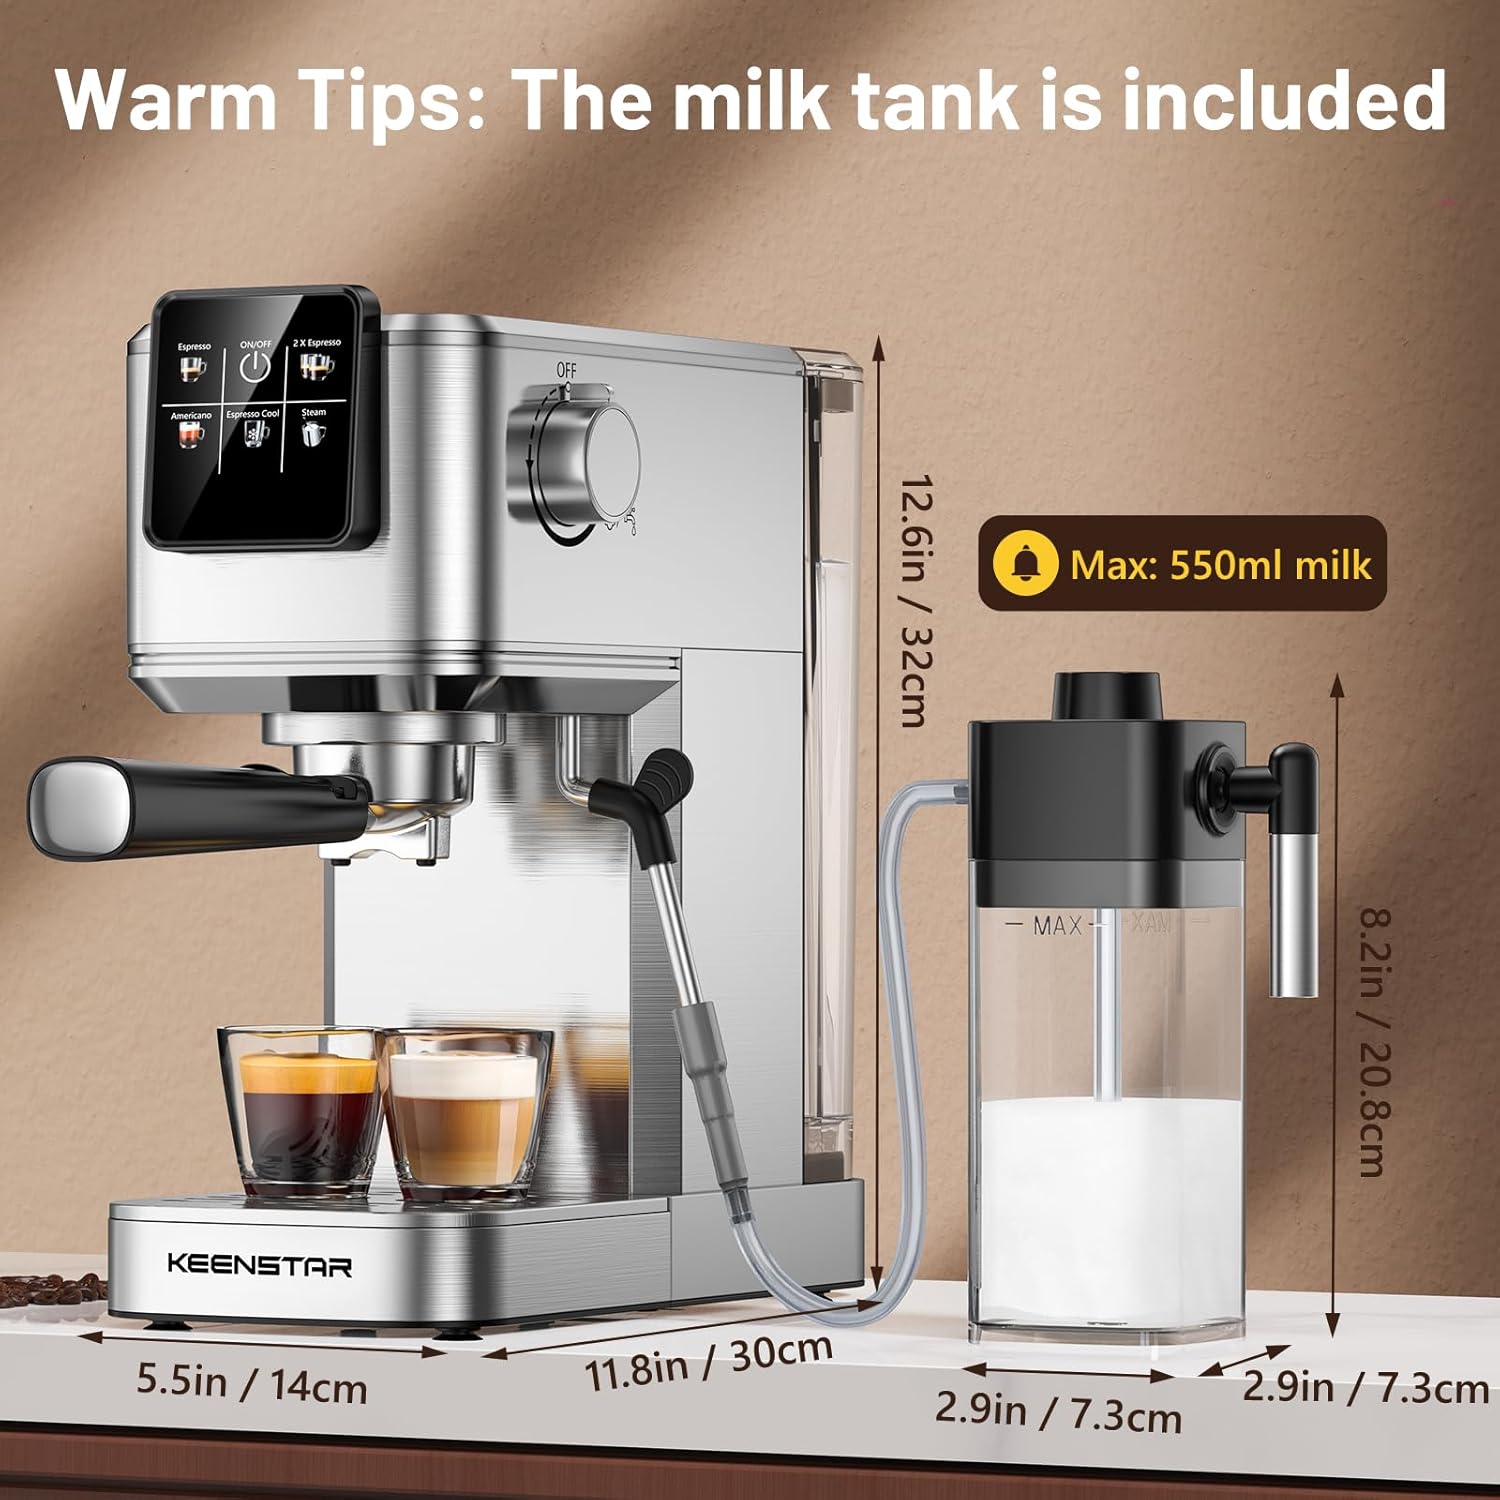
2.3. irudia: Produktuaren neurriak
A diagram showing the dimensions of the KEENSTAR Espresso Machine (11.8"D x 5.5"W x 12.6"H) and the milk tank (Max: 550ml milk, 8.2"H).
3. Konfigurazioa
3.1 Hasierako garbiketa
Before first use, wash all removable parts (water tank, milk tank, portafilter, filters, drip tray, coffee spoon/tamper) with warm soapy water. Rinse thoroughly and dry. Wipe the exterior of the machine with a damp oihal.
3.2 Priming the Machine (Before Each Use)
This process drains air from the internal pipes to ensure proper brewing.
- Fill the water tank with fresh, clean water and press the power button to turn on the machine.
- Turn the steam knob to the "ON" position.
- Wait for water to run out from the steam wand in a steady stream.
- Once water flows steadily, turn the steam knob to the "OFF" position.
- Itzali kafe-makina.

3.1. irudia: Priming Steps
A five-step visual guide for preparing the machine before each use, including filling the water tank, turning the knob to "ON", waiting for water from the steam wand, turning the knob to "OFF", and turning off the machine. This process aims to drain air from the pipes.
3.3 Ur depositua betetzea
Ensure the water tank is filled with fresh, cold water. Do not exceed the maximum fill line (1200ml) indicated on the tank.

3.2. irudia: Water Tank Fill Level
A diagram indicating the correct maximum fill level for the 1200ml water tank, emphasizing not to exceed the specified maximum value.
4. Funtzionamendu-argibideak
4.1 General Operation and Touch Screen
The machine features an intelligent touch screen for easy selection of various coffee types.

4.1. irudia: Intelligent Operation Panel
Xehetasun bat view of the intelligent touch screen operation panel, showing options for Espresso, 2x Espresso, Americano, Espresso Cool, and Steam functions.
4.2 Espressoa prestatzea
Ensure the steam knob is set to the "OFF" position before brewing coffee.
- Fill the water tank and press the power button. The blinking indicator signifies preheating. It is ready to brew when the indicator is steady.
- Load ground coffee into the filter (use 1 flat scoop for single, 2 for double) and tamp irmoki.
- Place the filter into the portafilter and attach it securely to the machine. Place your cup(s) on the drip tray.
- Press the desired Espresso button (single or double) on the touch screen.
- Your espresso will begin to brew.

4.2. irudia: Espresso Brewing Steps
A five-step visual guide for brewing espresso: fill water tank and press power, load and tamp ground coffee, place filter and cup, press Espresso button, and observe indicator light for readiness.

4.3. irudia: Secure Filter Locking
An image demonstrating the importance of ensuring the filter is fully locked into the machine before each coffee extraction.
4.3 Coffee Ground Recommendation
For optimal extraction and flavor, medium ground coffee (particle size >0.5mm) is suggested.

4.4. irudia: Recommended Coffee Ground Size
An image illustrating the recommended medium ground coffee (>0.5mm) for optimal espresso extraction, contrasting it with fine powder.
4.4 Rapid Cold Brew Function
To make cold brew espresso, fill the water tank 2/3 full with ice cubes before starting the brewing process. Select the "Espresso Cool" option on the touch screen.

4.5. irudia: Cold Brew Prestaketa
The KEENSTAR Espresso Machine preparing cold brew espresso, with a tip to fill the water tank 2/3 full with ice cubes for an "Espresso Cool" flavor.
4.5 Milk Frothing/Steaming
If you forget to press the steam button to preheat, the machine cannot steam milk. Water will run out from the steam wand like a line.
- Sakatu pizteko botoia makina pizteko.
- Press the "Steam" button on the touch screen to preheat. The blinking indicator signifies preheating. It finishes preheating when the indicator is steady.
- After preheating is complete, turn the steam knob to the "ON" position to release any remaining water in the pipe before frothing.
- Submerge the steam wand into the milk (in the milk tank or a separate pitcher) and begin frothing.

4.6. irudia: Milk Steaming Steps
A five-step visual guide for steaming milk: press power, press steam button to preheat, turn knob to "ON" after preheating, release remaining water, and begin frothing with milk tank or steam wand.

4.7. irudia: Automatic Milk Tank
Gertu bat view of the KEENSTAR Espresso Machine highlighting the automatic milk tank, designed for convenient and user-friendly milk frothing.
5. Mantentzea
5.1 Tantaka-erretilua garbitzea
The removable drip tray simplifies the cleaning process. Empty and rinse the drip tray regularly to prevent overflow and maintain hygiene.

5.1. irudia: Tanta-erretilu desmuntagarria
Irudi erakustaldi batasing the 2-in-1 filter (single and double cup options) and the removable stainless steel drip tray, designed for easy cleaning.
5.2 Garbiketa osagarriak
All accessories, including the portafilter, filters, and milk tank, must be washed by hand. They are not dishwasher safe.

5.2. irudia: Hand Washing Accessories
An image advising that all accessories for the espresso machine must be washed by hand and are not dishwasher safe.
5.3 Kalifikatzailea
Regular descaling is essential to maintain the machine's performance and extend its lifespan, especially in areas with hard water. Follow these general steps:
- Prestatu kalka kentzeko soluzio bat kalka kentzeko produktuaren fabrikatzailearen argibideen arabera, edo erabili ozpin zuri eta ur nahasketa bat (1:1 proportzioa).
- Bete ur-biltegia deskalifikatzeko soluzioarekin.
- Jarri ontzi handi bat kafe-irteeraren eta lurrun-hagaren azpian.
- Run half of the solution through the coffee brewing cycle without coffee.
- Run the other half of the solution through the steam wand.
- Garbitu ondo ur-depositua eta bete ur freskoarekin.
- Run several cycles of fresh water through both the coffee spout and steam wand to flush out any remaining descaling solution.
6. Arazoak
Atal honek aurki ditzakezun arazo ohikoenak jorratzen ditu. Hemen zerrendatzen ez diren arazoetarako, jarri harremanetan bezeroarentzako arreta-zerbitzuarekin.
| Arazoa | Kausa posiblea | Irtenbidea |
|---|---|---|
| Ez dago kafe-banaketarik | Water tank empty; machine not primed; portafilter not locked correctly; coffee too fine/tamped gogorregia. | Fill water tank; prime the machine; ensure portafilter is fully locked; use medium ground coffee and tamp astiro-astiro. |
| Coffee tastes weak/watery | Insufficient coffee grounds; coffee too coarse; not enough tamppresioa. | Increase coffee grounds; use medium ground coffee; tamp tinko. |
| Lurrun-hagatxoak ez du lurruna sortzen | Machine not preheated for steam; steam knob not open; steam wand blocked. | Press steam button to preheat; turn steam knob to "ON"; clean steam wand. |
| Makinak ura isurtzen du | Ur-depositua ez dago ondo kokatuta; tanta-erretilua beteta; barneko zigiluaren arazoa. | Ensure water tank is properly seated; empty drip tray; contact support if issue persists. |
| Plastic taste/smell | New machine residue; insufficient initial cleaning. | Run several cycles of plain water through the machine. If taste persists, try running a vinegar solution followed by multiple water rinses. |
7. Zehaztapenak
- Marka: KEENSTAR
- Ereduaren izena: JH-C5211
- ASIN: B0F1C8XTYZ
- Kolorea: Zilarrezkoa
- Produktuaren neurriak: 11.8" L x 5.5" W x 12.6" H
- Elementuaren pisua: 9.9 kilo
- liburukiatage: 120 Volt
- Kafe-makina mota: Espresso Makina
- Ezaugarri bereziak: Cup Warmer, Milk Frother, Permanent Filter
- Dakarten osagaiak: Filter, Milk Frother
- Estiloa: Milk Tank+20Bar Espresso Machine
- Produktuaren erabilera espezifikoak: Espressoa
8. Bermea eta Laguntza
8.1 Bermearen informazioa
The KEENSTAR Espresso Coffee Machine JH-C5211 comes with a 30-day money-back guarantee and free replacement within 1 year from the date of purchase. Lifetime after-customer service is also provided.
8.2 Bezeroarentzako laguntza
For any questions, concerns, or technical assistance, please refer to the contact information provided with your purchase or visit the official KEENSTAR weblaguntza baliabideen gunea.


