1. Sarrera
The Inkbird ITC-306T is a pre-wired electronic heating thermostat designed for precise temperature control. This device is ideal for applications requiring consistent heating, such as seed germination, reptile habitats, and hatching environments. It features dual time cycles for day and night temperature settings, ensuring optimal conditions over a 24-hour period. This manual provides detailed instructions for safe and effective operation.
2. Ezaugarri nagusiak
- 2025 Updated Design: Features thicker input (3-core, 7.8mm diameter) and output (4-core, 8.6mm diameter) wires for enhanced reliability and durability.
- Dual Time Cycles Setting: Allows setting different target temperatures for day and night periods over 24 hours, suitable for animals or plants.
- Heating Only Control: Operates in On and Off Control mode for heating devices. Maximum total load must not exceed 1200 watts.
- Integrated Temperature Probe: Equipped with a 6.56 ft (2 meter) sensor cord for accurate temperature monitoring.
- ETL zerrendatua: The entire controller is ETL listed, ensuring high safety standards.
3. Produktua amaitu daview

Figure 1: Inkbird ITC-306T controller unit, dual power outlets, and temperature probe.

2. irudia: Xehetasuna view of the digital display and control buttons (SET, Up, Down).
The ITC-306T features a main control unit with a digital display showing current and set temperatures. It includes three control buttons: SET, Up arrow, and Down arrow. The unit is connected to two power outlets for heating devices and a temperature probe. The main power cord is a grounded three-prong plug.

Figure 3: The dual heating outputs can power two separate heating devices simultaneously.
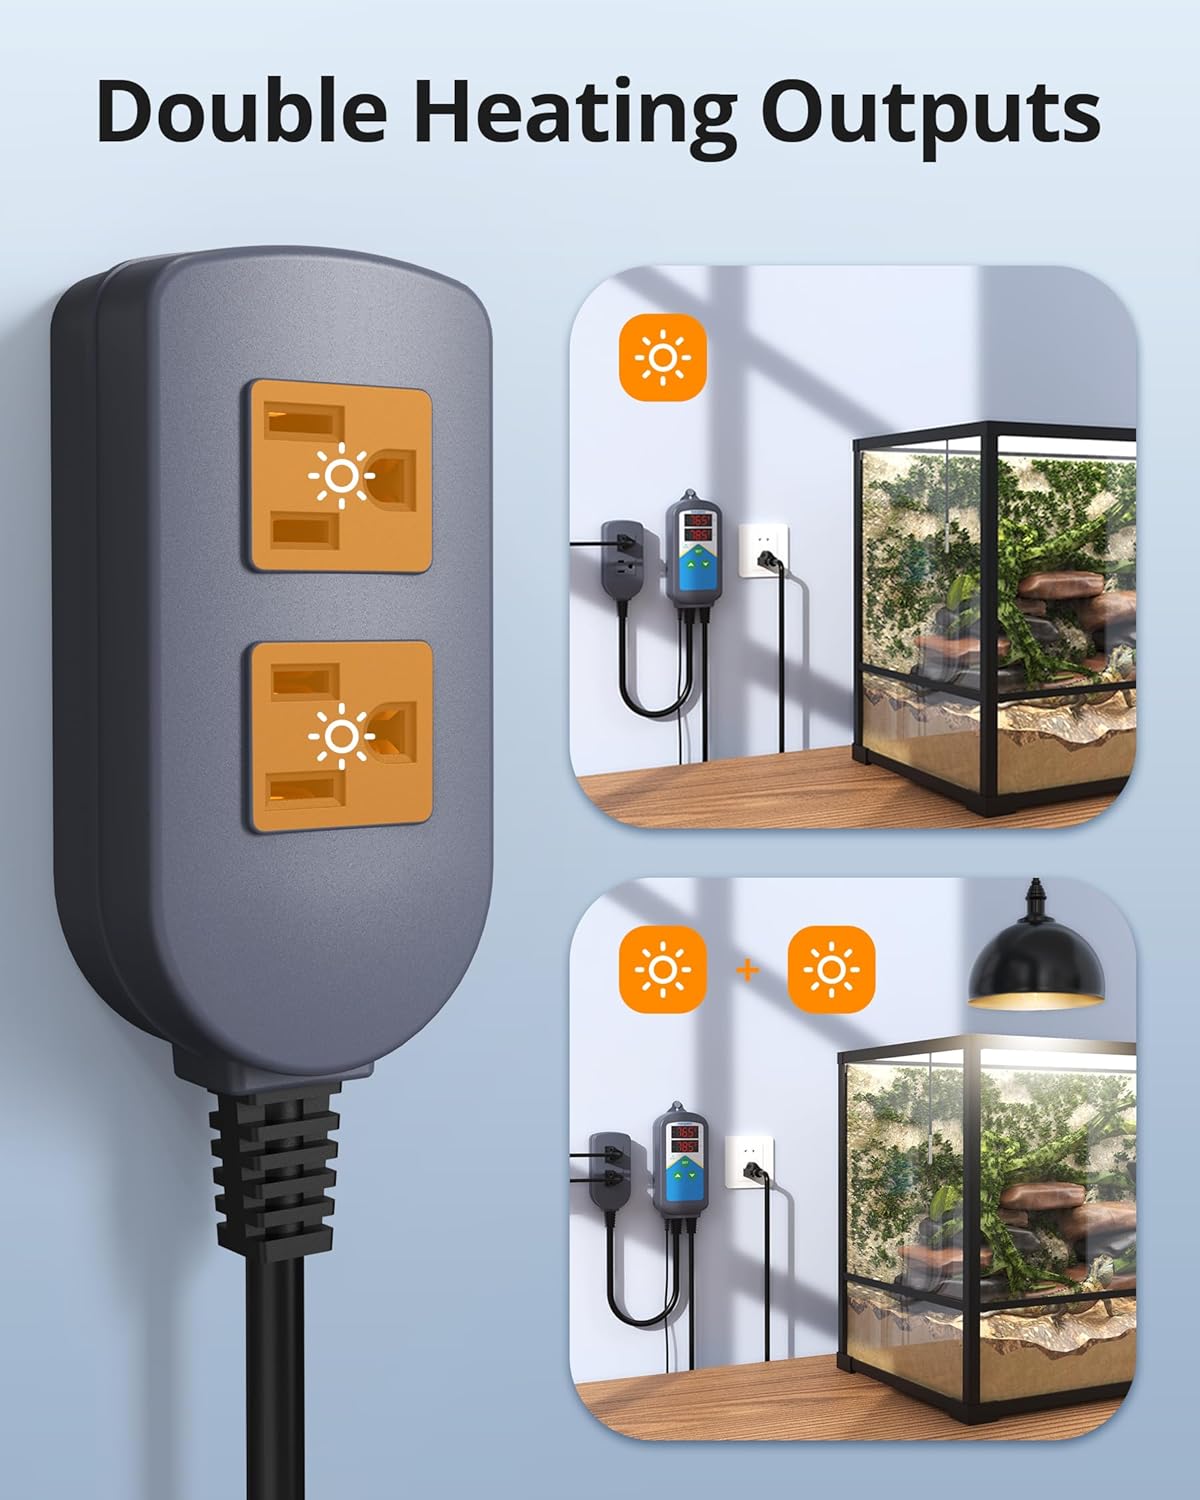
Figure 4: The controller features high and low temperature alarm functions for safety.
4. Konfiguratzeko argibideak
- Konektatu energia: Plug the main power cord of the ITC-306T into a standard 120V AC power outlet. The display will illuminate.
- Connect Heating Devices: Plug your heating devices (e.g., heat mats, heat lamps) into the two output sockets labeled 'WORK1' and 'WORK2'. Ensure the total wattagKonektatutako gailuen potentzia ez da 1200W baino handiagoa.
- Position Temperature Probe: Place the stainless steel temperature probe in the area where temperature control is needed. Ensure the probe is securely positioned and not directly exposed to heating elements.
- Hasierako piztea: The device will display the current temperature read by the probe.
5. Funtzionamendu-argibideak
5.1. Basic Temperature Setting (Common Settings)
- Enter Settings Menu: Power on the controller. Press and hold the EZARTU button for 3 seconds to enter the settings menu.
- Set Target Temperature (TS1): Use the Up and Down arrow buttons to set your desired target temperature (e.g., 78.5°F).
- Set Temperature Deviation (DS1): Sakatu EZARTU button again to move to the deviation setting. Use Up and Down arrows to set the desired temperature deviation (e.g., 2°F). When the temperature drops to (TS1 - DS1), the heating device will activate. Both heating outputs will turn on/off synchronously.
- Save Settings and Exit: Eduki sakatuta EZARTU button for 3 seconds to save your settings and exit the menu.

Step 1: Entering the settings menu.

Step 2: Setting the target temperature (TS1).

Step 3: Setting the temperature deviation (DS1).

Step 4: Saving settings and exiting.
5.2. Ezarpen aurreratuak
The ITC-306T offers several advanced settings for fine-tuning control. Access these by entering the settings menu (press and hold SET) and cycling through the options using the SET button.
- AH: High-Temperature Alarm: Set the maximum allowable temperature. If the probe reads above this, an alarm will sound.
- AL: Low-Temperature Alarm: Set the minimum allowable temperature. If the probe reads below this, an alarm will sound.
- CA: Calibration: Adjust the temperature reading to match a known accurate thermometer.
- CF: °F/°C Switch: Toggle between Fahrenheit and Celsius display units.
- ALM: Alarm ON/OFF: Enable or disable the temperature alarms.
- TR: Access Time Cycle Featured Settings: Enter the time cycle programming mode.

Figure 5: Advanced settings options displayed on the controller.
5.3. Timer Cycle Featured Settings (Day & Night)
To set different temperatures for day and night cycles:
- Access Time Cycle Settings: In the advanced settings menu, set TR=1 to enable and access the second temperature control settings.
- Set Second Target Temperature (TS2) and Deviation (DS2): Set the second target temperature (e.g., 68°F) and its deviation (e.g., 2°F). When the temperature drops to (TS2 - DS2), the heating device will activate.
- Set 24-Hour Time Cycle (TAH:TAM ~ TBH:TBM): Set the time period for the first target temperature (TS1) (e.g., 08:00 ~ 18:00). The time period TBH:TBM (Hour:Minute) ~ TAH:TAM (Hour:Minute) (next day) will automatically apply to the second target temperature (TS2) (e.g., 18:00 ~ 08:00 the next day).
- Set Current Time (CTH:CTM): Set the current hour (CTH) and current minute (CTM) for the controller. Press and hold the EZARTU botoia ezarpenak gordetzeko eta menutik irteteko.

Step 1: Enabling time cycle settings.

Step 2: Setting TS2 and DS2.
Step 3: Configuring the 24-hour time cycle.

Step 4: Setting the current time (CTH and CTM).
6. Aplikazioak
The Inkbird ITC-306T is a versatile temperature controller suitable for various applications requiring precise heating control.

Figure 6: Common applications include reptile care, incubation, seed germination, and chicken coops.
Figure 7: The controller can maintain optimal temperatures for seed germination.

Figure 8: Suitable for maintaining stable temperatures in reptile terrariums.

Figure 9: Provides consistent warmth for young chicks in a coop.
7. Zehaztapenak
| Ezaugarri | Zehaztapena |
|---|---|
| Eredua | ITC-306T |
| Sarrerako haria | 3-core wire, 7.8mm diameter |
| Irteerako haria | 4-core wire, 8.6mm diameter |
| Elikatze Hornidura | 100V~240V AC 50/60Hz |
| Gehienezko irteerako karga | 10A, 1200W (120V) |
| Tenperatura kontrolatzeko tartea | 32 ° C ~ 108 ° C (0 ° F ~ 42 ° F) |
| Tenperatura Ebazpena | 0.1 °F / 0.1 °C |
| Tenperaturaren zehaztasuna | ±0.5 °F / ±0.3 °C |
| Sensor Cord Length | 6.56 oin (2 metro) |
| Bistaratzeko mota | Digitala |
| Materiala | Plastikoa |
| Elementuaren pisua | 1.23 kilo |
| Paketearen neurriak | 8.31 x 4.57 x 3.43 hazbete |

Figure 10: Dimensions of the Inkbird ITC-306T controller and its components.
8. Arazoak
- Display Not Working / No Power: Ensure the main power cord is securely plugged into a functional 120V AC outlet. Check for any tripped circuit breakers.
- Temperature Reading Inaccurate: Verify the temperature probe is correctly positioned and not directly touching heating elements or exposed to drafts. Use the calibration (CA) setting in advanced options to fine-tune the reading if necessary.
- Heating Device Not Activating: Check if the target temperature (TS1/TS2) and deviation (DS1/DS2) are set correctly. Ensure the current temperature is below the activation threshold. Verify that the heating devices are properly plugged into the output sockets and are functional. Check if the total wattage exceeds 1200W, which could prevent activation.
- Alarms Sounding Unexpectedly: Review the High-Temperature Alarm (AH) and Low-Temperature Alarm (AL) settings. Adjust them to appropriate levels for your application. Ensure the ALM setting is configured as desired.
- Time Cycle Not Functioning: Confirm that TR is set to 1 in the advanced settings to enable time cycle features. Verify that the time periods (TAH:TAM ~ TBH:TBM) and current time (CTH:CTM) are set correctly.
9. Mantentzea
- Garbiketa: Wipe the controller unit with a soft, dry cloth. Do not use abrasive cleaners or immerse the unit in water.
- Zunda zaintzea: Keep the temperature probe clean. Avoid bending or damaging the probe cable.
- Biltegiratzea: Gorde gailua leku fresko eta lehor batean erabiltzen ez duzunean.
10. Produktu Ofizialen Bideoak
Video 1: BN-LINK Heat Mat Thermostat Overview. This video demonstrates the basic functions of a similar BN-LINK thermostat, including switching between Fahrenheit and Celsius, programming desired temperature, and understanding error codes. While not the exact Inkbird model, it illustrates general thermostat operation.
11. Bermea eta Laguntza
For warranty information and technical support, please refer to the documentation included with your product or contact Inkbird customer service directly. Protection plans may be available for purchase separately.


