1. Produktua amaitu daview
The NEEWER X11+TM8 is a versatile 2-in-1 teleprompter designed to enhance your video production, live streaming, and video conferencing experiences. It features an 11-inch teleprompter glass and an integrated 8-inch HD monitor, allowing for direct script display from mobile devices or use as an external computer display. This device ensures natural eye contact with your audience by reflecting text directly in front of your camera lens.

Image 1.1: NEEWER X11+TM8 Teleprompter showing different usage scenarios.
Ezaugarri nagusiak:
- 11-inch HD Beam Splitter Glass: Features a multi-coating to prevent ghosting and offers 75% light transmission for clear, readable text up to 2.5 meters. Includes a protective cover to minimize glare.
- Built-in 8-inch HD Monitor (1024 x 768): Enables direct screen mirroring from mobile devices (phones/tablets) via an included cable, eliminating the need for separate prompting devices or apps.
- External Computer Monitor Functionality: Compatible with Windows/macOS, allowing use as a second screen for maintaining eye contact during broadcasts. Requires driver installation for first-time HDMI use (USB 3.0 Type A port or higher required).
- Adjustable Camera Mount with Arca-Type QR Plate: Offers flexible positioning with up to 10 cm horizontal and 3 cm vertical adjustment. Supports payloads up to 2 kg with a 1/4-inch screw.
- Bateragarritasun zabala: Supports DSLR/mirrorless cameras, webcams, and smartphones (up to 8.5 cm width, compatible with various iPhone and Samsung Galaxy models).
- Muntaketa malgua: The teleprompter base includes 1/4-inch and 3/8-inch screw holes for mounting on tripods or other stands.
2. Paketearen edukia
Mesedez, egiaztatu elementu guztiak zure paketean daudela:

Image 2.1: Product dimensions and included components.
- 1 x X11 Teleprompter Unit
- 1 x 8-inch Monitor (integrated)
- 1 x eguzkitakoa
- 1 x Teleprompter oinarria
- 1 x Telefonoaren KLamp
- 1 x Webcam Mount
- 1 x Data Cable Set (HDMI, USB-C)
3. Konfiguratzeko argibideak
Follow these steps to set up your NEEWER X11+TM8 Teleprompter.
3.1 Assembling the Teleprompter
- Attach the teleprompter base to a tripod or stand using the 1/4-inch or 3/8-inch screw holes. Ensure it is securely fastened.
- Mount the teleprompter unit onto the base.
- Install the sunshade around the teleprompter glass. The touch closure allows for quick attachment and removal.
3.2 Mounting Your Device (Camera, Phone, or Webkamera)
- Kameretarako (DSLR/ispilurik gabekoak): Attach your camera to the Arca quick-release plate on the camera mount. Ensure the camera is centered and stable. Adjust the camera mount horizontally (up to 10 cm) and vertically (up to 3 cm) for optimal positioning behind the teleprompter glass.
- Smartphoneetarako: Use the provided phone clamp to secure your smartphone. Attach the phone clamp to the camera mount. Ensure the phone is positioned correctly to capture through the teleprompter glass.
- Izan ere Webkamak: Erabili emandakoa webcam mount to attach your webcam to the camera mount.
3.3 Connecting Data Cables and Driver Installation
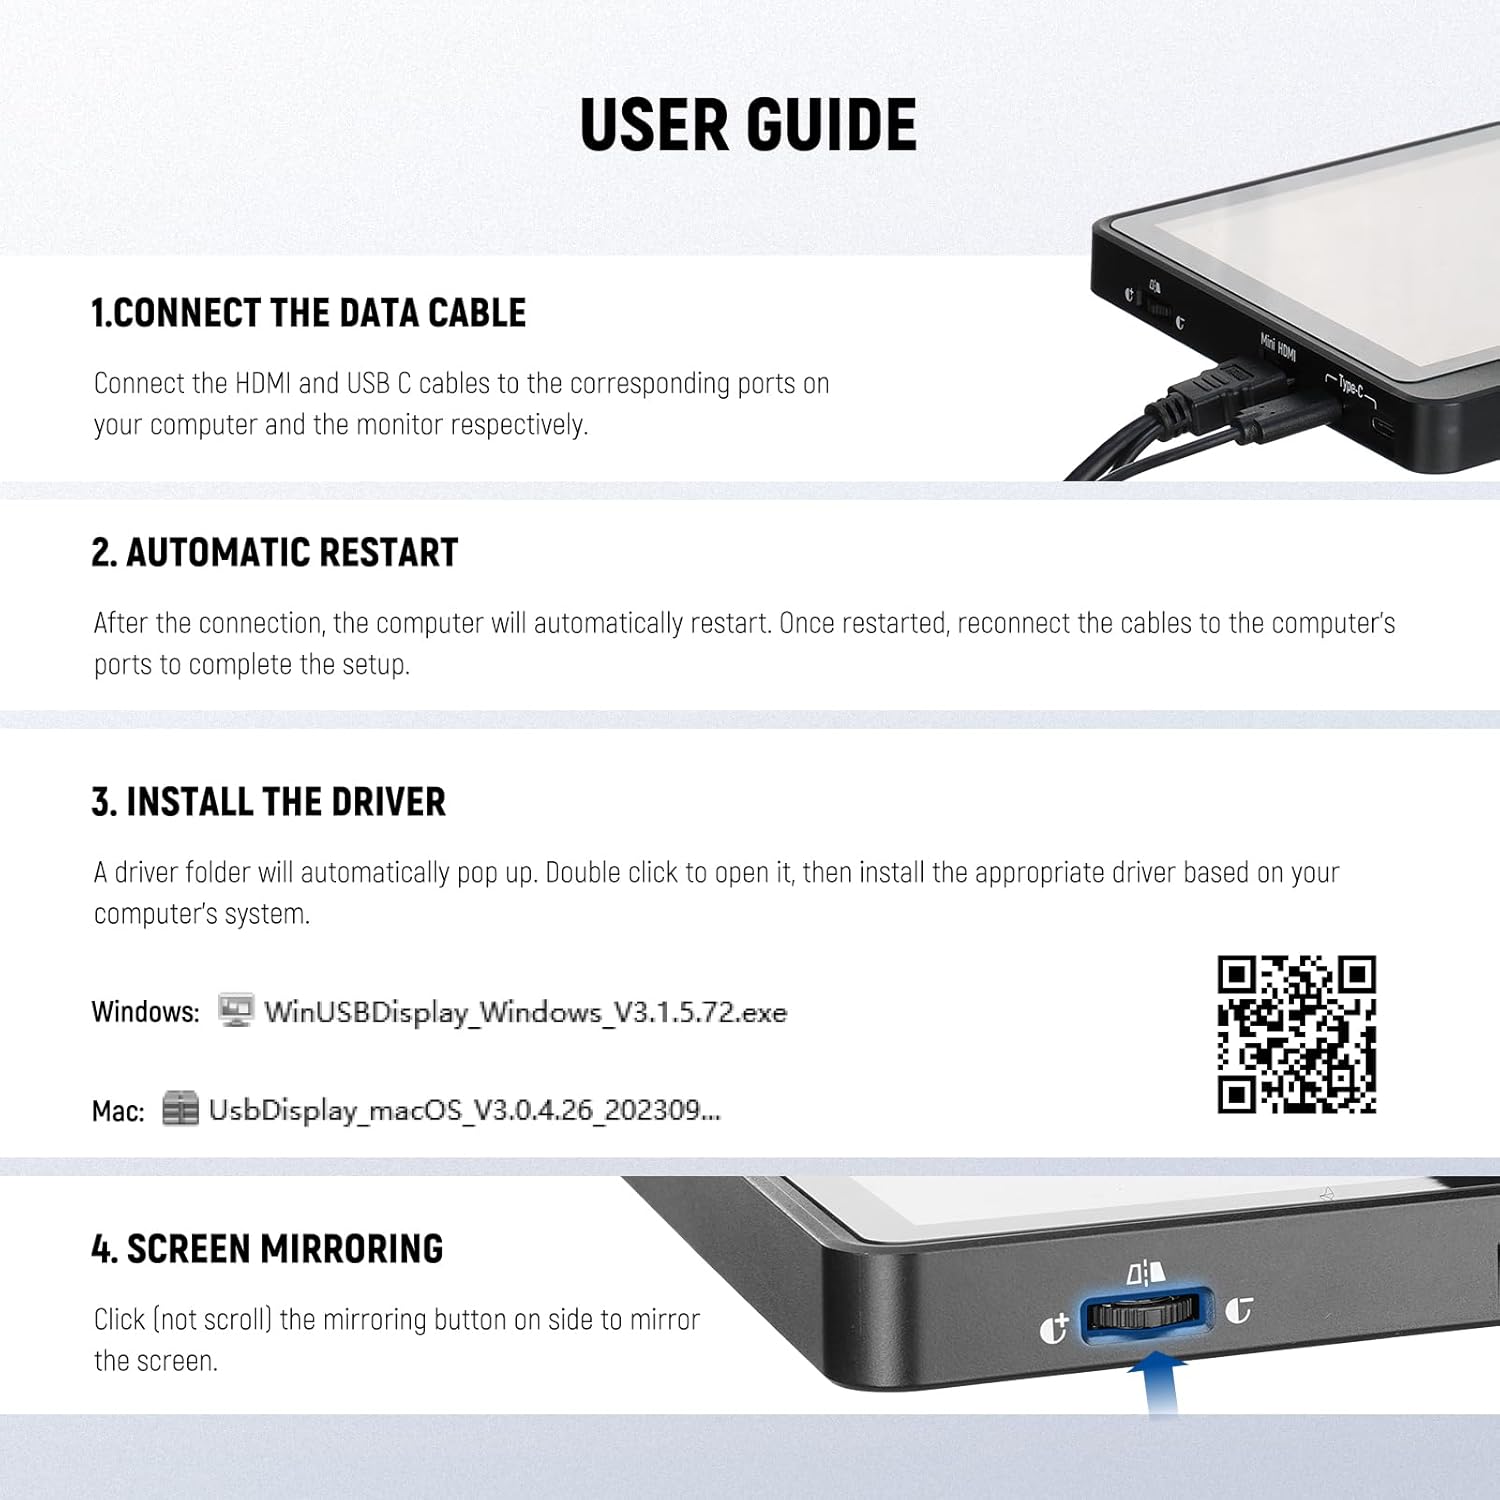
Image 3.1: Connection and driver installation steps.
- Datu-kableak konektatu: Connect the HDMI and USB-C cables to their respective ports on your computer and the teleprompter's monitor.
- Berrabiarazi automatikoa: After connecting, your computer may automatically restart. Once restarted, reconnect the cables to the computer's ports to complete the setup.
- Install Driver (for first-time computer use): If using the teleprompter as an external computer monitor for the first time, a driver folder will automatically appear. Double-click to open it and install the appropriate driver for your operating system (Windows or macOS).
Download Drivers Here
Note: This functionality is only for computers with a USB 3.0 Type A port or higher.
4. Funtzionamendu-argibideak
4.1 Screen Mirroring from Mobile Devices

Image 4.1: Mobile device screen mirroring setup.
The X11+TM8 teleprompter supports direct screen mirroring from your smartphone or tablet without requiring an additional app. Simply connect your mobile device to the teleprompter monitor using the included screen mirroring cable. Ensure the mirroring button on the side of the monitor is activated (click, not scroll) to initiate the screen mirror.
4.2 Using as an External Computer Monitor

Image 4.2: Teleprompter functioning as an extended computer display.
After installing the necessary drivers (refer to Section 3.3), the built-in monitor can function as a second display for your Windows or macOS computer. This allows you to display scripts or conference calls directly on the teleprompter, enabling you to maintain natural eye contact with your audience or participants.

Image 4.3: Maintaining eye contact during video calls.

Image 4.4: Visual comparison of natural eye contact with and without the teleprompter.
4.3 Adjusting for Optimal Viewing
- Ensure your script text size and scroll speed are comfortable for reading from your distance.
- Adjust the brightness of the built-in monitor to suit your environment and prevent eye strain.
- Position the teleprompter so that the reflected text is clearly visible through the beam splitter glass without obstructing your camera's view.
5. Mantentzea
Proper maintenance ensures the longevity and performance of your teleprompter.
- Cleaning the Beam Splitter Glass: Use a soft, lint-free microfiber cloth specifically designed for optics. For stubborn smudges, use a small amount of lens cleaning solution applied to the cloth, not directly to the glass. Avoid abrasive materials or harsh chemicals.
- Garbiketa orokorra: Wipe down the exterior of the teleprompter with a dry or slightly damp zapi biguna.
- Biltegiratzea: When not in use, store the teleprompter in a clean, dry place, preferably in its original packaging or a protective case, to prevent dust accumulation and damage.
- Manipulazioa: Handle the teleprompter with care, especially the glass component, to avoid scratches or breakage.
6. Arazoak
Arazoak badituzu, jo ezazu honako arazo eta irtenbide ohikoenei:
| Arazoa | Kausa posiblea | Irtenbidea |
|---|---|---|
| Text appears blurry or ghosted on the glass. | Improper camera/monitor alignment; external light interference; dirty glass. | Adjust camera and monitor positions. Ensure the sunshade is properly installed. Clean the beam splitter glass carefully. |
| Screen mirroring from mobile device not working. | Incorrect cable connection; mirroring button not activated. | Ensure the screen mirroring cable is securely connected. Click the mirroring button on the side of the monitor. |
| Teleprompter not recognized as an external computer monitor. | Driver not installed; incorrect USB port; cable issues. | Install the correct driver for your OS (refer to Section 3.3). Ensure your computer has a USB 3.0 Type A port or higher. Check all cable connections. Try a different USB port. |
| Camera cannot achieve proper focus through the glass. | Camera lens too wide; teleprompter too close to camera. | Ensure your camera lens is compatible with teleprompter use. Adjust the distance between the camera and the teleprompter glass. |
7. Zehaztapenak
| Ezaugarri | Xehetasuna |
|---|---|
| Marka | BERRIA |
| Eredua | X11+TM8 |
| Teleprompter Glass Size | 11 hazbete (27.9 cm) |
| Monitorearen tamaina | 8 hazbetekoa |
| Monitorearen bereizmena | 1024 x 768 HD |
| Argi Transmisioa | %75 |
| Camera Mount Payload | Gehienez 2 kg |
| USB-C sarrera | 5V/2A |
| Boterea | 10W |
| Elementuaren pisua | 1.25 kilo (567 g inguru) |
| Paketearen neurriak | 11.3 x 10.63 x 9.8 hazbete |
| Material nagusia | Plastikoa |
| Gailu bateragarriak | DSLR/Mirrorless Cameras, Mobile Phones (up to 8.5cm width), Webcams, Camcorders |
| OS bateragarria | Windows, macOS (for external monitor function) |
8. Bermea eta Laguntza
For warranty information and customer support, please refer to the official NEEWER webwebgunera joan edo produktua erosi diozun saltzailearekin harremanetan jarri. Gorde erosketaren frogagiria berme-erreklamazioetarako.
Lineako laguntza: Visit the official NEEWER website for FAQs, product registration, and further assistance.


