Sarrera
Thank you for choosing the AZDOME PG17 Pro Mirror Dash Cam. This manual provides essential information for setting up, operating, and maintaining your device. Please read it thoroughly before use to ensure optimal performance and safety.
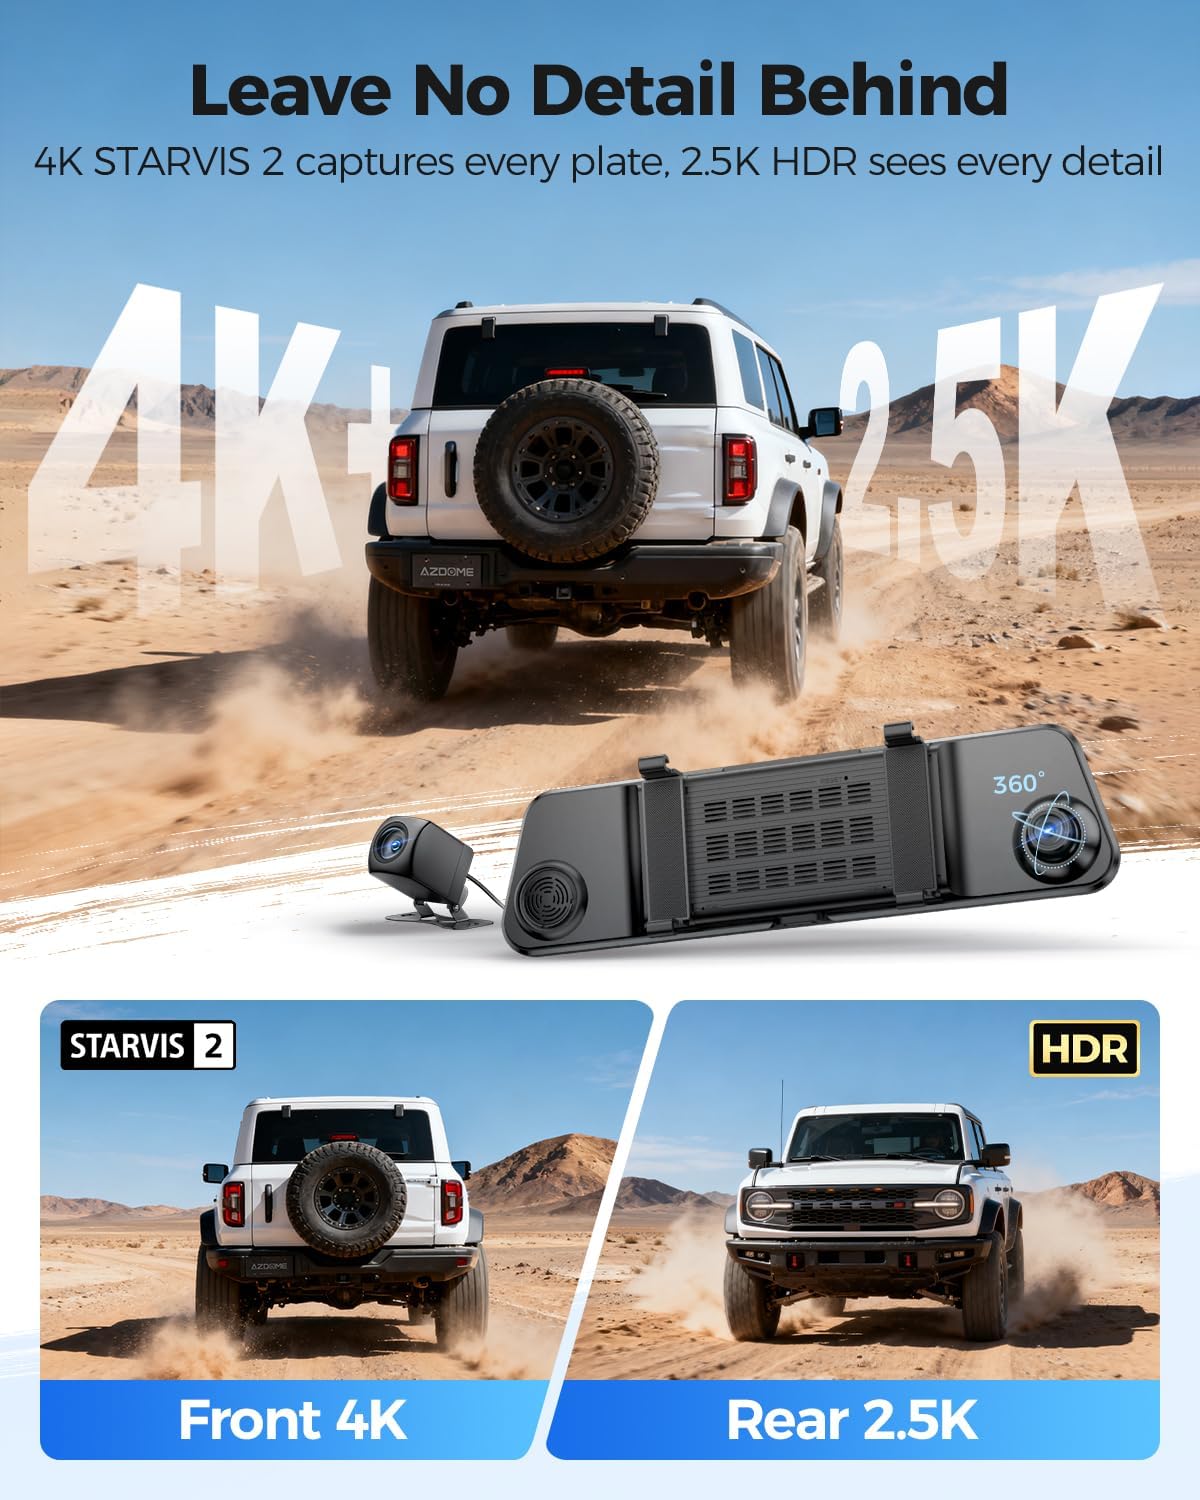
Image: The AZDOME PG17 Pro Mirror Dash Cam, showcasing its sleek design and integrated front camera, with the separate rear camera visible.
Kutxan dagoena
Egiaztatu behean zerrendatutako elementu guztiak zure paketean sartuta daudela:
- AZDOME PG17 Pro 4K Mirror Dash Cam ×1
- 2.5K Rear Camera ×1
- GPS Receiver ×1
- 128GB Memory Card ×1
- Type-C Power Cable ×1
- 20ft Rear Cam Cable ×1
- Car Wire Trim Tool ×1
- Straps ×4
- Cable Clips ×5

Image: A visual representation of all items included in the AZDOME PG17 Pro Mirror Dash Cam package.
Konfigurazioa eta Instalazioa
1. Installing the Mirror Dash Cam
Secure the main dash cam unit over your existing rearview mirror using the provided rubber straps. Ensure it is firmly attached and does not obstruct your view.

Image: A close-up of the dash cam being secured onto a vehicle's rearview mirror using the elastic straps.
2. Elikatze-kablea konektatzea
Connect the Type-C power cable to the dash cam and route it along the windshield trim down to your vehicle's 12V power outlet (cigarette lighter socket). Use the trim tool to tuck the cable neatly for a clean installation.
Video: Demonstrates the step-by-step installation process of the PG17 Pro Dash Cam, including securing the mirror unit and routing the power cable.
3. Atzeko kamera instalatzea
Connect the 2.5K rear camera to the main unit using the provided 20ft rear cam cable. Route this cable from the main unit, along the headliner and side pillars, to the rear of your vehicle. Mount the rear camera above your license plate frame for optimal rear view. Connect the red trigger wire from the rear camera cable to the positive wire of your vehicle's reversing light for automatic reverse assist functionality.

Image: A diagram illustrating how to connect the rear camera and the car charger to the main dash cam unit.
4. Installing the GPS Receiver
Plug the GPS receiver into the designated port on the dash cam. Mount the GPS module on your dashboard or windshield where it has a clear view of the sky for accurate signal reception. This enables GPS tracking and speed display.

Image: A visual demonstrating the built-in GPS logger, which tracks speed, location, and driving routes.
5. Memoria txartela sartzea
Insert the provided 128GB MicroSD card into the MicroSD card slot on the top of the dash cam. Ensure it clicks into place. The dash cam requires a high-speed memory card (U3 V30 A2 recommended) for optimal recording performance. Format the memory card before first use via the dash cam settings.
Funtzionamendu-argibideak
1. Piztu/Itzali
The dash cam will automatically power on and begin recording when your vehicle starts. It will power off automatically when the vehicle is turned off.
2. Ukipen-pantailaren interfazea
The 12-inch IPS touchscreen allows for easy navigation through menus and settings. Swipe left or right on the screen to switch between front camera view, atzeko kamera view, or a split-screen display showing both simultaneously.

Image: The dash cam display showing simultaneous 4K front and 2.5K rear camera views, highlighting clarity.
3. Ahots kontrola
Operate the dash cam hands-free using voice commands. Supported commands include: "Record Video", "Take Photo", "Turn on Audio", "Turn off Audio", "Show Front Camera", "Show Rear Camera", "Turn on WiFi", "Turn off WiFi", "Lock Video".

Image: A driver demonstrating the smart voice control feature to activate various dash cam functions without taking hands off the wheel.
4. ADAS (Advanced Driver Assistance System)
The ADAS feature provides real-time warnings for enhanced driving safety. This includes Lane Departure Warning, Forward Collision Warning, and Front Vehicle Start Alerts.

Image: A visual representation of the Advanced Driver Assistance System (ADAS) providing real-time collision warnings to the driver.
5. Parking Monitor (Hardwire Required)
For 24/7 parking surveillance, the dash cam requires a hardwire kit (sold separately). This enables Collision Detection and Time-Lapse Recording modes when the vehicle is parked.

Image: The 24H Parking Monitor feature, illustrating collision detection and time-lapse recording for vehicle security.
6. WiFi Connection and App Usage
Connect your dash cam to the AZDOME app via 5.8GHz WiFi for seamless video management, live preview, and settings adjustments. Download the AZDOME app from your smartphone's app store. The default WiFi password is 12345678.
Video: A demonstration of connecting the PG17 Pro to a smartphone via WiFi and using the AZDOME app.
Video: A guide on navigating and adjusting settings within the AZDOME app for the PG17 Pro.
Mantentzea
1. Memoria Txartelaren Kudeaketa
Regularly format your MicroSD card (at least once a month) to prevent data corruption and ensure continuous recording. The dash cam features loop recording, automatically overwriting the oldest files when the card is full, but periodic manual formatting is recommended.

Image: Illustrates the loop recording function, which automatically overwrites old files, and the emergency lock feature for critical footage.
2. Gailua garbitzea
Use a soft, dry cloth to clean the dash cam's screen and lens. Avoid using abrasive cleaners or solvents that could damage the device. Ensure the lenses are clean for clear video capture.
Arazoak konpontzea
If you encounter any issues with your AZDOME PG17 Pro, please refer to the following common solutions:
- Dash Cam-ek ez du pizten: Ensure the power cable is securely connected to both the dash cam and the vehicle's 12V power outlet. Check if the vehicle's ignition is on.
- Grabaketa arazoak: Format the MicroSD card through the dash cam settings. Ensure the card is a high-speed (U3 V30 A2) card.
- Unclear Video: Clean the front and rear camera lenses with a microfiber cloth. Adjust the camera angles for optimal view.
- GPS seinalearen galera: Ensure the GPS module has a clear view zeruarena eta seguru konektatuta dago.
- WiFi konexio arazoak: Verify that WiFi is enabled on the dash cam and your smartphone. Re-enter the WiFi password (default: 12345678).
- Ahots-kontrolak ez du erantzuten: Speak clearly and ensure the vehicle's audio is not excessively loud.
Laguntza gehiago behar baduzu, jarri harremanetan AZDOME bezeroarentzako arreta-zerbitzuarekin.
Zehaztapenak
| Ezaugarri | Xehetasuna |
|---|---|
| Ereduaren izena | PG17 Pro ADAS F1.0 |
| Produktuaren neurriak | 1.5 x 12 x 3 hazbete |
| Elementuaren pisua | 2.53 kilo |
| Bideo Harrapaketa Ebazpena | Front: 3840 × 2160 (4K), Rear: 2560 × 1440 (2.5K) |
| Ezaugarri bereziak | STARVIS 2 IMX678, Advanced Driver Assistance System (ADAS), 5.8GHz WiFi, GPS, Voice Control, Dual HDR, Reverse Assist |
| Muntatze Mota | Atzekoaview Ispilu Muntaia |
| Eremua View | 170 gradu |
| Konektibitate Teknologia | USB, Wireless (5.8GHz WiFi) |
| Pilak | 1 litio metalezko bateria behar da |
| Kolorea | Beltza |
Bermea eta Laguntza
The AZDOME PG17 Pro Mirror Dash Cam comes with 18 months of professional support. For any technical assistance, warranty claims, or product inquiries, please contact our customer service team.
Bezeroarentzako arretarako posta elektronikoa: zerbitzua@azdomevip.com

Image: AZDOME customer support representative ready to assist with product inquiries.


