1. Sarrera
The Olvy 2-in-1 Jump Starter and Power Bank (Model QS001) is a versatile and essential device designed to provide reliable emergency starting power for a wide range of 12V vehicles, including cars, trucks, motorcycles, SUVs, vans, and heavy-duty engines. Beyond its powerful jump-starting capability, it also functions as a high-capacity portable power bank and a multi-mode LED flashlight, making it an indispensable tool for any driver.
Engineered for performance in extreme conditions, this device operates effectively in temperatures ranging from -20°C to +60°C. It incorporates 9 layers of intelligent protection to ensure maximum safety and peace of mind during use.

Image: The Olvy Jump Starter is designed to operate reliably in extreme temperatures, from -20°C to +60°C, ensuring functionality in diverse climates.
2. Produktuaren ezaugarriak
- Powerful Jump Starter: Delivers up to 1500A peak current to start 12V diesel and gasoline vehicles, including cars, trucks, motorcycles, SUVs, vans, and heavy-duty engines.
- Seguru eta fidagarria: Equipped with 9 levels of intelligent protection, including reverse polarity, short circuit, overcurrent, overload, over-temperature, and over-discharge protection.
- Eguraldi Guztietako Operazioa: Designed to function in extreme conditions from -20°C to +60°C, ensuring reliable starts in cold or hot climates.
- Multi-functional Emergency Light: Integrated LED flashlight with 3 modes: bright light, strobe, and SOS signal for roadside safety and emergencies.
- Power Bank eramangarria: Dual USB and Type-C outputs with 8,000 mAh / 10,000 mAh capacity for charging smartphones, tablets, and other electronic devices on the go.

Image: The Olvy Jump Starter is suitable for a wide range of 12V vehicles, including sedans, motorcycles, SUVs, and even heavy-duty engines.
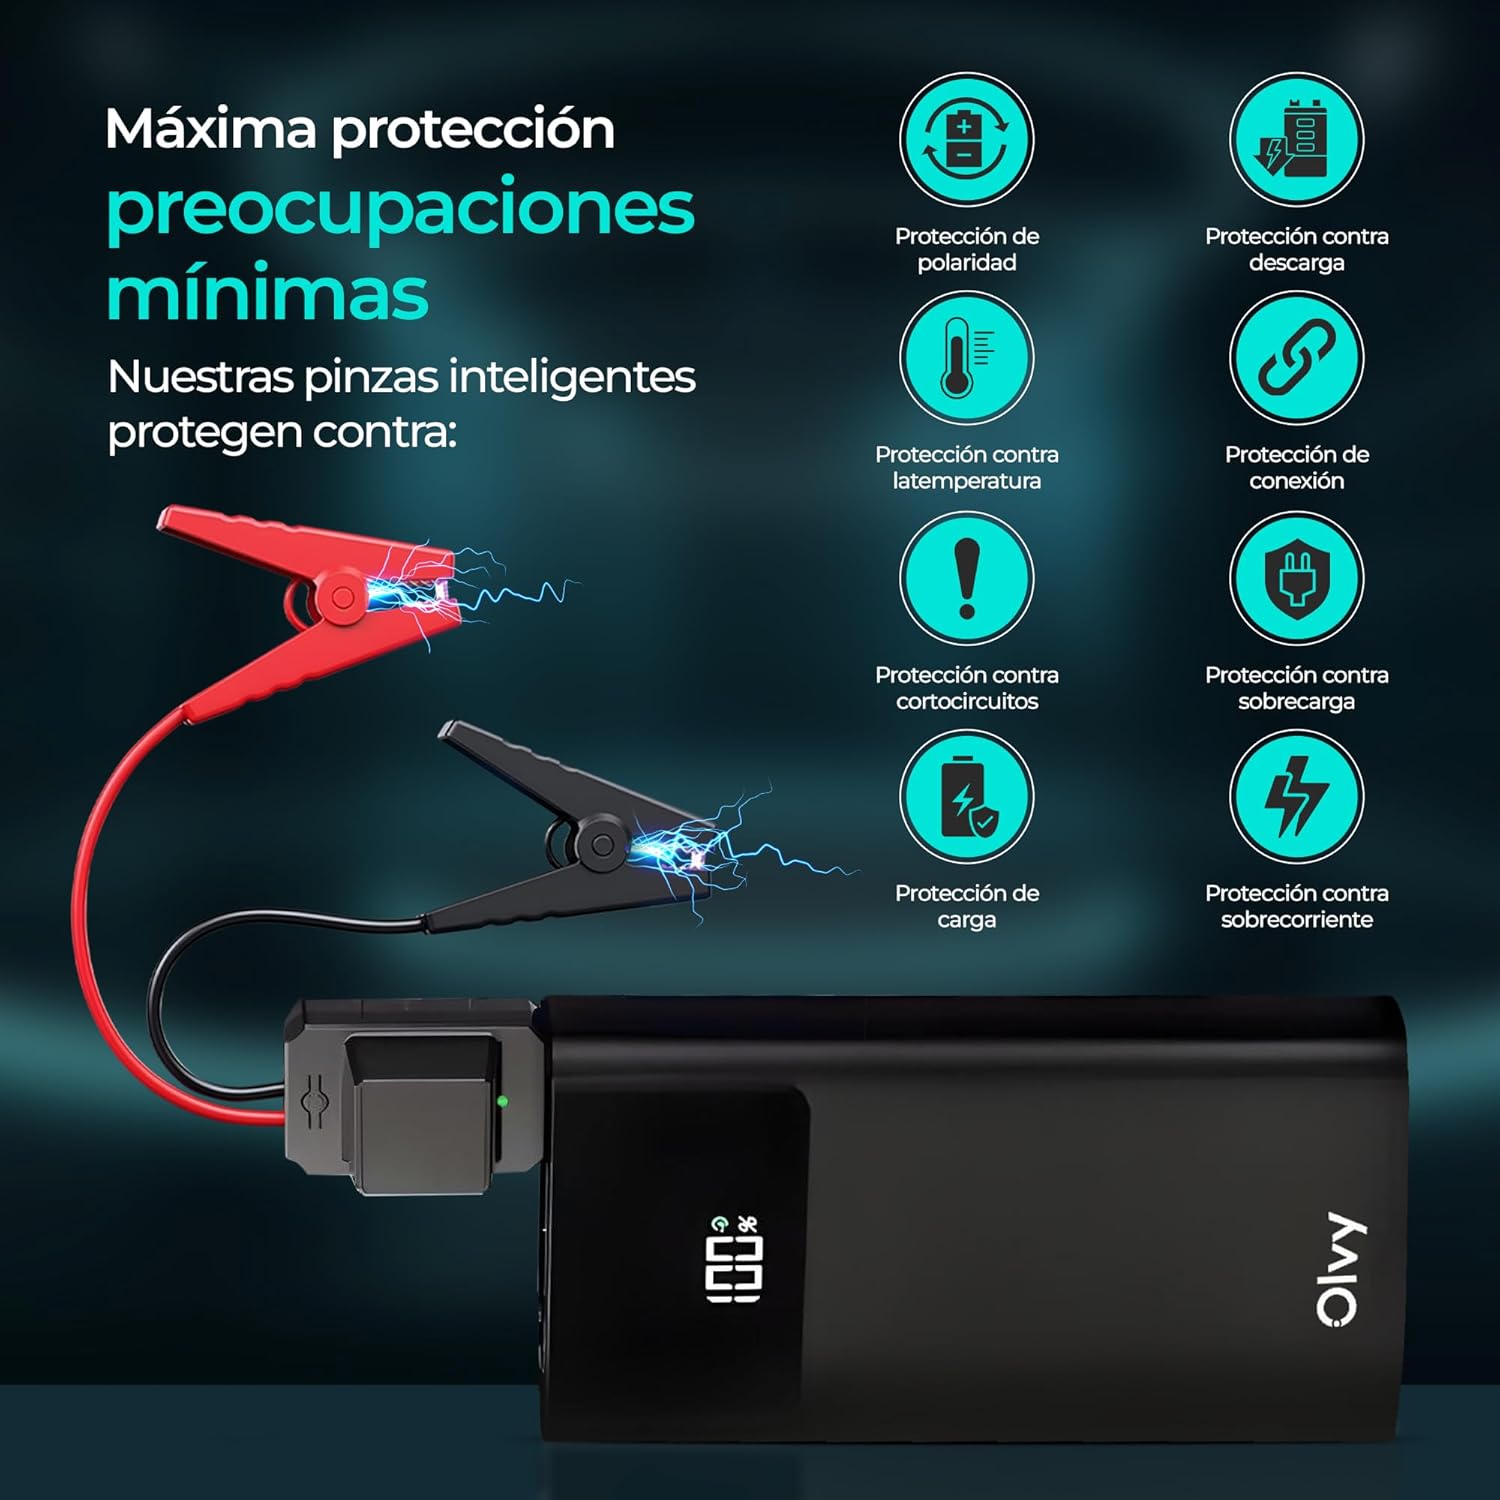
Image: The device features multiple intelligent protections, such as polarity protection, discharge protection, temperature protection, connection protection, short-circuit protection, overload protection, charge protection, and overcurrent protection.

Image: This compact and portable jump starter provides 1500A peak current and includes smart cables for safe and efficient operation.
3. Konfigurazioa
3.1. Paketearen edukia
Lehenengo aldiz erabili aurretik, ziurtatu elementu guztiak paketean daudela:
- 1x Olvy Jump Starter and Power Bank
- 1x Smart Battery Clamps
- 1x USB kargatzeko kablea
- 1x Biltegiratze Poltsa
- 1x Erabiltzailearen eskuliburua

Image: The complete package includes the Olvy 2-in-1 Jump Starter, smart battery clamps, a USB charging cable, a storage bag, and a user manual.
3.2. Hasierako kargatzea
Fully charge the Olvy Jump Starter before its first use. Connect the provided USB charging cable to the device's Type-C input port and a suitable USB power adapter (not included). The LCD screen will display the charging progress. Disconnect once fully charged.
4. Funtzionamendu-argibideak
4.1. Ibilgailu bat martxan jartzea
- Ensure the jump starter is sufficiently charged (at least 50% recommended).
- Konektatu bateria adimenduna clamps to the jump starter's dedicated port.
- Erantsi gorria (+) clamp ibilgailuaren bateriaren terminal positiboan.
- Erantsi (-) cl beltzaamp to the negative terminal of the vehicle's battery. Ensure a secure connection. The smart clamps will indicate a correct connection (e.g., a green light).
- Piztu ibilgailuaren motorra.
- Once the engine starts, immediately remove the smart clamps from the vehicle battery, then disconnect them from the jump starter.

Image: Simple 4-step process for jump starting: 1. Connect the smart clamps to the jump starter. 2. Clamp to the car battery. 3. Start the car. 4. Disconnect the clamps.
4.2. Energia-banku eramangarri gisa erabiltzea
The Olvy Jump Starter can charge your electronic devices:
- Connect your device's USB or Type-C charging cable to the corresponding output port on the jump starter.
- Abiarazleak automatikoki hasiko da zure gailua kargatzen.
- Monitor the charging status on your device and the jump starter's LCD screen.

Image: The device doubles as a power bank with Type-C and USB outputs, offering 8,000 mAh capacity to charge mobile devices.
4.3. LED linterna erabiltzea
The integrated LED flashlight offers three modes for various situations:
- Argi distiratsua: Press and hold the flashlight button to turn on the bright light.
- Strobe modua: Press the button again to switch to strobe mode for increased visibility.
- SOS seinalea: Press the button a third time for the SOS signal, useful in emergencies.
- Press and hold the button to turn off the flashlight.
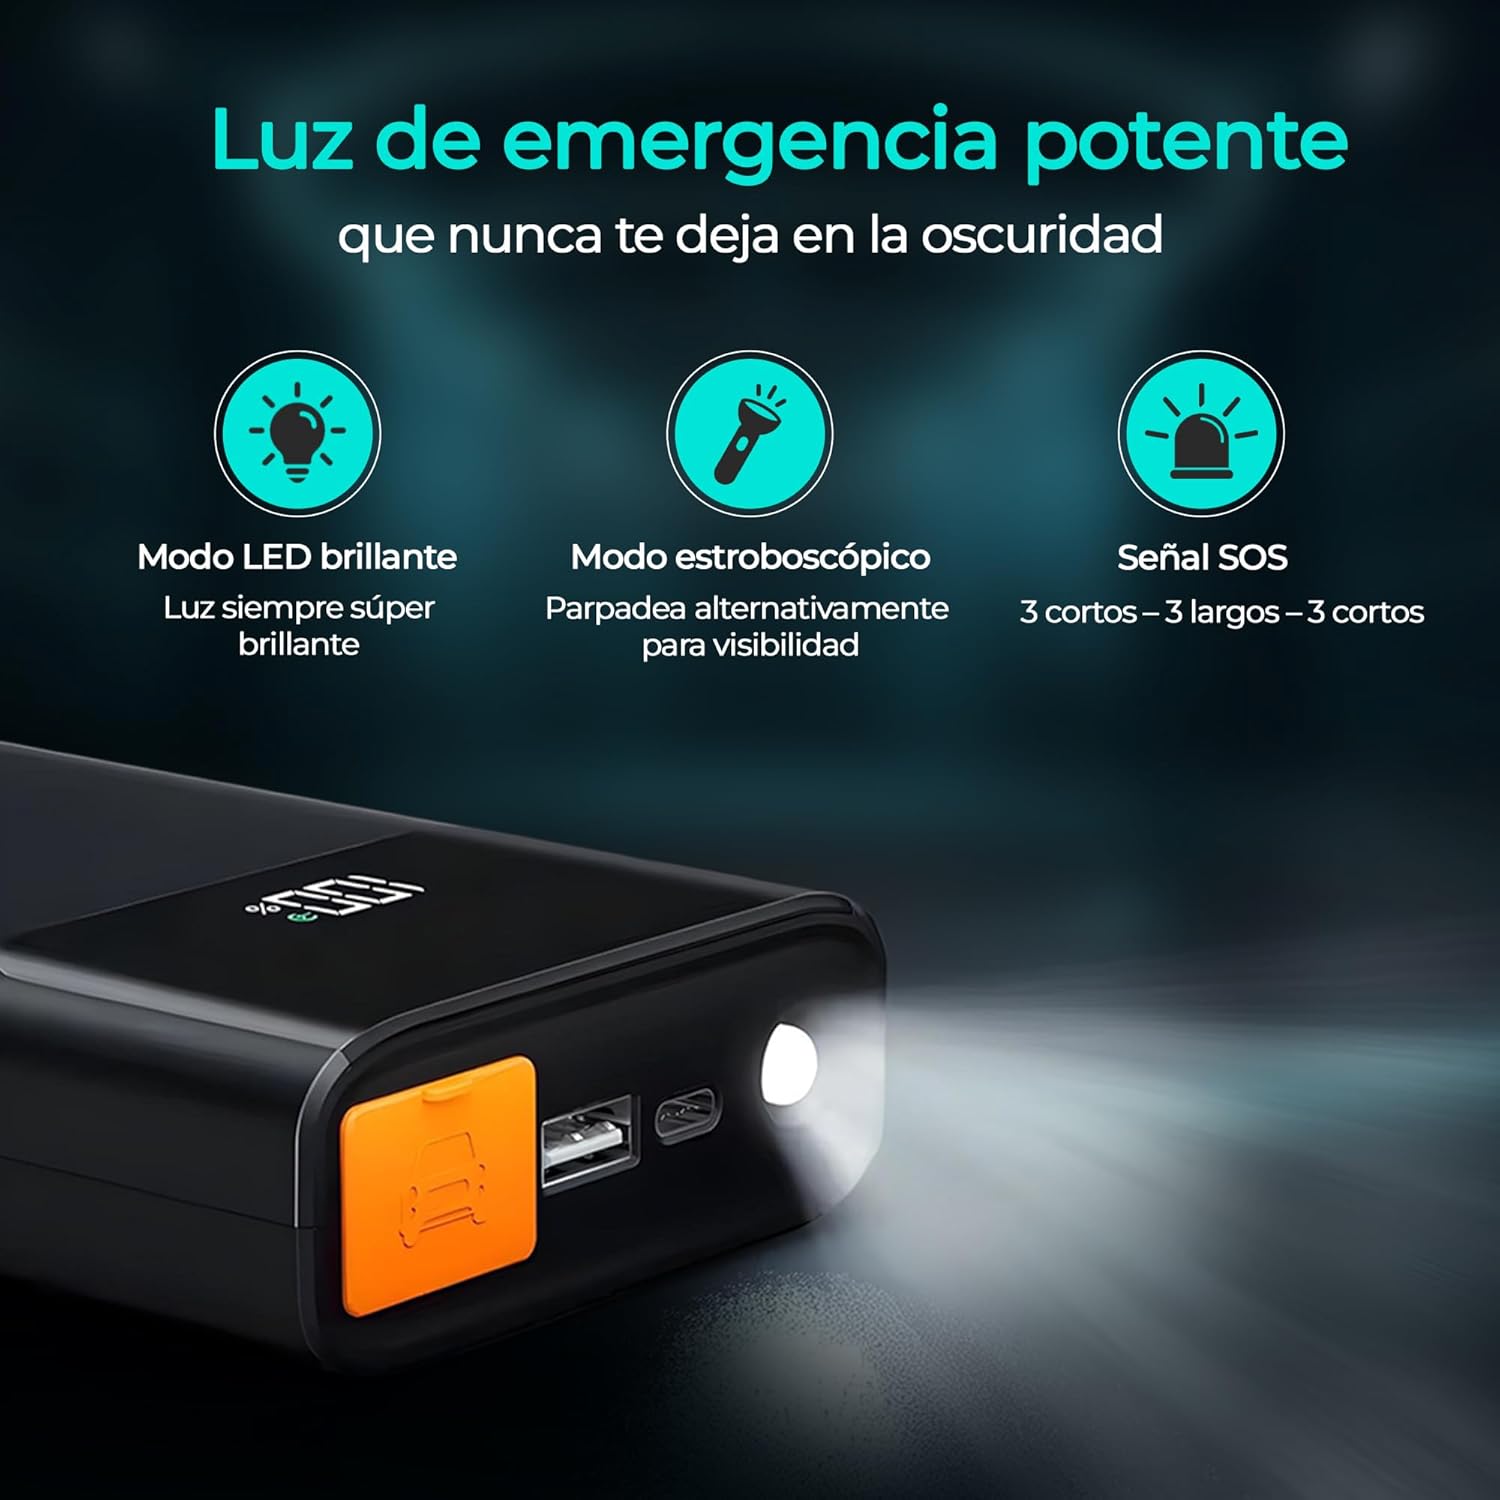
Image: The powerful emergency light features a super bright LED mode, an alternating strobe mode for visibility, and an SOS signal (3 short, 3 long, 3 short flashes).
5. Segurtasun informazioa
Produktu hau erabili aurretik, irakurri eta ulertu segurtasun-abisu eta argibide guztiak. Argibide hauek jarraitzen ez badira, deskarga elektrikoak, sua eta/edo lesio larriak gerta daitezke.
- Do not short-circuit the smart clamps.
- Ez busti produktua eurira edo hezeetara.
- Do not disassemble the product. Refer all servicing to qualified service personnel.
- Mantendu haurren eskura.
- Erabili emandako giltza adimenduna bakarrik.amps and charging cable.
- Ensure proper polarity when connecting to a vehicle battery (red to positive, black to negative). The smart clamps have built-in reverse polarity protection.
- Ez jarri salto batean izoztutako bateria bat.
- Ez erabili abiarazle elektrikoa kableak edo giltza badaude.amps hondatuta daude.
- Kendu clamps from the vehicle battery immediately after the engine starts.
6. Mantentzea
- Gorde abiarazlea leku fresko eta lehor batean, eguzki-argitik eta muturreko tenperaturetatik babestuta.
- Bateriaren osasuna mantentzeko, kargatu gailua 3-6 hilabetero, erabiltzen ez baduzu ere.
- Garbitu kanpoaldea leun batekin, damp oihal. Ez erabili produktu kimiko gogorrak edo material urratzaileak.
- Keep the smart clampgarbia eta korrosiorik gabekoa da.
7. Arazoak
7.1. Gailua ez da pizten
- Ensure the device is charged. Recharge if the battery level is low.
- Sakatu eta eutsi pizteko botoia segundo batzuetan, sakatze azkar bat ez dela ziurtatzeko.
7.2. Vehicle Not Starting
- Check that the smart clamps are securely connected to the vehicle battery terminals with correct polarity.
- Ziurtatu abiarazleak karga nahikoa duela.
- The vehicle battery might be severely discharged or damaged. Consult a professional mechanic.
- If the smart clamps indicate an error (e.g., red light), refer to the smart clamp's specific error codes in the full user manual.
7.3. Gailua ez da kargatzen
- Ensure the USB charging cable is properly connected to both the device and the power adapter.
- Try a different USB power adapter or charging cable.
8. Zehaztapenak
| Marka | Olvy |
| Eredua | QS001 |
| Goiko Korronte | 1500 Amperes |
| Bateria Edukiera | 8000 mAh (10000 mAh variant also mentioned) |
| Bateriaren zelulen konposizioa | Litio ioia |
| liburukiatage | 12 voltio (DC) |
| Funtzionamendu-tenperatura | -20°C eta +60°C artean |
| Neurriak | 19 x 12.7 x 9 cm |
| Pisua | 1.5 kg |
| USB irteera | Bai |
| C motako irteera | Bai |
9. Bermea eta Laguntza
For detailed warranty information and customer support, please refer to the warranty card included in your product package or visit the official Olvy webgunea. Gorde erosketa-agiria erosketaren frogagiri gisa, berme-erreklamazioetarako.


