1. Sarrera
Thank you for choosing the iScooter i14 Electric Scooter with Seat. This manual provides essential information for the safe assembly, operation, and maintenance of your new electric scooter. Please read it thoroughly before your first ride and keep it for future reference. Proper use and care will ensure optimal performance and longevity of your scooter.
2. Segurtasun informazioa
Your safety is paramount. Always wear a helmet and appropriate protective gear (knee pads, elbow pads) when riding. Familiarize yourself with local laws and regulations regarding electric scooter use. Do not ride in adverse weather conditions or on slippery surfaces. Avoid riding under the influence of alcohol or drugs. Regular maintenance checks are crucial for safe operation.
- Beti eraman kaskoa eta babes-arropa.
- Check brakes, tires, and all fasteners before each ride.
- Tokiko trafiko lege eta araudiak bete.
- Ez gainditu 264 kg-ko gehienezko pisua.
- Avoid riding in heavy rain, snow, or on icy roads.
3. Paketearen edukia
Kutxa irekitzean, egiaztatu osagai guztiak daudela:
- i14 Scooter elektrikoa
- Kargagailua
- Erabiltzailearen eskuliburua (dokumentu hau)
- Erreminta Kit
4. Konfigurazioa eta Muntaketa
Follow these steps to assemble your iScooter i14 Electric Scooter. A detailed assembly video is provided below for visual guidance.
4.1 Kutxatik ateratzea eta hasierako ikuskapena
Carefully remove all components from the packaging. Inspect for any damage that may have occurred during shipping.

Figure 4.1: The iScooter i14 Electric Scooter with Seat.
4.2 Front Wheel and Fender Installation
Attach the front wheel and fender to the scooter's fork using the provided tools. Ensure all bolts are securely tightened.
4.3 Eskulekuaren muntaia
Insert the handlebar stem into the main frame and secure it. Adjust the handlebar height to your preference and tighten the quick-release clamp. Attach the handlebar to the stem and secure it with the provided screws.

Figure 4.2: Adjusting the height of the handlebar for comfortable riding.
4.4 Eserlekuaren instalazioa
Insert the seat post into the designated slot on the scooter frame. Adjust the seat height for comfortable riding and secure it with the quick-release lever. Ensure the seat is firmly in place.

Figure 4.3: Adjusting the seat height to suit individual rider preferences.
4.5 Rear Basket Attachment
Secure the rear storage basket to the designated mounting points on the scooter's rear rack using the provided hardware. Ensure it is stable and can safely carry items.

Figure 4.4: The spacious rear basket for carrying personal belongings.
4.6 Muntaketa bideo gida
Video 4.1: This video demonstrates the assembly process for the iScooter i14 Electric Scooter with Seat, including unboxing, attaching the front wheel, handlebar, seat, and rear basket.
5. Funtzionamendu-argibideak
Understand the controls and features of your iScooter i14 for a safe and enjoyable ride.
5.1 Power On/Off and Key Ignition
Insert the mechanical key into the ignition slot and turn it to the 'ON' position to power on the scooter. The LCD display will illuminate. Turn the key to 'OFF' to power down.
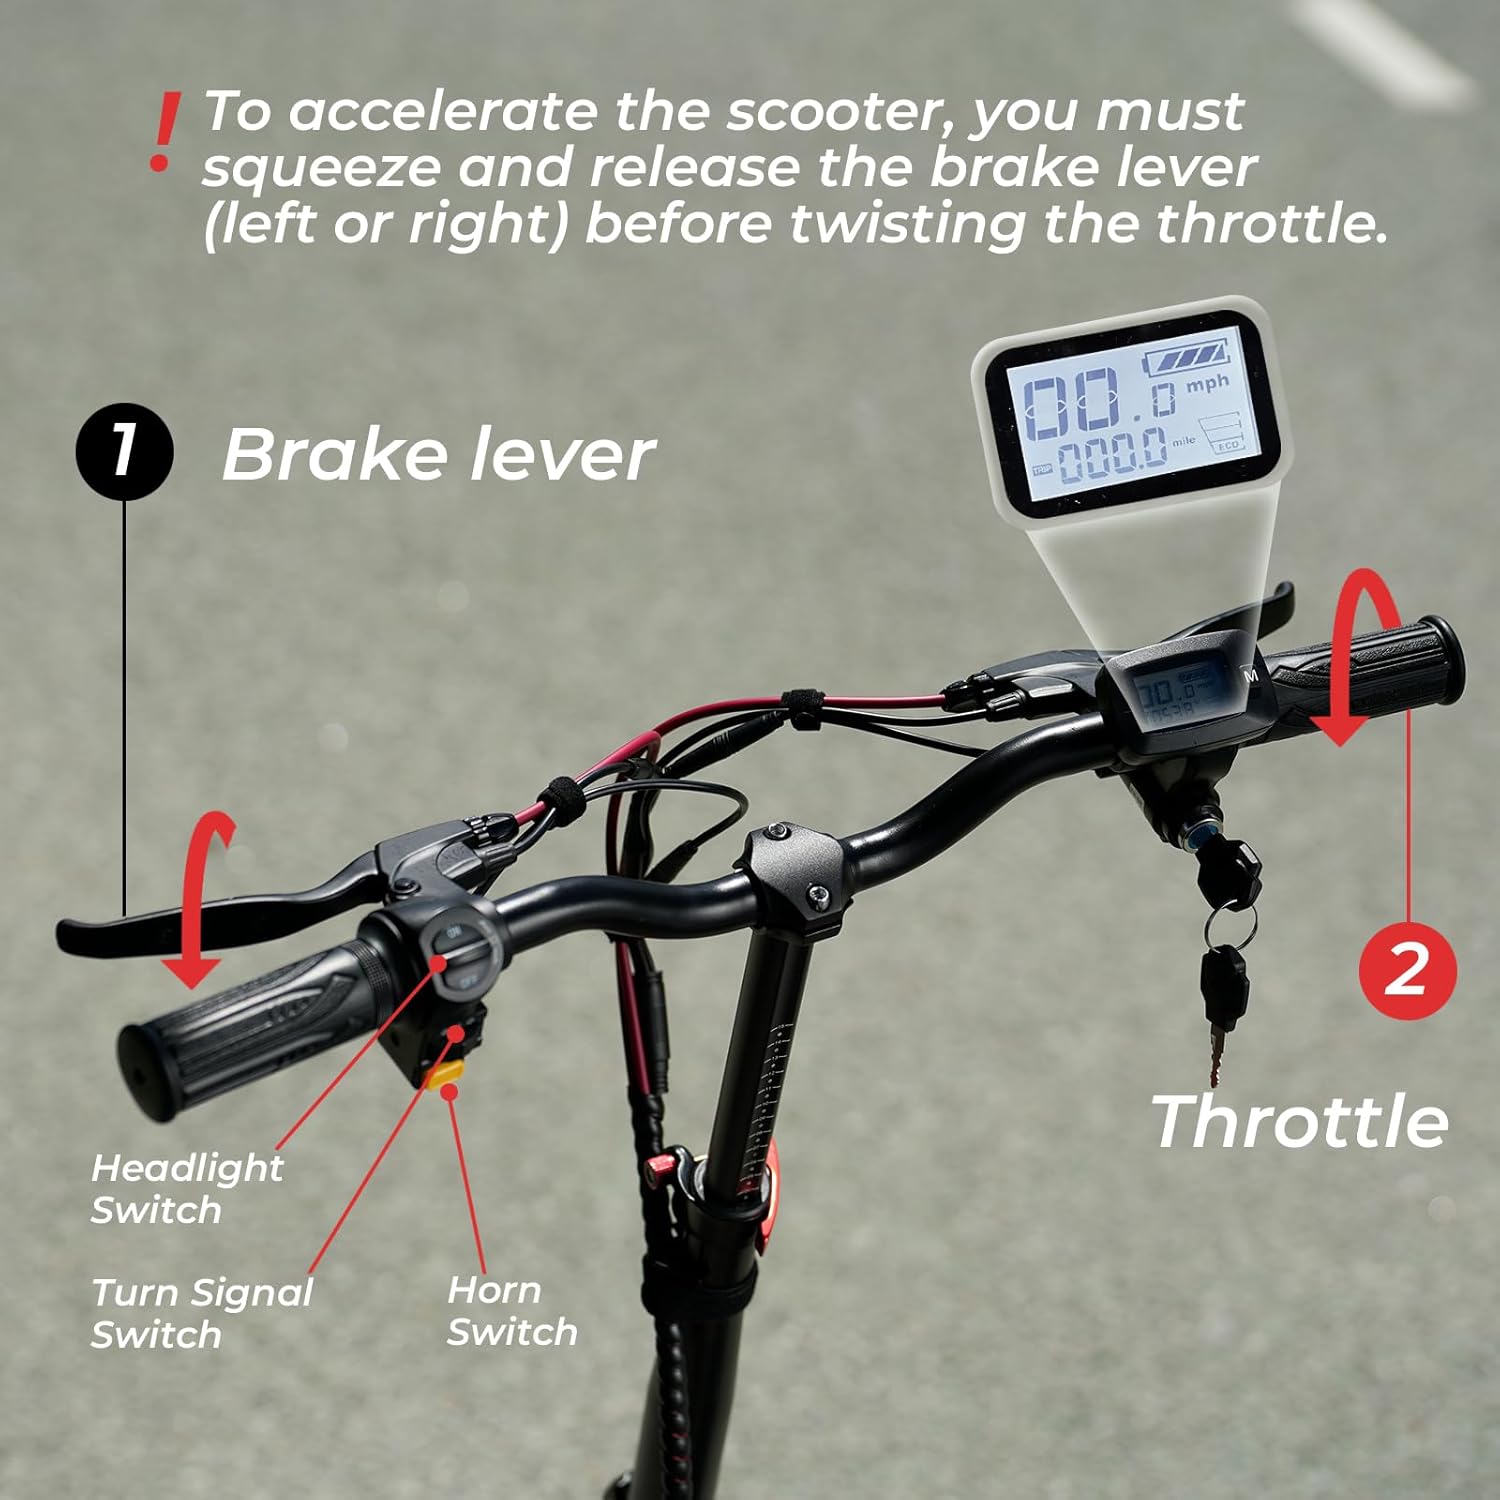
5.1 Irudia: Gainetikview of the handlebar controls, including the LCD display, key ignition, and switches.
5.2 Abiadura moduak
The iScooter i14 offers 3 adjustable speed modes: 9 MPH, 21 MPH, and 28 MPH. To switch between modes, press the 'M' button on the display twice. Select the appropriate speed mode based on your riding environment and experience level.
5.3 Azeleragailuaren funtzionamendua
To accelerate, you must first squeeze and release either the left or right brake lever before twisting the throttle. This safety feature prevents accidental acceleration. Twist the throttle gently to control your speed.
5.4 Argiak, klaxona eta biraketa-seinaleak
Use the dedicated switches on the handlebar to activate the front and rear LED lights for visibility, the horn for alerts, and the turn signals to indicate your direction to others.

Figure 5.2: The bright front LED light enhances visibility during low-light conditions.

Figure 5.3: The rear LED light ensures you are seen from behind, improving safety.
5.5 Balaztatze sistema
The scooter is equipped with front and rear disc brakes, along with an electric lock system, for powerful and reliable stopping performance. Apply both brake levers gently and evenly to slow down or stop. Avoid sudden, harsh braking, especially at high speeds.

Figure 5.4: The robust disc brake system provides effective stopping power.
6. Kargatzeko eragiketa
To charge your iScooter i14, locate the charging port on the scooter's deck. Connect the charger to the port, then plug the charger into a standard wall outlet. The indicator light on the charger will typically turn red during charging and green when fully charged. A full charge takes approximately 8 hours.
Video 6.1: This video demonstrates the charging process for the iScooter i14 Electric Scooter.
7. Mantentzea
Mantentze-lan erregularrak zure scooterraren iraupena eta funtzionamendu segurua bermatzen ditu.
- Pneumatikoen presioa: Check the pressure of the 14-inch pneumatic tires regularly. Maintain the recommended PSI as indicated on the tire sidewall for optimal ride comfort and range.
- Balazta-ikuskapena: Periodically inspect the front and rear disc brakes for wear and proper function. Adjust brake cables if necessary to ensure responsive braking.
- Garbiketa: Garbitu scooter iragarkiarekinamp oihal. Saihestu presio handiko ur-zorrotadak zuzenean osagai elektrikoetan erabiltzea.
- Bateria zaintzea: Gorde scooterra leku fresko eta lehor batean. Denbora luzez gordetzen baduzu, kargatu bateria % 50-70 inguru arte eta kargatu berriro 1-2 hilabetero deskarga sakonak saihesteko.
- Loturak: Regularly check all screws, bolts, and quick-release mechanisms to ensure they are tight and secure.
8. Arazoak
Hona hemen arazo ohikoenetako batzuk eta haien irtenbide posibleak:
| Arazoa | Kausa posiblea | Irtenbidea |
|---|---|---|
| Scooterrak ez du pizten | Low battery; Key not fully turned; Loose connections | Charge battery; Ensure key is in 'ON' position; Check all visible cable connections. |
| Motorra ez da martxan jartzen | Brake lever not released before throttle; Faulty throttle; Motor issue | Ensure brake lever is released; Contact customer support if issue persists. |
| Balaztak ahul sentitzen dira | Balazta-pastilak higatuta; Balazta-kablea soltea; Airea sistema hidraulikoan (hala badagokio) | Inspect brake pads for wear and replace if needed; Adjust brake cable tension; Consult a professional for hydraulic brake issues. |
| Funtzionamenduan zehar ezohiko zaratak | Osagai solteak; Hondakinak gurpiletan/balaztetan; Motorraren arazoa | Check all fasteners; Inspect wheels and brakes for obstructions; Contact customer support. |
9. Zehaztapenak
| Ezaugarri | Zehaztapena |
|---|---|
| Marka | iScooter |
| Ereduaren izena | i14 |
| Motor Potentzia | 800W |
| Abiadura gorena | 28 MPH |
| Gehienezko distantzia-tartea | 34 Mila |
| Bateria | 48V 10.4Ah |
| Kargatzeko Denbora | 8 ordu |
| Pneumatikoen Tamaina | 14 hazbete |
| Pneumatiko mota | Pneumatikoa |
| Esekidura Mota | Esekidura bikoitza (aurrea eta atzea) |
| Balazta Estiloa | Double Disc Brakes & EABS Braking Systems |
| Pisu Muga | 264 kilo |
| Elementuaren pisua | 72 kilo |
| Produktuaren neurriak (LxWxH) | 43"L x 17"Z x 45"A |
| Markoaren materiala | Aluminioa |
| Ezaugarri bereziak | 800W Motor, 28MPH Top Speed, 34MILES Long Range, Dual Suspension, Adjustable Height, Adjustable Seat |
| Gomendatutako Erabilerak | Joan-etorriak |
10. Bermea eta Laguntza
10.1 Bermearen informazioa
iScooter offers a 12-month or 180-day warranty on different components of your product. Please refer to the specific warranty terms provided with your purchase for detailed coverage.
10.2 Bezeroarentzako laguntza
For any questions, concerns, or assistance with your iScooter i14, please contact our customer support team:
- Call Center: +1 (855) 916-2366
- Txata/Posta elektronikoa: support@iscooterglobal.com
Our customer support team is available to assist you.

Figure 10.1: iScooter customer support details for assistance.


