Undalogic miniSMU MS01 2 kanaleko iturri-neurgailu trinkoa eta zehaztasun handikoa

Sarrera
miniSMU MS01-ri buruz
miniSMU MS01 2 kanaleko iturri-neurketa unitate (SMU) trinkoa eta zehaztasun handikoa da, proba eta karakterizazio elektroniko moldakorretarako diseinatua. Ikertzaile, ingeniari eta elektronika zaleentzat diseinatua, MS01-ak funtzionalitate indartsua eta eramangarritasuna uztartzen ditu, laborategiko eta landa-erabilerarako tresna aproposa bihurtuz.
Funtsezko Ezaugarri eta Onurak
- Bi kanaleko funtzionamendua: Bi SMU kanal independentek hainbat osagai aldi berean probatzea edo konparazio-analisia egitea ahalbidetzen dute.
- 4 koadranteko funtzionalitate osoa: Bolumena lortzeko eta murrizteko gai datage edo uneko, proba-eszenatoki sorta zabal baterako malgutasuna eskainiz.
- Zehaztasun handia:
- liburukiatagbarrutia: -12V-tik +12V-ra 1mV-ko zehaztasunarekin
- Oraingo barrutia: -180mA-tik +180mA-ra, 10nA-ko zehaztasunarekin 5 azpi-tarteetan
- Diseinu trinkoa: 137x82x29 mm-ko neurriekin, MS01 erraz eramangarria eta espazioa aurrezten duena da edozein lan-eremutan.
- Energia-aukera malguak: USB-C bidez funtzionatu 50mA-rainoko korronteetarako edo erabili barneko 12V DC egokitzailea korronte-tarte osoa lortzeko.
- Konektibitate polifazetikoa: Konektatu USB edo WiFi 4 bidez zure proba-konfigurazioan erraz integratzeko.
- Software interfaze intuitiboa: "MiniSMU" software osagarriak neurketa aurreratuak ahalbidetzen ditu, besteak beste, IV kurbak, egonkortasun probak eta potentzia puntu maximoaren jarraipena.
Aurreikusitako erabilera eta aplikazioak
miniSMU MS01 batez ere honetarako diseinatuta dago:
- Eguzki-zelulen karakterizazioa: Unibertsitate eta I+G laborategietarako aproposa, energia fotovoltaikoaren ikerketan eta garapenean lanean.
- Erdieroaleen probak: Transistoreak, diodoak eta beste osagai elektroniko batzuk zehaztasun handiz karakterizatu.
- Gailuen azterketa: Egin IV kurbaren neurketa zehatzak eta egonkortasun probak hainbat gailu elektronikotan.
- Energia Kudeaketa Ikasketak: Eguzki-zelulen eta beste energia-kudeaketako aplikazio batzuen potentzia-puntu maximoaren jarraipena egin.
- Ikerketa Elektroniko Orokorra: Egokia da hainbat proba eta neurketa elektronikoetarako, bai ingurune akademikoetan, bai industria-inguruneetan.
Eguzki-teknologiaren mugak gainditzen dituen ikertzailea, diseinu elektronikoak fintzen dituen ingeniaria edo karakterizazio elektronikoaren konplexutasunak ikasten dituen ikaslea izan, miniSMU MS01-ek neurketa zehatzak, fidagarriak eta sakonak egiteko behar dituzun tresnak eskaintzen dizkizu.
Segurtasun Informazioa
Zure segurtasuna da gure lehentasun nagusia. miniSMU MS01 bolumen txikikoetarako diseinatuta dagoen arrentage eragiketetan, ezinbestekoa da segurtasun-prozedura egokiak jarraitzea edozein proba-ekipo elektroniko erabiltzean. Mesedez, irakurri eta ulertu segurtasun-jarraibide hauek gailua erabili aurretik.
Segurtasun-neurri orokorrak
- Irakurri argibide guztiak: Irakurri eta ulertu arretaz segurtasun eta funtzionamendu argibide guztiak miniSMU MS01 erabili aurretik.
- Gorde dokumentazioa: Gorde erabiltzailearen eskuliburu hau eta segurtasun-informazio guztia etorkizunean erreferentzia gisa.
- Kontuan izan abisuak: Jarraitu gailuan eta funtzionamendu-argibideetan dauden abisu guztiak.
- Erabili nahi bezala: miniSMU MS01 proba eta neurketa elektronikoetarako diseinatuta dago. Ez erabili eskuliburu honetan zehazki deskribatzen ez den beste helburuetarako.
- Ingurune egokia:
- Erabili gailua ingurune garbi eta lehor batean.
- Saihestu tenperatura altuen, hezetasunaren edo eguzki-argiaren eraginpean egotea.
- Ziurtatu aireztapen egokia gehiegi berotzea saihesteko.
- Manipulazioa eta Garraioa:
- Kontu handiz maneiatu gailua kalte fisikoak saihesteko.
- Erabili jatorrizko ontzia edo babes-zorro egoki bat gailua garraiatzerakoan.
- Mantentzea:
- Ez saiatu gailua zeuk konpontzen, eskuliburu honetan berariaz adierazten ez bazaizu.
- Jarri zerbitzu-zerbitzu guztiak zerbitzu-pertsonal kualifikatuari.
Segurtasun elektrikoaren gogoetak
- Vol. Baxuatage Eragiketa: miniSMU MS01 bolumen baxuan funtzionatzen duen bitarteantag(-12V-tik +12V-ra), tratatu beti beste edozein gailu elektriko bezala errespetuz.
- Elikatze-iturria:
- Erabili emandako 12V-ko korronte zuzenaren egokitzailea edo gailuaren zehaztapenak betetzen dituen USB-C elikatze-iturri bat soilik.
- Aldian-aldian egiaztatu kable elektrikoak kalterik ote duten. Ez erabili gailua kable elektrikoa higatuta edo hondatuta badago.
- Deskonexioa: Funtzionamendu anormalen bat gertatzen bada edo matxura baten susmoa baduzu, deskonektatu berehala gailua energia-iturritik eta konektatutako edozein ekipotatik.
- Likidoaren esposizioa: Saihestu gailua likidoen ondoan edo hezetasun handiko inguruneetan erabiltzea. Gailuan likidoa isurtzen bada, deskonektatu berehala eta teknikari kualifikatu batek berrikusi dezan erabili aurretik.
- Trumoi-ekaitzak: Tximista-ekaitzetan edo gailua denbora luzez erabili gabe uzten denean edo erabili gabe uzten denean babes gehigarrirako, deskonektatu energia-iturritik.
- Proba-objektuetarako konexioa:
- Konektatu beti proba-kableak miniSMU MS01era, probatu beharreko zirkuitura konektatu aurretik.
- Deskonektatu proba-kableak probatzen ari den zirkuitutik miniSMU MS01etik deskonektatu aurretik.
- Ez gainditu gehienezko sarrera bolumenatagTerminal bakoitzerako zehaztutako tensioak eta korronteak.
- Deskarga estatikoa: Kontuan izan deskarga estatiko potentziala osagai elektroniko sentikorrak maneiatzean. Erabili ESD babes neurri egokiak beharrezkoa denean.
Gogoratu, miniSMU MS01 funtzionamendu segururako diseinatuta dagoen arren, ezinbestekoa dela beti kontuz ibiltzea eta zentzua erabiltzea edozein ekipamendu elektrikorekin lan egitean. Funtzionamendu seguruari buruzko zalantzarik edo galderarik baduzu, jarri harremanetan gure laguntza-taldearekin jarraitu aurretik.
RF Esposizioari buruzko informazioa
Ekipo honek kontrolatu gabeko ingurune baterako ezarritako FCC erradiazioaren esposizio-mugak betetzen ditu. Ekipo hau erradiadorearen eta gorputzaren artean gutxienez 20 cm-ko distantzian instalatu eta funtzionatu behar da.
FCC
FCC abisua
Gailu honek FCC Arauen 15. zatia betetzen du.
Funtzionamendua honako bi baldintza hauen menpe dago:
- Baliteke gailu honek ez du interferentzia kaltegarririk eragin, eta
- gailu honek jasotako edozein interferentzia onartu behar du, nahi ez den funtzionamendua eragin dezakeen interferentziak barne.
Betearen arduradunak espresuki onartzen ez dituen aldaketak edo aldaketek ekipamendua erabiltzeko erabiltzailearen eskumena baliogabetu dezakete.
OHARRA: Ekipo hau probatu da eta B Klaseko gailu digital baten mugak betetzen dituela ikusi da, FCC Arauetako 15. zatiaren arabera. Muga hauek etxebizitza-instalazio batean interferentzia kaltegarrien aurka arrazoizko babesa emateko diseinatuta daude. Ekipo honek irrati-maiztasun-energia sortzen, erabiltzen eta igor dezake eta, argibideen arabera instalatu eta erabiltzen ez bada, interferentzia kaltegarriak sor ditzake irrati-komunikazioetan. Dena den, ez dago bermatzen instalazio jakin batean interferentziarik gertatuko ez denik. Ekipo honek irrati- edo telebista-harreran interferentzia kaltegarriak eragiten baditu, eta hori ekipoa itzali eta piztuz jakin daiteke, erabiltzaileari gomendatzen zaio interferentziak zuzentzen saiatzea, neurri hauetako bat edo gehiago erabiliz:
- Berbideratu edo lekuz aldatu antena hartzailea.
- Handitu ekipoaren eta hargailuaren arteko bereizketa.
- Konektatu ekipoa hargailua konektatuta dagoen zirkuitu desberdineko entxufe batera.
- Kontsultatu banatzaileari edo irrati/telebistako teknikari esperientziadun bati laguntza lortzeko.
Produktua amaituview
Paketearen edukia
Zure miniSMU MS01 kutxa irekitzean, elementu hauek aurkitu beharko zenituzke:
- miniSMU MS01 gailua
- 12V DC korronte egokitzailea
- USB-C kablea
- WiFi antena (SMA konektorea)
- BNCtik banana entxuferako egokitzaile multzoa (2 bikote)
- Erabiltzailearen eskuliburua
- Kalibrazio-ziurtagiria
Elementu hauetakoren bat falta bada edo hondatuta badago, jarri harremanetan gure bezeroarentzako arreta-zerbitzuarekin berehala.
Gailuaren diseinua eta kontrolak
MiniSMU MS01-ak diseinu trinkoa eta funtzionala du, ordenagailuz kontrolatutako funtzionamendurako optimizatua. Hona hemen laburpenaview bere diseinua eta kontrolak:
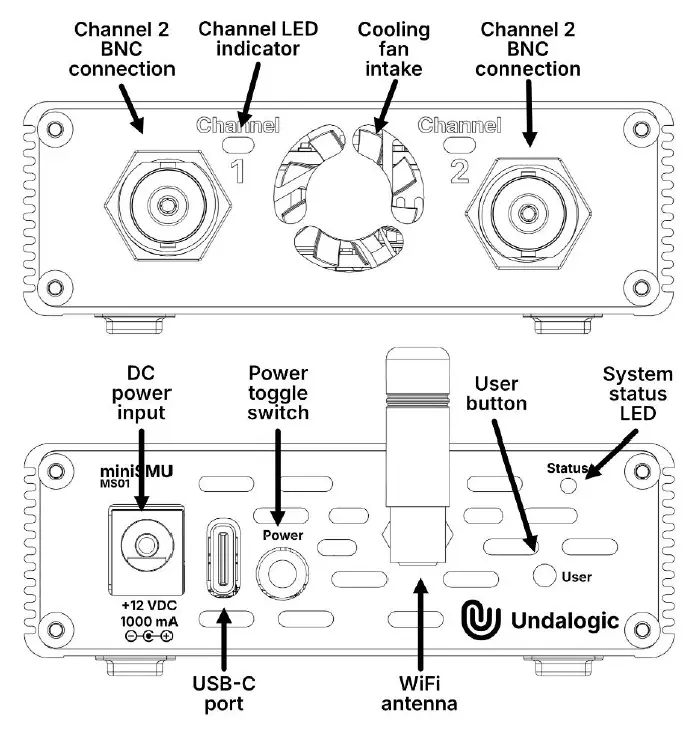
- Aurrealdeko panela:
- 1. kanaleko BNC konektorea
- 2. kanaleko BNC konektorea
- 1. kanalerako egoera LEDa
- 2. kanalerako egoera LEDa
- Hozte-haizagailuaren sarrera
- Atzeko Panel:
- 12V DC upel konektorea (erdiko pin positiboa)
- USB-C ataka (USB 2.0)
- Pizteko/itzaltzeko etengailua
- Erabiltzailearen botoia
- SMA antena konektorea WiFirako
- Hozteko haizagailuaren ihes-zirrikituak
Adierazleak eta kontrolak
miniSMU MS01-ak LED adierazleak erabiltzen ditu bere egoerari buruzko berehalako feedbacka emateko, eta ordenagailu software bidez kontrolatzen da.
- Egoera LEDak (kanal bakoitzeko bat):
- Berde trinkoa: Kanala aktibo dago eta parametro normaletan funtzionatzen du
- Gorri trinkoa: Kanala babes moduan dago (unekoa edo bolumena)tage muga gaindituta)
- Desaktibatuta: Kanala inaktibo dago
- Switch potentziala: Atzeko panelean kokatuta, etengailu honek gailua piztu eta itzaltzen du.
- WiFi aktibazio botoia: Atzeko panelean kokatuta, botoi honek WiFi irratia aktibatzen eta desaktibatzen du.
- Ordenagailuaren kontrola: miniSMU MS01-aren gainerako funtzio eta ezarpen guztiak zure ordenagailuan instalatutako software osagarriaren bidez kontrolatzen dira. Gailua zure ordenagailura konektatzen da USB-C atakaren bidez edo WiFi bidez.
Zure miniSMU MS01-aren diseinua, kontrolak eta adierazleak ulertzeak gailua behar bezala konfiguratzen eta bere egoera zehatz-mehatz interpretatzen lagunduko dizu. Hurrengo ataletan, sakonago aztertuko dugu gailua ordenagailura nola konektatu eta software interfazea nola erabili zure neurketetarako eta esperimentuetarako.
Zehaztapen Teknikoak
Zehaztapenak
- liburukiatage Zehaztapenak
- Tartea: -12 V-tik +12 V-ra
- Zehaztasuna: ±(0.1% + 1.5 mV)
- Neurketaren ebazpena: 6 uV
Korrontearen Neurketa
- Tartea: -180 mA-tik +180 mA-ra
- Zehaztasuna: ±(0.2% + 10 nA)
- Ebazpena: 10 pA
- Uneko tarteak: Automatikoki edo eskuz hauta daiteke
- 0tik 500 nA-ra
- 500 nA-tik 20 uA-ra
- 20 uA-tik 0.5 mA-ra
- 0.5 mA-tik 13 mA-ra
- 13 mA-tik 180 mA-ra
Uneko iturria
- Tartea: -180 mA-tik +180 mA-ra
- Zehaztasuna: ±(0.2% + 10 nA)
- Ebazpena: 10 pA
Potentziaren zehaztapenak
- Sarrerako potentzia aukerak:
- 5V USB-C bidez.
- Oharra: SMU korrontea 50 mA-ra mugatuta dago USB bidezko moduan lehenespenez.
- 12V DC upel konektorearen bidez
- 12V 2000 mA AC-DC elikatze-iturria barne (100-240 V sarrera)
- Gehienezko potentzia: 15W
- Irteera potentzia: Gehienez 2.1 W kanal bakoitzeko iturri edo hondoratu
Konektibitatea
- USB-C (USB 2.0)
- WiFi 4 (802.11b/g/n)
Kanalaren zehaztapenak
- Kanal kopurua: 2
- Kanalen independentzia: Funtzionamendu guztiz independentea. Bi BNC kanpoko babesak erreferentzia puntu komun gisa konektatuta daude.
- 4 koadranteko eragiketa: Bai, iturri eta hustubide gaitasuna bi bolumenetarakotage eta egungoa
Zehaztapen fisikoak
- Neurriak: 137 mm x 82 mm x 29 mm (WiFi antena barne)
- Pisua: 225 g
Ingurumen-zehaztapenak
- Funtzionamendu-tenperatura tartea: 0 eta 50 °C artean
- Biltegiratzeko tenperatura-tartea: -20 eta 70 °C artean
- Hezetasun-barrutia: 10 eta 80% RH
Neurtzeko gaitasunak
- IV kurbaren neurketak
- IV egonkortasun neurketak (aldizkako IV kurbak denbora luzez)
- Potentzia maximoaren puntuaren jarraipena (eguzki-zeluletarako)
- Datuen erregistroa
- Transistoreen IDS-VDS kurbak
- Transistoreen IDS-VGS kurbak
Softwarea
- Sistema eragile bateragarriak:
- Windows 7tik 11ra
- Sistemaren gutxieneko eskakizunak:
- Nukleo bikoitzeko CPUa (1.8 GHz edo azkarragoa)
- 4 GB RAM edo handiagoa
- 200 MB disko-espazioa
- USB 2.0 konexioa
- Sareko konexioa (miniSMU sarean sartzeko)
- 3333 TCP ataka libre egon behar da sare baten bidez miniSMUra sartzeko.
- Kontuan izan: Zehaztapen guztiak alda daitezke abisurik gabe. Informazio eguneratuena lortzeko, kontsultatu beti dokumentazio berriena.
Hasteko
Atal honek zure miniSMU MS01 lehen aldiz konfiguratzeko prozesuan zehar gidatuko zaitu. Jarraitu urrats hauek arretaz zure gailuak behar bezala funtziona dezan.
Despaketatzea eta ikuskatzea
- Kontu handiz atera miniSMU MS01 eta osagarri guztiak paketetik.
- Egiaztatu eskuliburu honetako "Paketearen edukia" atalean zerrendatutako elementu guztiak daudela.
- Egiaztatu gailua eta osagarriak bidalketa bitartean gertatu diren kalteen zantzurik dagoen ikusteko.
- Elementuren bat falta bada edo hondatuta badago, jarri harremanetan gure bezeroarentzako arreta-zerbitzuarekin berehala jarraitu aurretik.
Elikatze-aukerak
miniSMU MS01 bi modutara elikatu daiteke:
USB-C Power
- Bilatu USB-C ataka gailuaren atzeko panelean.
- Konektatu emandako USB-C kablea ataka honetara.
- Konektatu USB-C kablearen beste muturra ordenagailuko USB ataka batera edo USB elikatze-egokigailu batera.
Oharra: USB-C elikadura egokia da kanal bakoitzeko 100mA arte behar diren eragiketetarako. 12V DC elikadura egokitzailea
Korronte-tarte osoko funtzionamendurako (kanal bakoitzeko 175 mA arte):
- Bilatu 12V DC upel konektorea gailuaren atzeko panelean.
- Konektatu emandako 12V-ko korronte-egokitzailea ataka honetara.
- Entxufatu korronte-egokitzailea hormako entxufe egoki batera.
Abisua: Erabili emandako 12V-ko korronte zuzenaren egokitzailea edo zehaztapen zuzenak dituen egokitzaile baliokide bat soilik, zure gailua kaltetu ez dadin.
Konektibitate konfigurazioa
miniSMU MS01 zure ordenagailura USB edo WiFi bidez konekta daiteke.
USB konexioa
- Ziurtatu gailua piztuta dagoela
- Konektatu USB-C kablea gailuaren atzealdeko USB-C atakara.
- Konektatu beste muturra ordenagailuko USB ataka batera.
- Zure ordenagailuak automatikoki ezagutu beharko luke gailua. Eskatzen bazaizu, utzi zure ordenagailuari beharrezko kontrolatzaileak instalatzen.
WiFi konfigurazioa
- Ziurtatu gailua piztuta dagoela eta ordenagailu batera konektatuta dagoela USB-C kable baten bidez.
- miniSMU mahaigaineko aplikazioan, konektatu miniSMUren atakara.
- Egin klik mahaigaineko aplikazioaren konexio leihoan dagoen engranaje ikonoan eta egin klik "Wi-Fi ezarpenak" aukeran.
- Egin klik "Gaitu" aukeran Wi-Fi irratia atalean.
- Egin klik “Eskaneatu Wi-Fi sareak” aukeran eskuragarri dauden sareak ikusteko, hautatu sare egokia eta idatzi sarearen pasahitza.
- Konexioa arrakastaz egiten denean, miniSMU abiaraztean Wi-Fi sare honetara automatikoki konektatzeko gaitasuna aktibatu eta desaktibatu daiteke.
Software Instalazioa
- Eskuratu miniSMU mahaigaineko aplikazioaren kopia bat Undalogic-etik posta elektroniko bidezko eskaera baten bidez.
- Exekutatu instalatzailea eta jarraitu pantailako argibideei instalazioa amaitzeko.
Urrats hauek amaitu ondoren, zure miniSMU MS01 erabiltzeko prest egon beharko litzateke. Hurrengo atalak oinarrizko funtzionamenduan eta software interfazea zure gailua kontrolatzeko nola erabili erakutsiko dizu.
Oinarrizko Funtzionamendua
- Atal honek zure miniSMU MS01-aren oinarrizko eragiketetan gidatuko zaitu, gailua piztea eta oinarrizko neurketak egitea barne.
Piztu eta itzaltzea
Piztea:
- Ziurtatu gailua energia-iturri batera konektatuta dagoela (USB-C edo 12V DC egokigailuaren bidez).
- Aurkitu gailuaren atzeko panelean dagoen pizteko etengailua.
- Jarri etengailua ON posiziora.
- Aurreko paneleko egoera-LEDak piztuta egon beharko lirateke, gailua piztuta dagoela adieraziz.
Itzaltzea:
- Jarri atzeko paneleko pizteko etengailua OFF posizioan.
- LED guztiak itzali beharko lirateke, gailua itzalita dagoela adieraziz.
Gailura konektatzen
- Edozein eragiketa egin aurretik, miniSMU MS01-arekin konexioa ezarri behar duzu, honen bidez:
- USB edo WiFi. Ikusi “Hasteko urratsak” atala konexioari buruzko argibide zehatzak lortzeko.
Oinarrizko Aginte Egitura
- miniSMU MS01-ak komandoetan oinarritutako interfazea erabiltzen du funtzionatzeko. Komandoak software interfazearen bidez bidaltzen zaizkio gailuari. Komandoen egitura orokorra hau da:
- KANDOA [:AZPIKOMANDOA] [PARAMETROA]
- Kontsultetarako, erantsi galdera-marka bat (?) komandoari.
- Eskuragarri dauden komandoen eta haien funtzioen zerrenda behean agertzen da.
| Agindua | Funtzioa |
| *IDN? | Gailuaren identifikazio-informazioa itzultzen du |
| *RST | Gailua berrabiarazten du |
| SIST:ORDUA | Sistemaren ordua ezartzen du |
| SISTEMA: WIFI DIS | WiFia desgaitzen du |
| SISTEMA: WIFI ENA | WiFi gaitzen du |
| SIST:WIFI:AUTO? | WiFi konexio automatikoaren egoera kontsultatzen du |
| SIST:WIFI:AUTO DIS | WiFi konexio automatikoa desgaitzen du |
| SIST:WIFI:AUTO ENA | WiFi konexio automatikoa gaitzen du |
| SIST:WIFI:ESKANEATU? | Eskuragarri dauden WiFi sareak bilatzen ditu |
| SISTEMA:WIFI? | Uneko WiFi egoera kontsultatzen du |
| SIST:WIFI:SSID “” | WiFi SSID ezartzen du |
| SIST:WIFI:PASABIAGIA “” | WiFi pasahitza ezartzen du |
| SISTEMA:WIFI:SSID? | Uneko WiFi SSID kontsultatzen du |
| SIST:TENP? | Sistemaren tenperaturak kontsultatzen ditu |
| SOURx:CURR:PROT yy | x kanalerako korronte babes muga (yy A) ezartzen du |
| Agindua | Funtzioa |
| SOURx: EGUNGOA yy | x kanalerako uneko iturriaren (yy A) irteera ezartzen du |
| SOURx:VOLT:PROT yy | Multzoak voltagx kanalerako e babes-muga (yy V) |
| SOURx:VOLT yy | Multzoak voltagx kanalerako e iturriaren irteera (yy V) |
| SOURx:FIMV ENA | FIMV modua gaitzen du x kanalean |
| ITURRIA: FVMI ENA | FVMI modua gaitzen du x kanalean |
| SOURx:DATUAK:JARKITEA AKTIBATUTA/ITZAKATUA | X kanalerako datuen erreprodukzioa gaitzen/desgaitzen du |
| NEURRI x:VOLT:KORRONTEA? | Neurriak voltage eta korrontea x kanalean |
| NEURRI x:VOLT? | Neurriak voltage x kanalean |
| NEURRIA x: EGUNGOA? | x kanaleko korrontea neurtzen du |
| MEASx:OSR | OSR multzoak (Overak)ampx kanalerako ling ratioa) |
| OUTPx piztuta/itzali | X kanalerako irteera gaitzen/desgaitzen du |
Gailuaren identifikazioa eta berrezarpena
Gailua identifikatzea:
- Bidali komando hau: *IDN?
- Gailuak bere identifikazio-informazioa itzuliko du.
Gailua berrezarri: - Bidali komandoa: *RST
- Honek gailua bere lehenetsitako egoerara berrezarriko du.
Irteera-kanalak konfiguratzea
miniSMU MS01-ak bi kanal independente ditu, 1. kanala eta 2. kanala deiturikoak. Ordezkatu 'x' hurrengo komandoetan kanal zenbakiarekin (1 edo 2).
Ezarpena Voltage Irteera:
- Agindua: SOURx:VOLT
- Example: SOUR1:VOLT 5-ek 1. kanala 5 volt irteerara ezartzen du.
Korronte-irteera ezartzea:
- Agindua: SOURx:CURR
- Example: SOUR2:CURR 0.1-ek 2. kanala 100 mA-ko irteerara ezartzen du.
Babes Mugak Ezartzea:
- liburukiatagbabesa: SOURx:VOLT:PROT
- Egungo babesa: SOURx:CURR:PROT
- Example: SOUR1:VOLT:PROT 10-ek bolumena ezartzen dutag1. kanaletik 10 voltiora bitarteko e babes-muga.
Irteera gaitzea:
- Agindua: IRTEERA PIX AKTIBATUTA
- Example: OUTP1 ON-ek 1. kanalerako irteera gaitzen du.
Oinarrizko neurketak egitea
- Neurketa Boltage:
- Agindua: NEURRI x:VOLT?
- Example: NEURTU1:VOLT? bolumena neurtzen dutage 1. kanalean.
Korrontea neurtzea:
- Agindua: NEURRIA x: EGUNGOA?
- Example: MEAS2:CURR?-k 2. kanaleko korrontea neurtzen du.
Bi bolumenak neurtzeatage eta Korrontea:
- Agindua: NEURRI x:VOLT:KORRONTEA?
- Example: MEAS1:VOLT:CURR? bi bolumenak neurtzen ditutage eta korrontea 1. kanalean.
Neurketa moduak ezartzea
Force Voltage, Korrontearen Neurketa (FVMI) Modua:
- Agindua: ITURRIA: FVMI ENA
- Example: SOUR1:FVMI ENAk FVMI modua gaitzen du 1. kanalean.
Indar-korrontea, neurtu bolumenatage (FIMV) Modua:
- Agindua: SOURx:FIMV ENA
- Example: SOUR2:FIMV ENA-k FIMV modua gaitzen du 2. kanalean.
Datu-Streaming
Datuen erreprodukzioa gaitu:
- Komandoa: SOURx:DATUAK:JARKITEA ON
- Example: SOUR1:DATA:STREAM ON-ek 1. kanalerako datu-jarioa gaitzen du.
Ezarri SampTasa:
- Komandoa: SOURx:DATA:SRATE
- Example: SOUR1:DATA:SRATE 1000-k s ezartzen duampabiadura 1000 segundora arteampsegundoko les 1. kanalerako.
Gogoratu irteera desgaitu behar duzula (OUTPx OFF) neurketak amaitutakoan, probatzen ari den gailua babesteko.
Mantentze-lanak eta arazoak konpontzea
Atal honek zure MiniSMU MS01 mantentzeko eta erabiltzean aurki ditzakezun arazo ohikoenak konpontzeko argibideak eskaintzen ditu.
Ohiko mantentze-lanak
MiniSMU MS01 mantentze-lan minimoetarako diseinatuta dagoen arren, urrats hauek jarraituz errendimendu eta iraupen optimoa lortuko duzu:
- Garbiketa:
- Mantendu gailua garbi eta hautsik gabe. Erabili zapi leun eta lehor bat kanpoaldea garbitzeko.
- Ez erabili garbitzaile likidorik edo disolbatzailerik, hauek gailua kaltetu baitezakete.
- Hozte-haizagailutik hautsa kentzeko, ziurtatu miniSMU itzalita dagoela. Mugitu haizagailua libreki biratzea eragozteko bihurkin bat kontu handiz sartuz haizagailuaren palak blokeatzeko. Erabili aire konprimitu garbia haizagailutik hautsa kentzeko.
- Konexioak:
- Aldian-aldian egiaztatu BNC konektoreak, USB-C ataka eta elikatze sarrera higadura edo kalterik dagoen ikusteko.
- Ziurtatu konexio guztiak garbi daudela eta hondakinik gabe.
- Kalibrazioa:
- Zehaztasun optimoa lortzeko, zure gailua urtero kalibratzea gomendatzen dugu.
- Jarri harremanetan gure bezeroarentzako arreta-zerbitzuarekin kalibrazio-zerbitzuei buruzko informazioa lortzeko.
- Biltegiratzea:
- Denbora luzez erabiltzen ez baduzu, gorde gailua leku fresko eta lehor batean.
- Erabili jatorrizko ontzia epe luzerako biltegiratze edo garraiorako.
Ohiko arazoak konpontzea
Zure miniSMU MS01-arekin arazoak badituzu, saiatu arazoak konpontzeko urrats hauek:
- Gailua ez da pizten:
- Ziurtatu etengailua ON posizioan dagoela.
- Egiaztatu elikatze-iturria (USB-C edo 12V DC egokitzailea) ondo konektatuta dagoela.
- USB bidezko energia erabiltzen baduzu, saiatu beste USB ataka edo kable batekin.
- Korronte zuzeneko egokitzailea erabiltzen baduzu, ziurtatu funtzionatzen duen entxufe batera konektatuta dagoela.
- Ezin da USB bidez konektatu:
- Egiaztatu USB kablea bi muturretan ondo konektatuta dagoela.
- Probatu beste USB kable batekin.
- Ziurtatu gailuaren kontrolatzaile berrienak instalatuta dituzula.
- Ezin da WiFi bidez konektatu:
- miniSMU MS01-ek multicast DNS (mDNS) erabiltzen du sarean bere burua identifikatzeko, ziurtatu 5353 UDP ataka ez dagoela mugatuta.
- Egiaztatu WiFi irratia aktibatuta dagoela (Egoera LEDa urdina izan behar da. Gorriak WiFi konexioa huts egin duela adierazten du).
- Egiaztatu zure ordenagailua miniSMU MS01-aren sare berera konektatuta dagoela.
- Berrabiarazi miniSMU MS01 eta zure ordenagailua.
- Softwareak ez du gailua ezagutzen:
- Ziurtatu gailua piztuta dagoela eta behar bezala konektatuta dagoela (USB edo WiFi bidez).
- Itxi eta berriro ireki softwarea.
- Egiaztatu eta instalatu eskuragarri dauden software eguneratzeak.
- Neurketaren emaitzak zehaztugabeak dirudite:
- Egiaztatu probatzen ari den gailurako konexioak seguruak eta zuzenak direla.
- Ziurtatu neurketa-tarte egokia erabiltzen ari zarela.
- Baliteke gailuak kalibrazioa behar izatea. Jarri harremanetan bezeroarentzako arreta-zerbitzuarekin laguntza jasotzeko.
- Kanalaren LEDa gorria da:
- Honek adierazten du kanala babes moduan dagoela korronte edo bolumen gehiegizkoagatik.tage mugak.
- Egiaztatu probatzen ari zaren gailua zirkuitulaburrik edo bestelako arazorik duen.
- Murriztu ezarritako korrontea edo bolumenatage mugak softwarean.
Urrats hauek zure arazoa konpontzen ez badute, jarri harremanetan gure bezeroarentzako arreta-taldearekin laguntza gehiago jasotzeko.
Ohiko galderak
- G: Erabil al dezaket miniSMU MS01 landa-probetarako?
- A: Bai, MS01 laborategiko eta landa-erabilerarako diseinatuta dago, bere tamaina trinkoa eta energia-aukera anitzak direla eta.
- G: Zer motatako neurketak egin ditzaket miniSMU softwarearekin?
- A: miniSMU softwareak neurketa aurreratuak ahalbidetzen ditu, hala nola IV kurbak, egonkortasun probak eta potentzia puntu maximoaren jarraipena.
Dokumentuak / Baliabideak
 |
Undalogic miniSMU MS01 2 kanaleko iturri-neurgailu trinkoa eta zehaztasun handikoa [pdfErabiltzailearen eskuliburua MINISMU 2BN35, MINISMU 2BN35MINISMU minismu, miniSMU MS01 Zehaztasun Handiko 2 Kanaleko Iturburu Neurketa Unitate Trinkoa, miniSMU MS01, Zehaztasun Handiko 2 Kanaleko Iturburu Neurketa Unitate Trinkoa, Zehaztasun Handiko 2 Kanaleko Iturburu Neurketa Unitatea, 2 Kanaleko Iturburu Neurketa Unitatea, Iturburu Neurketa Unitatea, Unitatea |